| Pioneer | 0401, 1221, 1981, 0001, 1371, 1511, 1841, 4021, 4662 |
| Sony | 1071, 5811, 5321, 4981, 1901, 2741 |
| Toshiba | 1311, 5531, 1121, 2691, 0211, 0341, 0821, 151, 1801, 1841, 1911, 4891, 4941, 5081 |
| Samsung | 5791, 5801, 3301 |
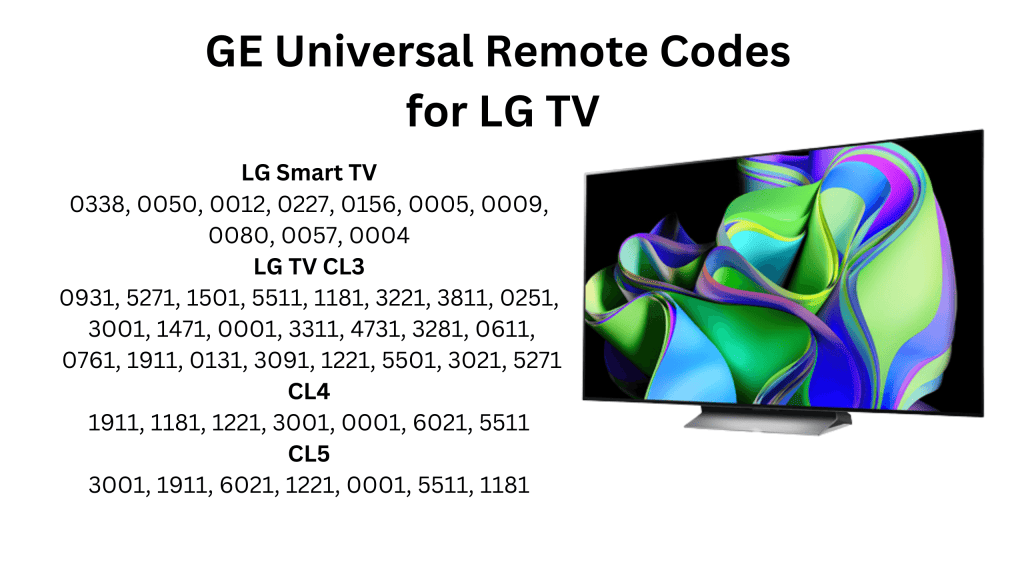
| LG | 6021, 0001, 5511, 3001, 1911, 1181, 1221 |
| Panasonic | 5821, 1573, 6231, 5201, 5551, 5561 |
| Sharp | 6011, 5341, 6251, 6001, 3191, 6171, 5941 |
| Philips | 0181, 6241, 6221, 5741, 6261, 6051, 0201, 0911, 3981, 4261 |
| JVC | 5071, 6271, 1481, 5781, 5281, 0901, 0771, 0481 |
| Hitachi | 6301, 1041, 6171, 4331, 0925 |
| RCA | 0131, 1001, 2851, 2361, 1731, 4921, 3431, 2481, 2121, 2131, 0691, 3572, 2381 |
| Vizio | 0081 |
| Insignia | 2891, 0371, 6381, 6171, 2271, 0141, 6481, 0581, 0871, 0921, 2241, 6181, 2921, 3761, 4371, 4721, 4761, 5051, 5061, 5181 |
| Sanyo | 1161, 5261, 2891, 5251 |
| Dynex | 3141, 5311, 3161, 6521, 0371, 2891 |
| Element | 5421, 1091, 1651, 5361, 5341, 2401, 5471, 5831, 5841, 6021 |
| Westing House | 5971, 5981, 5781, 3241, 1891, 2141, 0111, 2281 |
| Hisense | 6161, 1651, 6251, 6171, 20181, 5331, 2211, 2141, 5341, 0001, 0671, 4391 |
| TCL | 6171, 5961, 6031, 5771, 6201 |
| Magnavision | 5741, 4191, 4761, 0975, 4641, 4261, 0141 |
| Akai | 0191, 5891, 5901, 5911, 5921, 6041, 3215, 0331, 4151, 4461, 5141, 5171 |
| AOC | 4261, 961 |
| Coby | 3351, 2521, 2511, 2531, 5091, 5191, 2541, 2551 |
| Apex | 2521, 6081, 6101, 0045, 4841, 0191, 1891, 0425, 0431, 0671, 1025, 1105, 5111, 0245 |
| Curtis | 2121, 2141, 2361, 2371, 5411, 1881, 1891 |
| Polaroid | 2401, 5541, 6491, 4631, 091, 5411, 1961, 0581, 6101, 2271, 2311, 2451, 5132 |
| Sylvania | 1381, 2761, 0371, 4761, 3701, 0141, 0201, 0231, 0941, 0951, 0001, 0321, 0931, 0961, 1021, 1221, 1801, 1821, 4731 |
| RCA | 2131, 5881, 6391, 5421, 5781, 1651, 2361, 4771, 2761, 4191, 0221, 1731 |
| Proscan | 2131, 5881, 6391, 5421, 5781, 1651, 2361, 4771, 2761, 4191, 0221, 1731 |
| Magnavox | 2131, 5881, 6391, 5421, 5781, 1651, 2361, 4771, 2761, 4191, 0221, 1731 |
| Proton | 0001, 0391, 0641, 1221, 1911, 2231, 4211, 4221, 4271 |
| Viore | 5431, 1421, 1881, 2141, 2831, 2841, 3681 |
| Curtis Mathes | 0351, 1552, 5351, 5371, 0001, 0261, 1221, 1661, 4011, 4941 |
| Emerson | 2761, 5761, 5231, 5221, 5831, 5561, 5421, 0141, 0201, 2891, 4731, 1651 |
| Dynex | 3141, 5311, 3161, 6521, 0371, 2891 |
| JVC | 5071, 6271, 1481, 5781, 5281, 0901, 0771, 0481 |
| Pioneer | 0401, 1221, 1981, 0001, 1371, 1511, 1841, 4021, 4662 |
| Panasonic | 5821, 1573, 6231, 5201, 5551, 5561 |
| Magnavox | 2131, 5881, 6391, 5421, 5781, 1651, 2361, 4771, 2761, 4191, 0221, 1731 |
| Toshiba | 1311, 5531, 1121, 2691, 0211, 0341, 0821, 151, 1801, 1841, 1911, 4891, 4941, 5081 |
| Sony | 1071, 5811, 5321, 4981, 1901, 2741 |
| Samsung | 5791, 5801, 3301 |
| Philips | 0181, 6241, 6221, 5741, 6261, 6051, 0201, 0911, 3981, 4261 |
| LG | 6021, 0001, 5511, 3001, 1911, 1181, 1221 |
| Sharp | 6011, 5341, 6251, 6001, 3191, 6171, 5941 |
| Toshiba | 1311, 5531, 1121, 2691, 0211, 0341, 0821, 151, 1801, 1841, 1911, 4891, 4941, 5081 |
| Sanyo | 1161, 5261, 2891, 5251 |
| JVC | 5071, 6271, 1481, 5781, 5281, 0901, 0771, 0481 |
| Samsung | 5791, 5801, 3301 |
| Panasonic | 5821, 1573, 6231, 5201, 5551, 5561 |
| Toshiba | 1311, 5531, 1121, 2691, 0211, 0341, 0821, 151, 1801, 1841, 1911, 4891, 4941, 5081 |
| Sony | 1071, 5811, 5321, 4981, 1901, 2741 |
| Pioneer | 0401, 1221, 1981, 0001, 1371, 1511, 1841, 4021, 4662 |
| Magnavox | 2131, 5881, 6391, 5421, 5781, 1651, 2361, 4771, 2761, 4191, 0221, 1731 |
| Sharp | 6011, 5341, 6251, 6001, 3191, 6171, 5941 |
| LG | 6021, 0001, 5511, 3001, 1911, 1181, 1221 |
| Philips | 0181, 6241, 6221, 5741, 6261, 6051, 0201, 0911, 3981, 4261 |
| Proscan | 2131, 5881, 6391, 5421, 5781, 1651, 2361, 4771, 2761, 4191, 0221, 1731 |
| Hitachi | 6301, 1041, 6171, 4331, 0925 |
| Toshiba | 1311, 5531, 1121, 2691, 0211, 0341, 0821, 151, 1801, 1841, 1911, 4891, 4941, 5081 |
| Samsung | 5791, 5801, 3301 |
| Sony | 1071, 5811, 5321, 4981, 1901, 2741 |
| Pioneer | 0401, 1221, 1981, 0001, 1371, 1511, 1841, 4021, 4662 |
| Philips | 0181, 6241, 6221, 5741, 6261, 6051, 0201, 0911, 3981, 4261 |
| LG | 6021, 0001, 5511, 3001, 1911, 1181, 1221 |
| Magnavision | 5741, 4191, 4761, 0975, 4641, 4261, 0141 |
| Toshiba | 1311, 5531, 1121, 2691, 0211, 0341, 0821, 151, 1801, 1841, 1911, 4891, 4941, 5081 |
| Sony | 1071, 5811, 5321, 4981, 1901, 2741 |
| Samsung | 5791, 5801, 3301 |
| Panasonic | 5821, 1573, 6231, 5201, 5551, 5561 |
| Pioneer | 0401, 1221, 1981, 0001, 1371, 1511, 1841, 4021, 4662 |
| Sharp | 6011, 5341, 6251, 6001, 3191, 6171, 5941 |
| Toshiba | 1311, 5531, 1121, 2691, 0211, 0341, 0821, 151, 1801, 1841, 1911, 4891, 4941, 5081 |
| Samsung | 5791, 5801, 3301 |
| LG | 6021, 0001, 5511, 3001, 1911, 1181, 1221 |
| Philips | 0181, 6241, 6221, 5741, 6261, 6051, 0201, 0911, 3981, 4261 |
| JVC | 5071, 6271, 1481, 5781, 5281, 0901, 0771, 0481 |
| RCA | 0131, 1001, 2851, 2361, 1731, 4921, 3431, 2481, 2121, 2131, 0691, 3572, 2381 |
| Toshiba | 1311, 5531, 1121, 2691, 0211, 0341, 0821, 151, 1801, 1841, 1911, 4891, 4941, 5081 |
| Toshiba | 1311, 5531, 1121, 2691, 0211, 0341, 0821, 151, 1801, 1841, 1911, 4891, 4941, 5081 |
| RCA | 0131, 1001, 2851, 2361, 1731, 4921, 3431, 2481, 2121, 2131, 0691, 3572, 2381 |
| Panasonic | 5821, 1573, 6231, 5201, 5551, 5561 |
| Toshiba | 1311, 5531, 1121, 2691, 0211, 0341, 0821, 151, 1801, 1841, 1911, 4891, 4941, 5081 |
| Samsung | 5791, 5801, 3301 |
| LG | 6021, 0001, 5511, 3001, 1911, 1181, 1221 |
| Philips | 0181, 6241, 6221, 5741, 6261, 6051, 0201, 0911, 3981, 4261 |
| Sony | 1071, 5811, 5321, 4981, 1901, 2741 |
| Pioneer | 0401, 1221, 1981, 0001, 1371, 1511, 1841, 4021, 4662 |
| Magnavox | 2131, 5881, 6391, 5421, 5781, 1651, 2361, 4771, 2761, 4191, 0221, 1731 |
| Toshiba | 1311, 5531, 1121, 2691, 0211, 0341, 0821, 151, 1801, 1841, 1911, 4891, 4941, 5081 |
| Sanyo | 1161, 5261, 2891, 5251 |
| JVC | 5071, 6271, 1481, 5781, 5281, 0901, 0771, 0481 |
| Samsung | 5791, 5801, 3301 |
| Proscan | 2131, 5881, 6391, 5421, 5781, 1651, 2361, 4771, 2761, 4191, 0221, 1731 |
| Dynex | 3141, 5311, 3161, 6521, 0371, 2891 |
| Hisense | 6161, 1651, 6251, 6171, 20181, 5331, 2211, 2141, 5341, 0001, 0671, 4391 |
| Magnavision | 5741, 4191, 4761, 0975, 4641, 4261, 0141 |
| Viore | 5431, 1421, 1881, 2141, 2831, 2841, 3681 |
| Polaroid | 2401, 5541, 6491, 4631, 091, 5411, 1961, 0581, 6101, 2271, 2311, 2451, 5132 |
| Magnavox | 2131, 5881, 6391, 5421, 5781, 1651, 2361, 4771, 2761, 4191, 0221, 1731 |
| Dynex | 3141, 5311, 3161, 6521, 0371, 2891 |
| TCL | 6171, 5961, 6031, 5771, 6201 |
| Coby | 3351, 2521, 2511, 2531, 5091, 5191, 2541, 2551 |
| Insignia | 2891, 0371, 6381, 6171, 2271, 0141, 6481, 0581, 0871, 0921, 2241, 6181, 2921, 3761, 4371, 4721, 4761, 5051, 5061, 5181 |
| AOC | 4261, 961 |
| Apex | 2521, 6081, 6101, 0045, 4841, 0191, 1891, 0425, 0431, 0671, 1025, 1105, 5111, 0245 |
| Sylvania | 1381, 2761, 0371, 4761, 3701, 0141, 0201, 0231, 0941, 0951, 0001, 0321, 0931, 0961, 1021, 1221, 1801, 1821, 4731 |
| Curtis | 2121, 2141, 2361, 2371, 5411, 1881, 1891 |
| Element | 5421, 1091, 1651, 5361, 5341, 2401, 5471, 5831, 5841, 6021 |
| Westing House | 5971, 5981, 5781, 3241, 1891, 2141, 0111, 2281 |
| Hitachi | 6301, 1041, 6171, 4331, 0925 |
| Viore | 5431, 1421, 1881, 2141, 2831, 2841, 3681 |
| AOC | 4261, 961 |
| Viore | 5431, 1421, 1881, 2141, 2831, 2841, 3681 |
| Toshiba | 1311, 5531, 1121, 2691, 0211, 0341, 0821, 151, 1801, 1841, 1911, 4891, 4941, 5081 |
| Philips | 0181, 6241, 6221, 5741, 6261, 6051, 0201, 0911, 3981, 4261 |
| Coby | 3351, 2521, 2511, 2531, 5091, 5191, 2541, 2551 |
| Curtis | 2121, 2141, 2361, 2371, 5411, 1881, 1891 |
| Sony | 1071, 5811, 5321, 4981, 1901, 2741 |
| Panasonic | 5821, 1573, 6231, 5201, 5551, 5561 |
| Apex | 2521, 6081, 6101, 0045, 4841, 0191, 1891, 0425, 0431, 0671, 1025, 1105, 5111, 0245 |
| TCL | 6171, 5961, 6031, 5771, 6201 |
| Hitachi | 6301, 1041, 6171, 4331, 0925 |
| Pioneer | 0401, 1221, 1981, 0001, 1371, 1511, 1841, 4021, 4662 |
| Insignia | 2891, 0371, 6381, 6171, 2271, 0141, 6481, 0581, 0871, 0921, 2241, 6181, 2921, 3761, 4371, 4721, 4761, 5051, 5061, 5181 |
| Sylvania | 1381, 2761, 0371, 4761, 3701, 0141, 0201, 0231, 0941, 0951, 0001, 0321, 0931, 0961, 1021, 1221, 1801, 1821, 4731 |
| Westing House | 5971, 5981, 5781, 3241, 1891, 2141, 0111, 2281 |
| RCA | 0131, 1001, 2851, 2361, 1731, 4921, 3431, 2481, 2121, 2131, 0691, 3572, 2381 |
| Hitachi | 6301, 1041, 6171, 4331, 0925 |
| Proscan | 2131, 5881, 6391, 5421, 5781, 1651, 2361, 4771, 2761, 4191, 0221, 1731 |
| AOC | 4261, 961 |
| Sylvania | 1381, 2761, 0371, 4761, 3701, 0141, 0201, 0231, 0941, 0951, 0001, 0321, 0931, 0961, 1021, 1221, 1801, 1821, 4731 |
| Sanyo | 1161, 5261, 2891, 5251 |
| JVC | 5071, 6271, 1481, 5781, 5281, 0901, 0771, 0481 |
| Coby | 3351, 2521, 2511, 2531, 5091, 5191, 2541, 2551 |
| Hisense | 6161, 1651, 6251, 6171, 20181, 5331, 2211, 2141, 5341, 0001, 0671, 4391 |
| Curtis | 2121, 2141, 2361, 2371, 5411, 1881, 1891 |
| JVC | 5071, 6271, 1481, 5781, 5281, 0901, 0771, 0481 |
| Polaroid | 2401, 5541, 6491, 4631, 091, 5411, 1961, 0581, 6101, 2271, 2311, 2451, 5132 |
| Apex | 2521, 6081, 6101, 0045, 4841, 0191, 1891, 0425, 0431, 0671, 1025, 1105, 5111, 0245 |
| Proton | 0001, 0391, 0641, 1221, 1911, 2231, 4211, 4221, 4271 |
| Curtis Mathes | 0351, 1552, 5351, 5371, 0001, 0261, 1221, 1661, 4011, 4941 |
| Curtis Mathes | 0351, 1552, 5351, 5371, 0001, 0261, 1221, 1661, 4011, 4941 |
| Curtis Mathes | 0351, 1552, 5351, 5371, 0001, 0261, 1221, 1661, 4011, 4941 |
| Viore | 5431, 1421, 1881, 2141, 2831, 2841, 3681 |
| Curtis Mathes | 0351, 1552, 5351, 5371, 0001, 0261, 1221, 1661, 4011, 4941 |
| Curtis Mathes | 0351, 1552, 5351, 5371, 0001, 0261, 1221, 1661, 4011, 4941 |
| Insignia | 2891, 0371, 6381, 6171, 2271, 0141, 6481, 0581, 0871, 0921, 2241, 6181, 2921, 3761, 4371, 4721, 4761, 5051, 5061, 5181 |
| Apex | 2521, 6081, 6101, 0045, 4841, 0191, 1891, 0425, 0431, 0671, 1025, 1105, 5111, 0245 |
| AOC | 4261, 961 |
| Element | 5421, 1091, 1651, 5361, 5341, 2401, 5471, 5831, 5841, 6021 |
| Apex | 2521, 6081, 6101, 0045, 4841, 0191, 1891, 0425, 0431, 0671, 1025, 1105, 5111, 0245 |
| AOC | 4261, 961 |
| Apex | 2521, 6081, 6101, 0045, 4841, 0191, 1891, 0425, 0431, 0671, 1025, 1105, 5111, 0245 |
| Proscan | 2131, 5881, 6391, 5421, 5781, 1651, 2361, 4771, 2761, 4191, 0221, 1731 |
| Curtis Mathes | 0351, 1552, 5351, 5371, 0001, 0261, 1221, 1661, 4011, 4941 |
| Proscan | 2131, 5881, 6391, 5421, 5781, 1651, 2361, 4771, 2761, 4191, 0221, 1731 |
| Proscan | 2131, 5881, 6391, 5421, 5781, 1651, 2361, 4771, 2761, 4191, 0221, 1731 |
| Curtis Mathes | 0351, 1552, 5351, 5371, 0001, 0261, 1221, 1661, 4011, 4941 |
| Curtis Mathes | 0351, 1552, 5351, 5371, 0001, 0261, 1221, 1661, 4011, 4941 |
| Curtis Mathes | 0351, 1552, 5351, 5371, 0001, 0261, 1221, 1661, 4011, 4941 |
| Magnavox | 2131, 5881, 6391, 5421, 5781, 1651, 2361, 4771, 2761, 4191, 0221, 1731 |
| Polaroid | 2401, 5541, 6491, 4631, 091, 5411, 1961, 0581, 6101, 2271, 2311, 2451, 5132 |
| Toshiba | 1311, 5531, 1121, 2691, 0211, 0341, 0821, 151, 1801, 1841, 1911, 4891, 4941, 5081 |
| Toshiba | 1311, 5531, 1121, 2691, 0211, 0341, 0821, 151, 1801, 1841, 1911, 4891, 4941, 5081 |
| Insignia | 2891, 0371, 6381, 6171, 2271, 0141, 6481, 0581, 0871, 0921, 2241, 6181, 2921, 3761, 4371, 4721, 4761, 5051, 5061, 5181 |
| JVC | 5071, 6271, 1481, 5781, 5281, 0901, 0771, 0481 |
| Magnavox | 2131, 5881, 6391, 5421, 5781, 1651, 2361, 4771, 2761, 4191, 0221, 1731 |
| Hitachi | 6301, 1041, 6171, 4331, 0925 |
| Toshiba | 1311, 5531, 1121, 2691, 0211, 0341, 0821, 151, 1801, 1841, 1911, 4891, 4941, 5081 |
| LG | 6021, 0001, 5511, 3001, 1911, 1181, 1221 |
| Curtis | 2121, 2141, 2361, 2371, 5411, 1881, 1891 |
| Insignia | 2891, 0371, 6381, 6171, 2271, 0141, 6481, 0581, 0871, 0921, 2241, 6181, 2921, 3761, 4371, 4721, 4761, 5051, 5061, 5181 |
| Panasonic | 5821, 1573, 6231, 5201, 5551, 5561 |
| Sanyo | 1161, 5261, 2891, 5251 |
| Toshiba | 1311, 5531, 1121, 2691, 0211, 0341, 0821, 151, 1801, 1841, 1911, 4891, 4941, 5081 |
| TCL | 6171, 5961, 6031, 5771, 6201 |
| Samsung | 5791, 5801, 3301 |
| Samsung | 5791, 5801, 3301 |
| Curtis | 2121, 2141, 2361, 2371, 5411, 1881, 1891 |
| Westing House | 5971, 5981, 5781, 3241, 1891, 2141, 0111, 2281 |
| Curtis | 2121, 2141, 2361, 2371, 5411, 1881, 1891 |
| JVC | 5071, 6271, 1481, 5781, 5281, 0901, 0771, 0481 |
| Coby | 3351, 2521, 2511, 2531, 5091, 5191, 2541, 2551 |
| Pioneer | 0401, 1221, 1981, 0001, 1371, 1511, 1841, 4021, 4662 |
| Magnavox | 2131, 5881, 6391, 5421, 5781, 1651, 2361, 4771, 2761, 4191, 0221, 1731 |
| Viore | 5431, 1421, 1881, 2141, 2831, 2841, 3681 |
| Viore | 5431, 1421, 1881, 2141, 2831, 2841, 3681 |
| Sylvania | 1381, 2761, 0371, 4761, 3701, 0141, 0201, 0231, 0941, 0951, 0001, 0321, 0931, 0961, 1021, 1221, 1801, 1821, 4731 |
| Viore | 5431, 1421, 1881, 2141, 2831, 2841, 3681 |
| Hitachi | 6301, 1041, 6171, 4331, 0925 |
| Panasonic | 5821, 1573, 6231, 5201, 5551, 5561 |
| LG | 6021, 0001, 5511, 3001, 1911, 1181, 1221 |
| Samsung | 5791, 5801, 3301 |
| Toshiba | 1311, 5531, 1121, 2691, 0211, 0341, 0821, 151, 1801, 1841, 1911, 4891, 4941, 5081 |
| Toshiba | 1311, 5531, 1121, 2691, 0211, 0341, 0821, 151, 1801, 1841, 1911, 4891, 4941, 5081 |
| Curtis Mathes | 0351, 1552, 5351, 5371, 0001, 0261, 1221, 1661, 4011, 4941 |
| AOC | 4261, 961 |
| Westing House | 5971, 5981, 5781, 3241, 1891, 2141, 0111, 2281 |
| Toshiba | 1311, 5531, 1121, 2691, 0211, 0341, 0821, 151, 1801, 1841, 1911, 4891, 4941, 5081 |
| Toshiba | 1311, 5531, 1121, 2691, 0211, 0341, 0821, 151, 1801, 1841, 1911, 4891, 4941, 5081 |
| Magnavision | 5741, 4191, 4761, 0975, 4641, 4261, 0141 |
| Philips | 0181, 6241, 6221, 5741, 6261, 6051, 0201, 0911, 3981, 4261 |
| Hitachi | 6301, 1041, 6171, 4331, 0925 |
| JVC | 5071, 6271, 1481, 5781, 5281, 0901, 0771, 0481 |
| Polaroid | 2401, 5541, 6491, 4631, 091, 5411, 1961, 0581, 6101, 2271, 2311, 2451, 5132 |
| Dynex | 3141, 5311, 3161, 6521, 0371, 2891 |
| TCL | 6171, 5961, 6031, 5771, 6201 |
| Viore | 5431, 1421, 1881, 2141, 2831, 2841, 3681 |
| Magnavox | 2131, 5881, 6391, 5421, 5781, 1651, 2361, 4771, 2761, 4191, 0221, 1731 |
| Proton | 0001, 0391, 0641, 1221, 1911, 2231, 4211, 4221, 4271 |
| Proscan | 2131, 5881, 6391, 5421, 5781, 1651, 2361, 4771, 2761, 4191, 0221, 1731 |
| Insignia | 2891, 0371, 6381, 6171, 2271, 0141, 6481, 0581, 0871, 0921, 2241, 6181, 2921, 3761, 4371, 4721, 4761, 5051, 5061, 5181 |
| Curtis | 2121, 2141, 2361, 2371, 5411, 1881, 1891 |
| Curtis Mathes | 0351, 1552, 5351, 5371, 0001, 0261, 1221, 1661, 4011, 4941 |
| Polaroid | 2401, 5541, 6491, 4631, 091, 5411, 1961, 0581, 6101, 2271, 2311, 2451, 5132 |
| Viore | 5431, 1421, 1881, 2141, 2831, 2841, 3681 |
| Hitachi | 6301, 1041, 6171, 4331, 0925 |
| Curtis | 2121, 2141, 2361, 2371, 5411, 1881, 1891 |
| Dynex | 3141, 5311, 3161, 6521, 0371, 2891 |
| Dynex | 3141, 5311, 3161, 6521, 0371, 2891 |
| Polaroid | 2401, 5541, 6491, 4631, 091, 5411, 1961, 0581, 6101, 2271, 2311, 2451, 5132 |
| JVC | 5071, 6271, 1481, 5781, 5281, 0901, 0771, 0481 |
| Curtis | 2121, 2141, 2361, 2371, 5411, 1881, 1891 |
| Proscan | 2131, 5881, 6391, 5421, 5781, 1651, 2361, 4771, 2761, 4191, 0221, 1731 |
| Toshiba | 1311, 5531, 1121, 2691, 0211, 0341, 0821, 151, 1801, 1841, 1911, 4891, 4941, 5081 |
| Toshiba | 1311, 5531, 1121, 2691, 0211, 0341, 0821, 151, 1801, 1841, 1911, 4891, 4941, 5081 |
| Insignia | 2891, 0371, 6381, 6171, 2271, 0141, 6481, 0581, 0871, 0921, 2241, 6181, 2921, 3761, 4371, 4721, 4761, 5051, 5061, 5181 |
| TCL | 6171, 5961, 6031, 5771, 6201 |
| Magnavox | 2131, 5881, 6391, 5421, 5781, 1651, 2361, 4771, 2761, 4191, 0221, 1731 |
| Sony | 1071, 5811, 5321, 4981, 1901, 2741 |
| Sylvania | 1381, 2761, 0371, 4761, 3701, 0141, 0201, 0231, 0941, 0951, 0001, 0321, 0931, 0961, 1021, 1221, 1801, 1821, 4731 |
| Samsung | 5791, 5801, 3301 |
| Samsung | 5791, 5801, 3301 |
| Curtis Mathes | 0351, 1552, 5351, 5371, 0001, 0261, 1221, 1661, 4011, 4941 |
| Proscan | 2131, 5881, 6391, 5421, 5781, 1651, 2361, 4771, 2761, 4191, 0221, 1731 |
| Viore | 5431, 1421, 1881, 2141, 2831, 2841, 3681 |
| Insignia | 2891, 0371, 6381, 6171, 2271, 0141, 6481, 0581, 0871, 0921, 2241, 6181, 2921, 3761, 4371, 4721, 4761, 5051, 5061, 5181 |
| Curtis Mathes | 0351, 1552, 5351, 5371, 0001, 0261, 1221, 1661, 4011, 4941 |
| AOC | 4261, 961 |
| Dynex | 3141, 5311, 3161, 6521, 0371, 2891 |
| Viore | 5431, 1421, 1881, 2141, 2831, 2841, 3681 |
| Magnavision | 5741, 4191, 4761, 0975, 4641, 4261, 0141 |
| Toshiba | 1311, 5531, 1121, 2691, 0211, 0341, 0821, 151, 1801, 1841, 1911, 4891, 4941, 5081 |
| Dynex | 3141, 5311, 3161, 6521, 0371, 2891 |
| Proscan | 2131, 5881, 6391, 5421, 5781, 1651, 2361, 4771, 2761, 4191, 0221, 1731 |
| Coby | 3351, 2521, 2511, 2531, 5091, 5191, 2541, 2551 |
| Magnavox | 2131, 5881, 6391, 5421, 5781, 1651, 2361, 4771, 2761, 4191, 0221, 1731 |
| Toshiba | 1311, 5531, 1121, 2691, 0211, 0341, 0821, 151, 1801, 1841, 1911, 4891, 4941, 5081 |
| Curtis Mathes | 0351, 1552, 5351, 5371, 0001, 0261, 1221, 1661, 4011, 4941 |
| Toshiba | 1311, 5531, 1121, 2691, 0211, 0341, 0821, 151, 1801, 1841, 1911, 4891, 4941, 5081 |
| Viore | 5431, 1421, 1881, 2141, 2831, 2841, 3681 |
| Panasonic | 5821, 1573, 6231, 5201, 5551, 5561 |
| Samsung | 5791, 5801, 3301 |
| Curtis | 2121, 2141, 2361, 2371, 5411, 1881, 1891 |
| Curtis Mathes | 0351, 1552, 5351, 5371, 0001, 0261, 1221, 1661, 4011, 4941 |
| TCL | 6171, 5961, 6031, 5771, 6201 |
| Hitachi | 6301, 1041, 6171, 4331, 0925 |
| Pioneer | 0401, 1221, 1981, 0001, 1371, 1511, 1841, 4021, 4662 |
| Coby | 3351, 251 |


![GE Universal Remote Codes List & Program Guide [Latest]](https://geekydane.com/wp-content/uploads/2023/07/GE-Universal-Remote-Codes-List.png)


![Roblox Decal IDs list – Image IDs [Updated]](https://geekydane.com/wp-content/uploads/2023/04/best-Roblox-Decal-Ids.png)


![Google Drive Still Processing the Video [Fixed]](https://geekydane.com/wp-content/uploads/2023/01/Google-Drive-Still-Processing-Video.png)