Allocating more RAM to your Minecraft server enables you to expand your Minecraft world and run it smoothly. As your Minecraft world grows in size the default allocated RAM might not be enough and sometimes it can cause your game to crash. Increasing the RAM of your server also helps you to apply additional plugins and mods to your Minecraft Server. However, It might be tricky to understand the process of adding extra RAM. Thankfully, We have found some workarounds to solve this problem.
Minecraft is a popular arcade game with over 100 Million copies sold worldwide. The game is very popular among teenagers and youngsters. It allows you to mine various metals, and build new things using them. The game is really fun to play especially when you add mods and other external features to it. However, Due to these additions, the game might get heavy and take longer time to launch. This might irritate a lot of players and can affect your gaming experience.
There are multiple ways to increase the RAM of your Minecraft server and this additional RAM will enable you to add extra features such as Mods, and various plugins to enhance your gaming experience. Some players find it difficult to find methods to allocate more RAM thus we have written this guide which will guide you step-by-step on how to allocate more ram to your Minecraft server.
The default allocated RAM to a Minecraft Server is 2 GB which is enough to run the basic module of the game. However, as your Minecraft world grows and you add extra plugins, Mods, or textures, the allocated RAM won’t be able to handle this load and your game might crash. Below we have mentioned four easy methods that will help you to increase the RAM size of your Minecraft Server.
Allocate More RAM to a Minecraft Server using Default Launcher
Before proceeding please make sure that you have the correct version of JAVA installed on your computer otherwise you will not be able to increase the RAM size on your Minecraft Server. download Java 8 64-bit version by clicking this link.
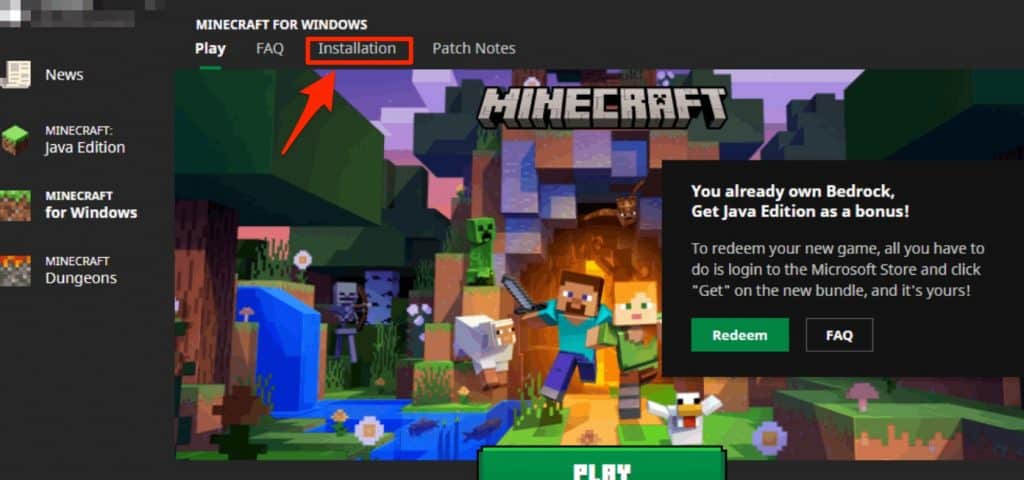
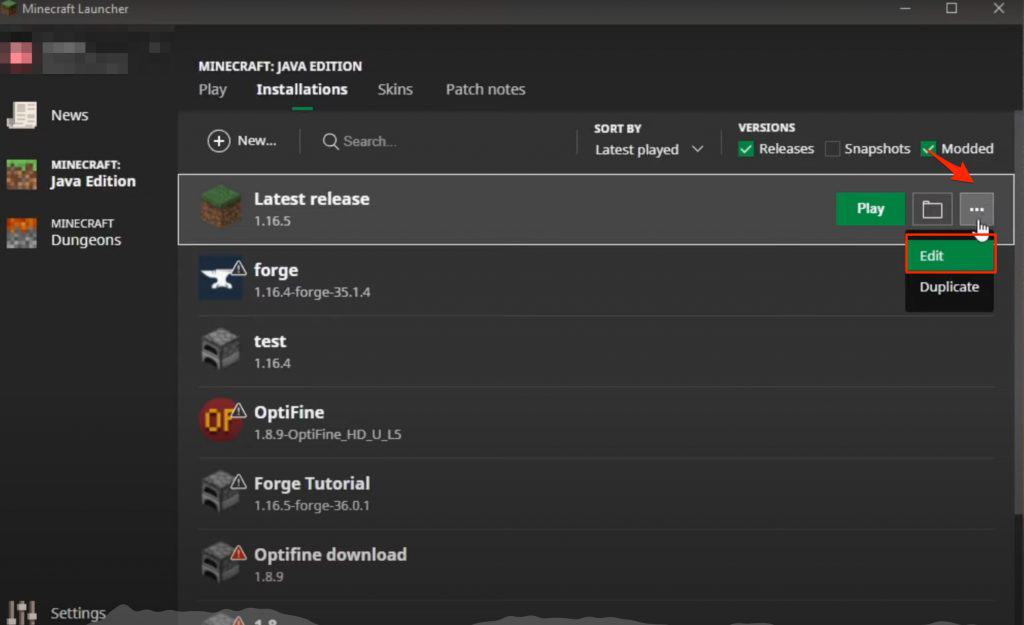
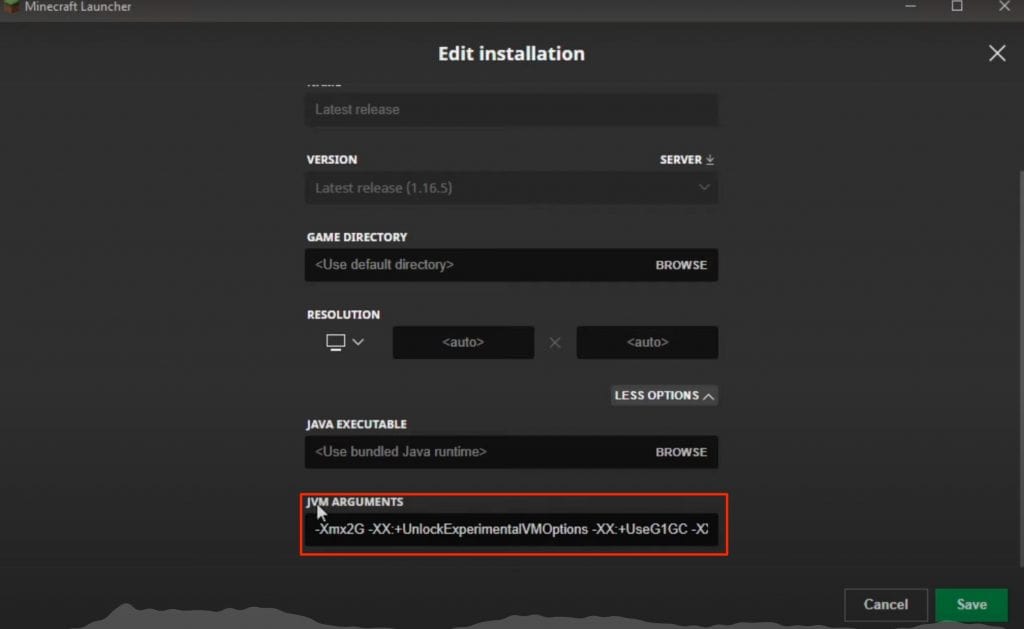
To Allocate more RAM to your Minecraft server, Launch the default Minecraft launcher and click the “Installation” option. Click on the three dots icon on the right side of the “Latest Release” and select edit. Click on the more options button and under JVM arguments text “-Xmx2G” change the number to your desired one. here 2G represents the 2 Gigabytes memory.
For a more detailed and step-by-step guide follow the below-given steps.
Step 1: Open the default Minecraft launcher and head over to the “Installation” tab.
Step 2: Under the Installation tab, click the three dots icon which is placed on the right side of the “Latest Release” and click “Edit” from the dropdown menu.
Step 3: Under the “Edit Installation” tab, Scroll down to the “More options” button and click it. from the list of new options, select “JVM arguments” under JVM arguments as you can see -Xmx2G where 2G represents the number of Gigabytes of memory allocated to the Minecraft server. Edit this number to whatever number of Gigabyte memory you want to allocate.
Step 5: Finally, Click the play tab and start playing Minecraft on your server without any interruption.
Increase Minecraft Server RAM easy Method
Another method of increasing Minecraft server RAM is by creating a text file with configuration details in the Minecraft folder. This method can be tricky for some people but if you follow the steps given below then you can easily increase the RAM of your server.
Step 1: Open the Minecraft server directory from the C:// directory of your computer or by simply searching for “Minecraft_Server” in the windows search bar.
Step 2: Now open the Notepad app by clicking the windows icon >> All Apps >> notepad or by searching for the notepad app using the search bar.
Step 3: Paste the given text in the notepad file that you have just created
ava -Xmx****M -Xms****M -exe Minecraft_Server.exe -o true
PAUSE
Step 4: Replace **** with the value in Megabytes that you want to allocate (1GB = 1024MB) for example, if you want to allocate 4 GB of RAM to your Minecraft server then it will be 4096 MB.
Step 5: Finally Save the Notepad file by clicking “CTRL + S” on your keyword or head over to files >> Save As option. change the default “.txt” extension to the “.bat” extension and save the file in the Minecraft server folder we just found.
Step 6: The newly created file will be your new launcher with the RAM you have allocated. double-click on the file icon to launch it and enjoy Minecraft with additional RAM.
Increase Minecraft Server RAM using CurseForge Launcher
There are many third-party launchers available for Minecraft. They help you with additional options and features and provide you with many tools to customize your game. One such popular launcher is CurseForge Launcher. It offers easy options to change the memory allocated to your Minecraft server. Below are the steps to change the default memory using CurseForge Launcher.
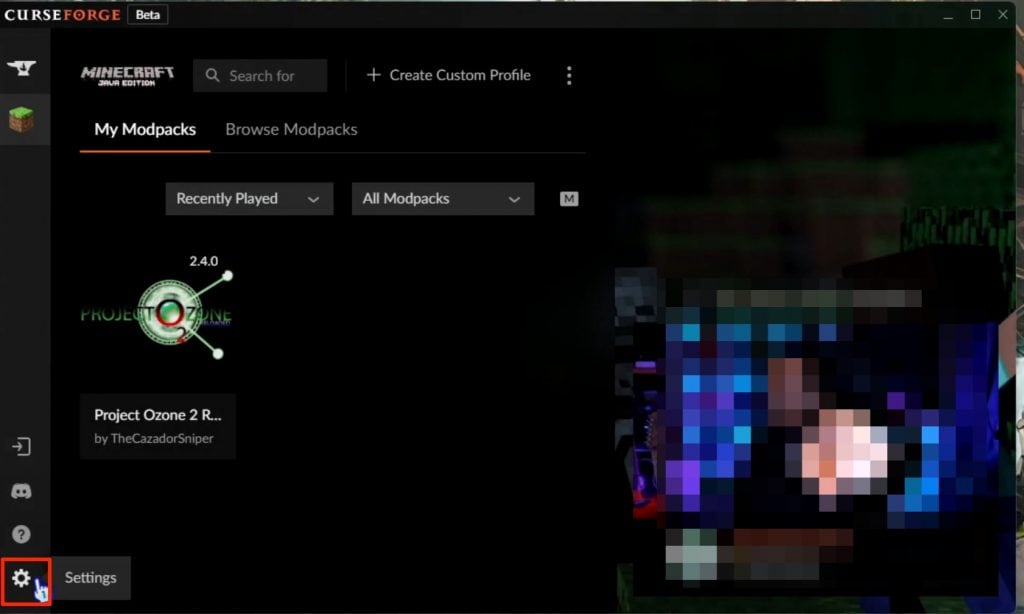
Step 1: Open the CurseForge Launcher by double-clicking the icon. On the Launch Window, click the “Settings” gear icon located at the bottom left corner.
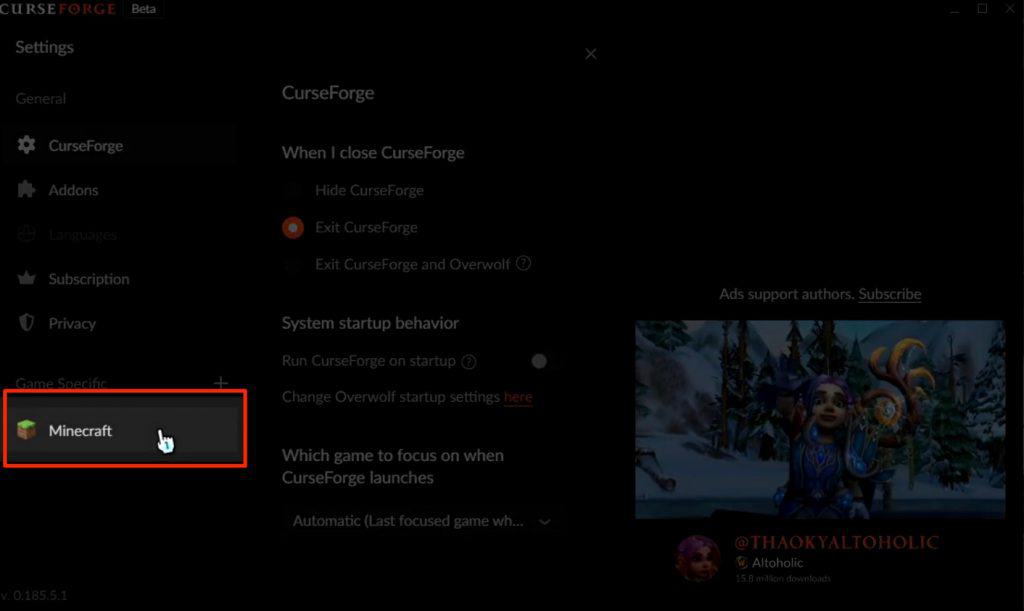
Step 2: From the right-side menu, Under the “Game Specifics” tab, select Minecraft
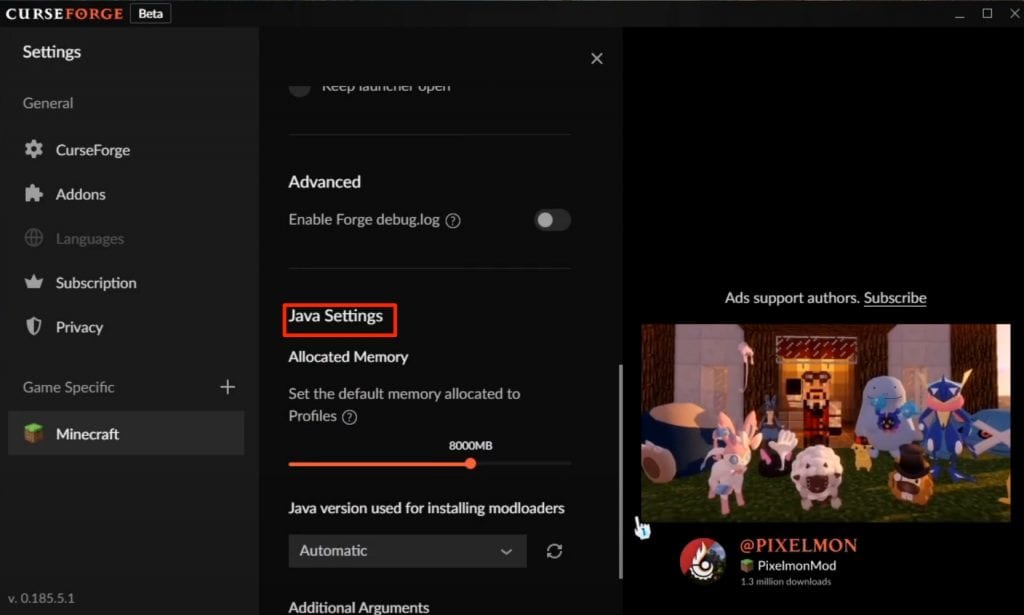
Step 3: On the Minecraft settings page, scroll down to the option that says “Java Settings”. Under the Allocated memory option, use the scroll bar to adjust the RAM allocation to your Minecraft server.
Step 4: Finally click the “X” icon at the top right corner or relaunch the curseforge launcher and enjoy Minecraft with additional allocated RAM.
ATLauncher:
ATlaucher is another widely used third-party launcher for Minecraft. Atlauncher also has the option to change the default memory allocation settings for Minecraft. Follow these steps to change memory of your Minecraft server using ATlauncher.
Step 1: Open the ATLauncher app on your computer.
Step 2: Select the “Settings” option from the menu given on the right side.
Step 3: From the top menu, click on Java/Minecraft to launch the Minecraft-related settings.
Step 4: Look for the Maximum memory/ RAM option and change number according to your requirement.
Step 5: Finally Hit the save button and start playing Minecraft without crashes or lags.
Conclusion:
These are the top four methods to easily allocate more RAM to your Minecraft server. There are other third-party launchers such as ATLauncher, Voidswrath, and Technic launcher and the method of changing the memory settings might be different as per the launcher but in most of these launchers, you will find the memory allocation option in the settings tab.

