Category: Internet

  • How to Access Archived Emails in Gmail

    How to Access Archived Emails in Gmail

    Archiving emails in Gmail is a great way to keep your important or unimportant emails away from your main inbox. It also helps you to access them whenever you need them. However, many people find it difficult to access archived emails in Gmail. This can be problematic for many people as they might not be able to spot the location of the archived emails when needed. There is no separate folder for archived emails in the Gmail Mobile app or on the desktop and it might confuse a lot of users.

    Gmail is considered a synonym for emails. Almost everyone who uses a mobile phone or laptop has a Gmail account. Gmail helps you send and receive emails constantly. Gmail helps you to send and receive important emails, Attachments, Documents, and other data on your Mobile or PC. To access other products of Google such as Youtube or Share files on Google Drive, a Gmail Id is a must thing. It is a handy and very useful tool for College students and Office workers to share important documents, Notes, and Presentations or just to have their official work on the record. Whatever the reason might be, Gmail has always been a useful tool. However, there are a lot of Gmail features that are confusing or hard to understand and one such feature is archiving emails in Gmail.

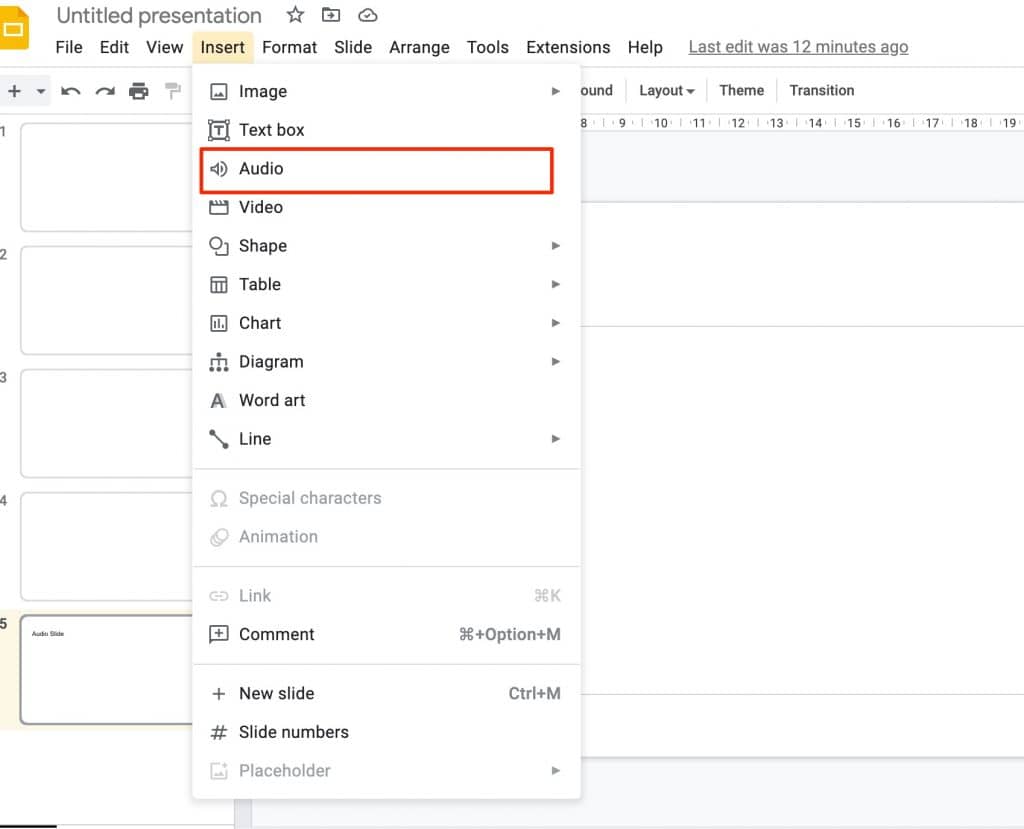
    This article will guide you through different steps to successfully retrieve your archived emails in Gmail Android and iOS app and on their desktop site.

    What happens when I archive emails in Gmail

    When you archive an email in Gmail App or the desktop site, the emails are directly sent to the “All mail” folder. This folder shows you a collection of all the emails that you receive at your email address. This includes mails from the spam folder, Inbox, Archived mails, Promotional, and updates.

    For accessing your Archived mail, You can directly visit the “All mails” folder from the Gmail website or the mobile app and enter the sender’s name or email address in the search box to quickly locate it.

    How to Archive Emails in Gmail

    We keep using our Gmail mailing address on a lot of websites and these websites keep sending us promotional emails and offer daily. To keep your important emails away from these offers and to protect them from getting deleted mistakenly, archiving the emails is one of the best options.

    To Archive Emails on Gmail, Follow these steps

    • Go to the Gmail App or Website and log in with your ID.
    • Select the email that you want to archive, if you want to archive multiple emails then select them by clicking the check box.
    • Click on the Archive icon that looks like a down arrow.

    archive emails in gmail

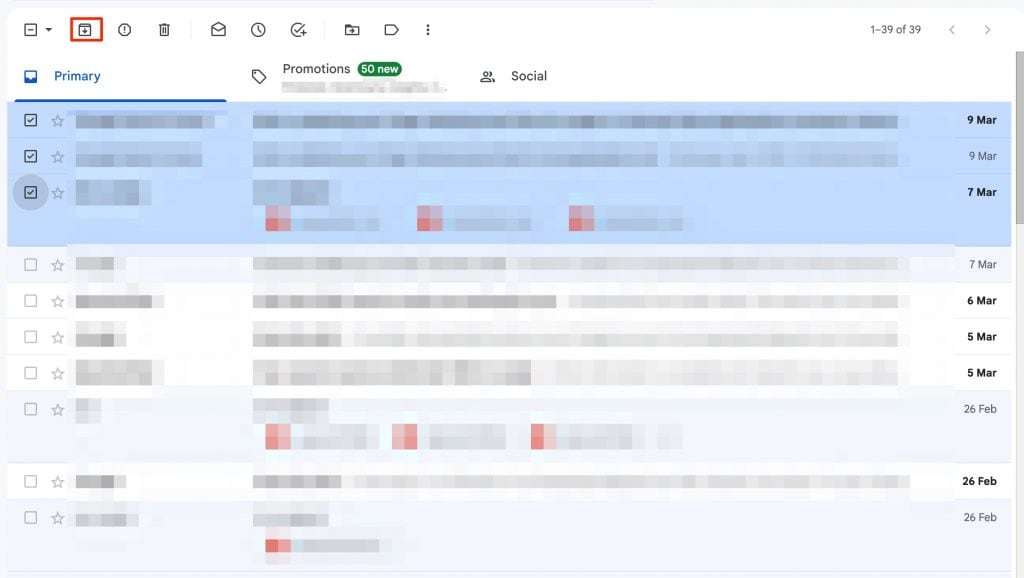
    That’s it! it’s that simple to archive emails in Gmail. Now let’s see the steps to access these archived emails in Gmail.

    How to Find Archived email on Gmails Web

    It is really easy to access or find the archived emails on your Gmail account. Unfortunately, many users find it tricky or difficult to find the exact location as there is no separate folder for archived emails. Generally, all the archived emails are stored under the “All Mail” label, but you might find it difficult to point out or locate the exact archived email. Here are the steps to find archived emails on Gmail Website.

    Step 1: Go to Gmail.com and log in with your credentials. On the main dashboard, Scroll through the options using the left-side menu to find the “All Mail” option. (Click the “More” button if you can’t locate All Mail directly.)

    all mail gmail

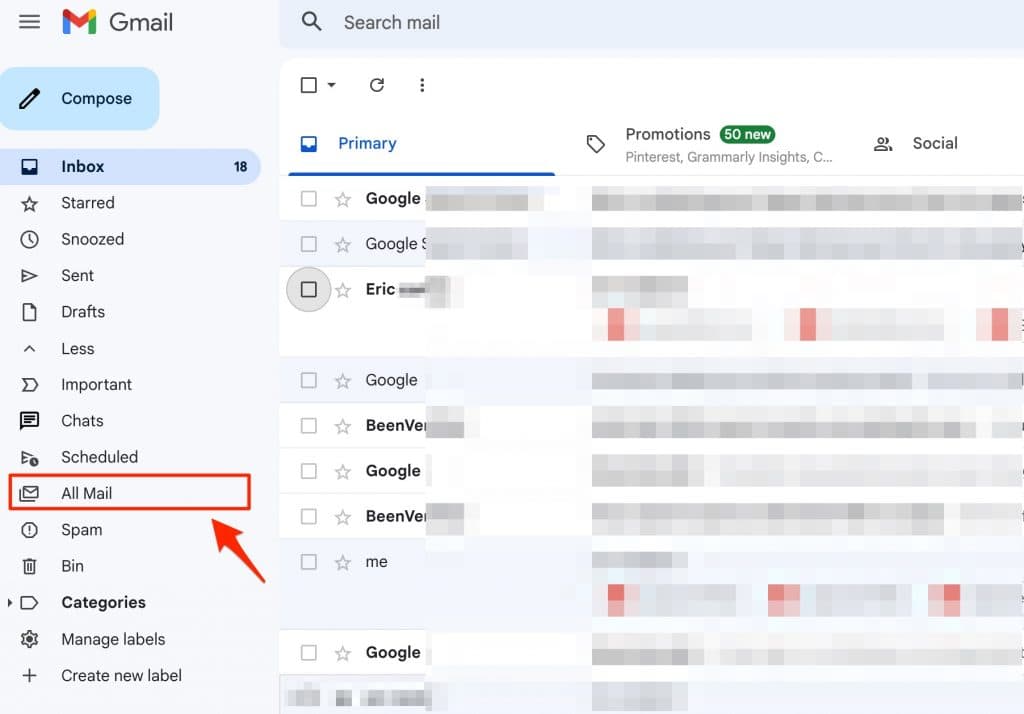
    Step 2: In the All Mail option, you will find all your emails, including Primary, Promotional, Updates, All Trash mail, and Archived mail.

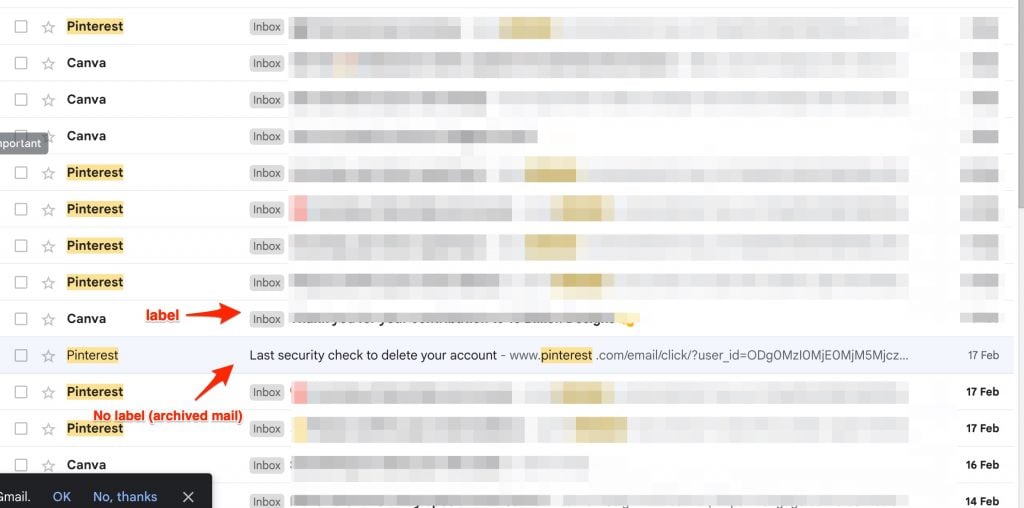
    Step 3: Now scroll through the list and find the email that you have archived. You can find the email by using the sender’s mail ID, Subject title, Mail body, date, size, attachment, etc. If you can’t remember any of those then the trick is to locate emails that do not have “Inbox” labeled before the subject. These emails without Inbox labels are generally Archived emails on Gmail.

    access archived mails on gmail

    How to Access Archived Emails on Gmail Mobile App

    If you use Gmail App on your Android or iOS then it is quite easy to locate Archived mail on these devices. Also, you will be able to archive or unarchive emails on Gmail mobile app quite easily. Here are the steps.

    Step 1: Launch the Gmail app on your Android or iOS device.

    Step 2: Click the three-line icon on the left side of the screen and select the “All Mail” option.

    Step 3: Finally, Look for the archived mail in the “All Mail” label. You can use the search box to enter the sender’s name or email address to quickly find the archived email you are looking for.

    Conclusion:

    Finding archived emails on Gmail is quite easy but also difficult at the same time. Gmail should introduce a separate folder or label for Archived emails just like it does for Spam, Promotional, or other types of mail. Having an option like archiving emails when you receive thousands of spam and promotional mails is a great way to keep your important emails secure and away from your main inbox. Whenever you receive the reply to the archived mail, you will directly get it into the Inbox folder.

  • Roblox Free Promo Codes – Redeem Codes, 1000 Free Robux

    Roblox Free Promo Codes – Redeem Codes, 1000 Free Robux

    If you are looking for a list of working Roblox promo codes then you’ve come to the right place. We have curated a list of all games that offer promo codes for free to use. These promo codes can be used to add different styles and cosmetics to your character. If you are looking to add more life to your character by adding hats, caps, hairstyles, t-shirts, and other accessories then we have a complete library of such free times that you can use. We will also guide you on how you can redeem these codes on your Roblox account.

    Roblox is a popular game-building and gaming software with 100 million+ users worldwide. The platform is popular due to its game-building functionality and different items that can be added to your Avatar. You can either buy these items by using Robux, a Roblox virtual currency. If you need more information on how you can buy or donate Robux then we have written another article “How to send/donate robux on roblox” that you can check.

    In this article, we will not talk about buying items using Robux as it is expensive and might require you to spend money. Thankfully, many games and individual creators on Roblox offer these items for free and we will give you a list of such items that you can redeem into your Roblox account.

    Active Roblox promo codes March 2023

    promo codes are great for people looking to get free stuff in Roblox games. The promo codes enable you to purchase the item at no extra cost and can help you build your character more uniquely. Below we are sharing a list of working promo codes that are available to use on Roblox.

    • SPIDERCOLA – Spider Cola shoulder pet promo code
    • StrikeAPose (Island of Move) – Hustle Hat promo code
    • TWEETROBLOX – The Bird Says promo code

    Also Read : 

    Island of Move codes

    • GetMoving  – Get free Speedy Shades
    • SettingTheStage – Get a free Build It Backpack
    • WorldAlive – Get free Crystalline Companion
    • VictoryLap – Get free Cardio Cans
    • DIY – Get free Kinetic Staff

    How to Redeem Island of Move codes

    Now that you have the island of move promo codes, let’s see the method to redeem the codes in your Roblox account.

    Step 1: Go to the island of move games page and click the green Play button.

    Step 2: Click Open Roblox if prompted.

    Step 3: Now go to the game and head over to the interact booth and click Redeem Code.

    redeem island of move roblox promo code

    Step 4: Enter any code from the above list and the item will be added to your Roblox account instantly.

    Mansion of Wonder codes

    • FXArtist – Free Artist Backpack
    • ThingsGoBoom – Free Ghastly Aura waist
    • ParticleWizard – Free Tomes of the Magus’s shoulders
    • Glimmer – Free Head Slime accessory
    • Boardwalk – Free Ring of Flames waist

    Steps to Redeem Mansion of Wonder promo code

    Step 1: Visit the Mansion of Wonder Roblox page and click the Play button to launch the game in the Roblox player.

    Step 2: Head over to the yellow circle placed at the left side of the game and click the “Get Swag” option.

    get swag mansion of wonder

    Step 3: Click on the Redeem code button that pops up and enter the Roblox promo code obtained above.

    redeem mansion of wonder promo codes for free

    Roblox promo codes to get free clothes and accessories

    Below is a list of free items such as Clothes, accessories, Characters, hats, faces, necks, etc that you can use to upgrade your Avatar on Roblox for free. Please click the Get button to add the item to your Roblox account which can be used later to upgrade your avatar.

    1. Denim Jacket with White Hoodie – Free Clothing accessory on Roblox.
    2. Zip Hoodie – Black – Free jacket.
    3. Ripped Skater Pants – Free pants for your Roblox Avatar.
    4. Roblox Baseball Cap – Free Roblox cap.
    5. Short and Sleek – Brown – Hair Accessories.
    6. Oversized Deal With It Shades – Free shades.
    7. Junkbot – Free character.
    8. Oakley – Free Roblox Character.
    9. Knit Sweater – Gray – Free sweater
    10. Floral Swim Trunks – Blue – Free Pants

    How to Redeem Roblox promo code

    Now that you know all the Roblox promo codes that are free and can be used to get free items in the game. Let’s see the steps to redeem these codes to your Roblox account.

    It is really simple to redeem or add the promo codes to your Roblox account. Here are the steps –

    step 1: Visit the official website of Roblox and sign in with your login id and password.

    Step 2: Now visit the Redeem page on Roblox.

    Step 3: Enter the promo code you have just obtained and click the Redeem button.

    redeem roblox promo codes

    Conclusion:

    There are many promo codes that are available on the monthly basis on Roblox. also, if there is any festival or function then more items are made available for free to the general players and you can grab this opportunity to get free Roblox items or promo codes that can be used to get in-game accessories without spending any Robux.

    We will keep updating this article to add more items and a list for you to grab every possible item for free using the promo codes.

  • How To Find Someone’s Address from Phone Number

    How To Find Someone’s Address from Phone Number

    Did you ever feel a need to find someone’s address? but all you have is their phone number, Now it might seem impossible to get someone’s address with just a phone number. Thankfully, there are a few ways that might help you to actually achieve this. Not many people are aware of these methods and even for us it took a bit of time to find all the working methods that might actually help you. In this article, we will discuss about these methods and how you can easily track someone’s address or other details with just a phone number.

    Find Someone’s Address from the Phone Number for Free

    It might seem a difficult task to track someone’s address with just a phone number. However, there are many websites that work as a directory and can offer you the address when you input the person’s phone number. There are other ways also such as searching on Google Maps or Social Media. These methods might be lengthy and take your time but there is a high chance that these methods can work as effectively as the directory websites.

    There are some websites known as reverse phone lookup, They work similarly to a phone directory but in reverse. Rather than searching for a person using their name, you put in their phone number and these websites will give you the complete details of the person that phone number belongs to.

    Find Address From Phone Number in USA

    In the USA, these websites are quite popular and they have been working for years now. Their database is strong and frequently updated with the new list of phone numbers. If the person you are trying to track is from the USA then this method can come in handy and you might easily find the phone number without much hassle. Let’s see the steps to find the address by using Mobile Number.

    Track address from Phone Number Using Whitepages for free

    If you are from the USA then white pages is a well-known website for you to track people using their first and last names. However, very few people are aware that Whitepages also offers you a reverse phone number and reverse address lookup option to search for a person by using just their phone number. Here are the steps.

    Step 1: Visit the Whitepages website and click the “Reverse Phone” link just above the search bar.

    find address white pages

    Step 2: Enter the phone number with the area code in the given search box and click the search button. (Verify captcha if required)

    Step 3: Once the search is complete, you can see the phone number and the address associated with it.

    reverse phone lookup whitepages

    The website also gives you the first and last name of the person who owns that phone number and other details such as the person’s age, city, other phone numbers, relatives & associates Background reports, etc.

    Find the address from a mobile number using BeenVerified

    BeenVerified is another popular website with a strong database of phone numbers and addresses associated with it. You can use this website to find People, Phone lookup, Address lookup, Email Lookup, or to find any vehicle information.

    1: Visit BeenVerified and click on the Phone lookup link.

    phone lookup beenverified

    2: Enter the Phone number or the landline number that you want to track.

    3: Wait for the search process to complete. The website will give you all the available details such as Address, Person’s name, Mobile Phone Carrier, Background info, Social Media accounts, Online Photo Search, current address, past address, and other information related to that phone number.

    Use Free lookup

    freelookup.net is a free website to find someone’s address using the phone number. This website is an ideal choice to look for someone’s address using their phone number in the UK, Canada, USA, Australia, New Zealand, and Europe.

    The website offers you information such as Owner’s name, residential address, location, carrier, Line type, social media profiles, and other phone numbers associated with that owner, photos, and email address.

    Here are the steps to track the address on free-lookup.net

    • Visit the official website of free-lookup.net
    • Enter the Phone number in the search bar and wait for the website to complete the search process.
    • Get information such as name, Address, Spam score, Spam report, phone number searches, and other data associated with that phone number.

    find address using phone number on free lookup

    Find the address using the Phone number on TrueCaller in India

    Truecaller is a popular android and iOS app to get the details of any phone number. The app is quite popular in India and in Europe. It is completely free to look for addresses using a phone number on Truecaller and you can do it by going directly to their website or by downloading their android or iOS app on your phone.

    Step 1: Here are the steps to find someone’s details using their phone number on truecaller.

    Step 2: Visit the official website of Truecaller or download their mobile app.

    Step 3: Enter the phone number that you want to track and log in with your Google or Mircosoft account.

    find address using phone number truecaller

    That’s it! Once you have successfully logged in, the website will redirect you to the page where you will find all the necessary information including the person’s name, Email address, Mobile number’s carrier, address, and activity report.

    track phone number email address

    The information displayed on Truecaller can be trusted because of its strong database and considering that millions of users use it daily.

    FAQs

    Q. How to Find Someone’s address using a Phone number in USA & Canada?

    Ans: You can use websites like whitepages.com, anywho, or allareacodes.com to reverse lookup for a phone number and get details of the person associated with that number.

    Q. How to Find someone’s address using a Phone number in the UK?

    Ans: There are many reverse address lookup websites such as https://who-called.co.uk/ or use free-lookup.net’s UK database to find the address of the person by just using their Mobile or landline number.

    Q. Find the address of a person using their phone number in Europe

    Ans: If you want someone’s address in Europe by just using their phone number then you can simply use free-lookup.net and enter that person’s phone number to get all the details associated with that number.

    Final Words:

    If someone is harassing you or constantly calling you for no reason then you can use the methods given in this article to find their name and address to confront them directly. These methods are proven and work for almost everyone who wants to track the addresses of people by just using their phone numbers.

    Please let us know if you need more information or if you know any other trick to find someone’s address by using their phone number.

  • How To Cancel Showtime Subscription

    How To Cancel Showtime Subscription

    Showtime offers you an extended free trial to watch your favorite TV shows and Movies. But once the trial is ended or about to end, people find it difficult to cancel the showtime subscription. You can cancel the showtime subscription at any time without much hassle and from any device of your choice. In this article, we will walk you through the steps required to successfully cancel your showtime subscription on Web, Android, iOS, Amazon, Roku, Xbox, or any other Smart TV.

    Showtime is a popular TV show and Movie streaming platform with millions of active users. It offers a wide range of content in Live Sports, Comedy, Documentaries, thrillers, Sci-fi, Romcom, and other genres. the platform is known for its popular psychothriller dramas such as Dextex: new blood, Murder in big horn, the 12th victim, Waco, and many more.

    Showtime offers a 7-day free trial to its customers. once the trial is over, the paid subscription service is automatically renewed until you cancel it manually. This article will help you to cancel your showtime subscription before your trial ends for Showtime streaming service or Showtime anytime.

    How to Cancel Showtime Free Trial

    If you have not yet renewed your showtime subscription and want to cancel it before your trial period ends then you can follow this guide. It’s easy to cancel your showtime free trial before it starts charging you money. Follow these steps –

    1. Open the Showtime website in your browser on PC or on Mobile.
    2. Log in with your credentials (ID and password)
    3. Click the profile-like icon in the top-right corner of your screen.
    4. Click on “Your Subscription”
    5. Click “Cancel Your Subscription” and follow the steps.

    cancel showtime free trial

    Cancel Showtime on Amazon

    If you subscribed to the Showtime content using your Amazon account on the App, Fire tablet, or Firestick then these are the steps.

    On Amazon Website

    • Visit https://amazon.com and log in with your credentials.
    • Click on the “Your Account” option given at the top-right corner.
    • From the list of options, select “Your Android Apps and Devices”.
    • Select the “Your subscriptions” option from the left-pane menu.
    • Finally, Click the “Cancel Channels” link.
    • Again click the “Cancel Channels” button when prompted.

    cancel showtime subscription amazon

    On the Amazon Fire tablet

    • Go to the apps option on your fire tablet.
    • click the menu icon on the top-right corner and select subscriptions.
    • Scroll through the list and select “Showtime” and click “Cancel Subscription”.

    Amazon Mobile App

    1. Launch the Amazon app on your device.
    2. Sign in if you haven’t already, click the menu icon at the bottom right corner and select “Your account”
    3. Go to Membership and Subscriptions.
    4. From the list, Select “Channel Subscriptions”, and select Prime Video Channels.
    5. Look for a Showtime subscription and click the Cancel Subscription button.

    cancel showtime subscription mobile

    Cancel your Showtime Subscription on Apple Devices

    You can cancel your Showtime subscription on any apple device by simply turning off the auto-renewal option. Here are the steps.

    On your iPhone, iPad, or iPod

    • From your home screen click the settings app.
    • Click on Subscriptions and select Showtime.
    • Turn off the auto-renewal option and your Showtime subscription will be canceled.

    To cancel showtime on your Macbook or any other Mac device

    • Launch the iTunes app on your mac
    • Click Sign in and enter your Apple ID and password or you can directly sign in using the touch ID.
    • Click on your name in the top-right corner and select “Account Settings”. (Might be asked to enter your password again)
    • Go to Settings tab >> Manage >> Showtime.
    • Turn off the automatic renewal option to cancel your showtime subscription.

    To Cancel a Showtime subscription on an Android device

    Step 1: Go to the Google Play store.

    Step 2: Click the profile icon in the top-right corner.

    Step 3: Select Payments and subscriptions.

    Step 4: Click Subscriptions.

    Step 5: Under Active subscriptions, click Showtime and select the “Cancel Subscription” option.

    On Fire TV Stick

    • Start your TV and go to Fire TV Stick menu.
    • Go To the App store.
    • Open Menu and select “Subscriptions”.
    • Click through the list and select the Showtime App, Click the Cancel Subscription button.

    How to Cancel Showtime Subscription on Roku TV

    • Launch your Roku TV and visit the Homepage.
    • Find the Showtime app and click the (*) button on your Roku remote.
    • Click Manage Subscription and select the Cancel subscription option.

    Steps to Cancel Showtime Subscription on LG or Samsung Smart TV

    The method is not direct rather you have to visit the official website of showtime in order to cancel your subscription on LG or Samsung Smart TV. Here are the steps.

    1. Visit the official website of Showtime from your PC or from your mobile device.
    2. Click the profile icon in the upper-right corner and go to your account.
    3. Select the “Cancel Showtime Subscription” option.

    Cancel Showtime on Optimum online

    If you have subscribed to Showtime on Optimum online then there is no direct way of canceling your subscription. You have to call Optimum customer care at (866) 200-7192 and ask them to cancel your subscription.

    FAQs on Showtime

    Q. How to Cancel Showtime Free Trial?

    Ans: It is really easy to cancel the free trial of showtime, just visit their website, go to your account section and click on My subscriptions. Here you can choose to cancel your subscription by clicking on the “Cancel Subscription” button.

    Q. How To Get Showtime Refund?

    Ans: If your billing cycle is about to end then there is no way of getting a refund for the previous usage. However, if your subscription that just now been renewed then you can simply contact the Showtime support team to get your refund.

    Q. How to cancel my Showtime Subscription?

    Ans: You have to cancel your showtime subscription by visiting the website or the app that was used to subscribe in the first place. You can read the article to understand the steps to successfully cancel it on Android, iOS, Amazon, Fire Stick, Roku, and other platforms.

    Final Words

    Showtime offers great shows and movies to binge-watch. If you are someone who is always looking for new content to watch then Showtime is definitely your go-to place. However, if you need a break from the digital world or don’t want to spend money on individual subscriptions then you can follow the methods given above to successfully cancel your trial or paid Showtime subscription anytime.

  • How Do I Update My Towers for Straight Talk

    How Do I Update My Towers for Straight Talk

    Having a slow internet speed or not getting proper network coverage even to make a call is a nightmare in today’s world. not getting connected to your network provider or receiving errors like not registered on the network can simply mean that you are being blocked from your making or receiving a call or even using the internet, There are multiple factors that might contribute to a poor network connection that can lead to all of these. People using services like Verizon and Straight Talk often face these issues whenever they go out of their preferred network zone. However, Upgrading your Towers for Straight talk might be the solution here. This will ensure that your network connection is strong enough to support your internet requirements or even at least to make a call in low connectivity areas.

    Straight talk is a mobile prepaid service that works on a pay-as-you-go model. The company was recently acquired by Verizon networks and is operating in almost every state in the USA. The straight talk uses network services from multiple companies including, AT&T, T-mobile, and Verizon, at any given time, you would be connected to any of these three service providers.

    The company claims to offer uninterrupted service throughout the United States of America. However, we all know that this isn’t the case, and every now and then you might face network or coverage issues while using the Straight Talk device. Thankfully, by doing research, visiting various forums, and talking to experts, our team has come up with a list of solutions that might help you to solve this coverage issue on Straight talk by updating the towers, changing the APN, changing carrier settings, and doing few other settings to resolve the issue.

    Update My Towers for Straight Talk

    Let’s talk about the possible troubleshooting methods and methods that might actually help you to get a strong network and better signals on the Straight Talk device. These methods are easy and you can easily use them to resolve the network by updating your towers on Straight talk.

    Update Access Point Names (APN)

    Updating your Access point names is the first method and an important step towards solving the network coverage issue faced on Straight talk devices. Straight talk does not own any mobile network towers, rather, it rents them from multiple providers such as AT&T, and Verizon. This is bad as well as good news, as you can switch between networks to see which network provider has the strongest network in that area. Here are the steps to change the APN setting on your device.

    Configure Straight talk on AT&T Network

    Let’s first see the method you can use to change your current network provide on Straight talk to the AT&T network.

    Step 1: Launch the Settings app on your device and head over to the Mobile Network option under Networks & Connectivity.

    Step 2: Select Mobile Networks and scroll through the list to find the Access point Names text and click it.

    APN update straight talk

    Step 3: Here, Click the Three dots icon or the “+” Icon given at the top right corner of your screen to add a New APN.

    straight talk roaming update

    Step 4: Finally, enter the below-given data in the respective fields in the New APN option.

    • Name: Leave blank
    • APN: att.mvno
    • Username: Leave Blank
    • Password: Leave Blank
    • MMSC: mmsc.cingular.com
    • MMS proxy: 66.209.11.33:80
    • Max Size: Leave blank
    • MMS UA Prof URL: http://www.apple.com/mms/uaprof.rdf

    update towers straight talk

    Leave all other fields as blank and click the tick mark icon on the top-right corner of your screen to save the settings.

    Configure network on Tracfone

    As we have already seen the method to configure your network on AT&T towers. Let’s see how you can update it on the Tracfone network.

    Before moving forward, follow steps 1 to 4 given in the previous method until you reach the “Add New APN” option, and then just enter the data given below. If you haven’t read those then we are repeating them here as well.

    • Go to the settings option on your mobile.
    • Head over to the Networks >> Mobile network option
    • Under mobile networks, click the Access Point Names or APN.
    • Click the Plus sign or Add new APN option depending upon your device.

    Once you are on the Add new APN page, enter the following data in their respective fields.

    • Name: Leave blank
    • APN: tfdata
    • Username: Leave Blank
    • Password: Leave Blank
    • MMSC: mms-tf.net
    • MMS proxy: mms3.tracfone.com:80
    • Max Size: Leave blank
    • MMS UA Prof URL: apple.com/mms/uaprof.rdf

    Leave all other fields blank and click the save button on the top-right corner to save your APN.

    Update the Roaming list on your Mobile

    The Preferred Roaming list is a list of frequencies that are offered by third-party carrier services. In the case of Straight talk, if you are unable to connect to the default network then you can switch to some other network such as T-mobile or AT&T to get your network back. This method will help you to get quicker and faster internet speed along with good network coverage to make or receive calls on your device.

    You can update your Preferred roaming list by calling *22891 from your dial pad on your mobile. This will activate the PRL update request and you will receive the list of the latest PRL services that are available for you.

    Change Carrier Settings on your Mobile

    This is another important setting to do when you want to update your Straight Talk towers. by changing or updating the carrier settings you can improve the network speed and connect to the best available network in that area.

    Here are the steps to update the carrier settings on your Straight talk android phone.

    #1. Open the settings app on your phone by scrolling down the notification bar from the top and selecting settings. Alternatively, you can also open settings by launching the app from your app drawer.

    #2. Under network and connectivity, click on the Network settings option.

    #3. Click on the Sim card for which you want to update the carrier setting.

    #4. Click on the Operator option and uncheck the Auto-select option. Now you will get a list of preferred networks in your area, just select the best available network and you will be switched to that network automatically.

    Conclusion

    If you were looking for How Do I Update My Towers for Straight Talk? then these are the methods that we have given above that will help you to solve your network and connectivity issues. You can also try other methods that you might find on Youtube or other online forums.

    If you know any other solution apart from these three then please let us know and we will include it in our article.

  • Google Drive Still Processing the Video [Fixed]

    Google Drive Still Processing the Video [Fixed]

    If you use Google Drive to store photos, Videos, or other important files on the cloud then you must’ve come across the text that says “We’re processing this video. Please check back later.” or something like “Video is still processing and can be downloaded later” This is a common problem with many Google drive users and because of this, they are unable to download or view the video file as it is still in process. In this article, we will discuss the reasons for this text to appear and how you can bypass this and video or download the video without any interruption.

    Google Drive is a widely used cloud application to store and share files. It is also one of the important products of Google as it enables google to offer multiple services such as Google Docs, sheets, and Google Slides under the same platform. Google Drive also helps you to save space on your mobile or PC by transferring files to the cloud. Google Drive offers up to 15 GB of storage for free which is enough for many people.

    A lot of the drive users use it for sharing files and other documents, Videos with their friends and family. However, when you or someone tries to download the video they say a text saying the following lines.

    • We’re processing this video, Check back later or download the video now. 
    • We’re processing this video. Please check back later.
    • The video is still processing and can be downloaded later.

    These are some of the common errors that a user sees when playing a video online on google drive. read this article to understand what google means by processing the video, how long it takes, and how you can easily view the video on Google Drive without any interruption.

    What does Google Drive Processing Video mean?

    When you upload a video on Google Drive, It goes into the upload phase until the uploading is done. after that, the video is processed to support different resolutions, Formats, devices, and codecs. During this process you see the “Google Drive Processing video” message appearing on your device.

    How Long does Video Processing take on Google Drive?

    There is no solid statement about how much time Google Drive or Photos takes to Process a video as it needs to be uploaded first and then the video will be processed. Obviously, the major factor while uploading a video would be the size of that video which will influence the time taken to upload that video. However, uploading a video from PC and mobile works differently. Your internet connectivity such as LAN, Wifi, 3G, 4G, and 5G upload speed also influences the uploading time.

    How long does it take to process the video on Google Drive? well, it can take anywhere between 10-30 minutes depending on the video to process the video. Once the Processing of the video is completed, you can video or download the video without any problem.

    Also Read : 

    How To Fix “Google Drive Video Still Processing”

    If you have successfully uploaded a video file on Google Drive and still whenever you click on it then it prompts “Video Still Processing” then you should wait for some more time for the video to complete its processing in the background. However, if the issue does not get resolved on its own then you can follow a few methods mentioned in this article that will help you to get rid of the Video File still processing issue on Google Drive.

    Reupload the video

    If the video is short and even though after uploading the video a long back if you are still seeing the “We’re processing this video, Check back later or download the video now” message appear on the screen when you click it, there are chances that the file is not properly uploaded or processed by the Google Drive.

    If the video length is not that big and your upload speed is good then you can try to upload it again and see if the processing gets completed for you to play the video directly on Google Drive.

    Clear Browsing Data and Cached files

    if the video is uploaded and the processing of the video also gets completed. However, if you still get to see the “Processing video” message then there might be some problem with your browser. The most common problem in such cases is bad browsing data and cached files. These files are temporarily stored on your browser for faster access but sometimes these files can create problems that can lead to errors and bugs appearing while using the internet.

    Follow the below-given steps to clear your browser cache and data.

    Step 1: Open your browser and click the menu icon given at the top right corner of your screen and select the settings option.

    chrome settings option

    Step 2: Now on the settings menu, Select the “Privacy and Security” option from the left side menu and click on “Clear Browsing Data” under privacy and security.

    clear chrome browsing data and cache

    Step 3: Finally, Restart your browser and open google drive to play the video without the “Video Still Processing” issue.

    Upgrade Your Browser

    If for any reason, both the already mentioned methods fail to solve the “Video is Processing” error on your Google Drive then update your browser to the latest available version. Follow these steps to update/upgrade your browser.

    Step 1: If you have already launched the browser on your computer then simply click the menu icon on your browser and select the last option “Help >> About Chrome”

    upgrade google chrome

    Step 2: Now under about chrome, The browser will automatically check for updates and if there is an update available then it will automatically download it.

    chrome checking for updates

    Step 3: Once you see the “Chrome is up to date” message rather than checking for updates, that means the upgradation process is completed. Just relaunch your browser and go to Google Drive to see if the issue is resolved.

    chrome is up to date

    Download the video and play it offline

    If the problem is still not solved then you can try downloading the video by using the shareable link on Google Drive. This way you can not watch the video directly on Google Drive and it will consume some of your data and space on your device.

    Here are the steps to download the video using a link.

    #1 Open the Google Drive App or Website on your browser.

    #2 Head over to the video file that you want to download.

    #3 Now Right-click on the file and select the “Get Link” option.

    get shareable link google drive

    #4 On the following window, Select “anyone with the link” under the General Access option and click the “Copy link” button.

    #5 Open the link in the new tab and click the download icon to start downloading the video file.

    #6 Finally Open it on any local video player such as VLC Media Player or MX Player and enjoy your video.

    Conclusion :

    Google Drive is an important part of our lives and it makes sharing large files, sheets, docs, pdfs, and videos so much easy. However, Due to the nature of videos, some users might experience issues like the video keeps loading and never actually plays. If you face any such issue then make sure to try the methods given in the article.

  • How to Enable Google Drive Dark Mode on PC, Mobile and iPhone

    How to Enable Google Drive Dark Mode on PC, Mobile and iPhone

    It’s not a long time ago when many websites and apps started rolling out the dark mode version of their products. Surprisingly, almost everyone accepted the switch and people started liking the new dark version of these apps. Nowadays, a lot of websites and apps launch their product with a dark theme by default without wasting time on developing a lighter version. However, many applications and sites still prefer the light mode over the dark mode and one such platform is Google Drive. In this tutorial, we will explain how you can enable Google Drive dark mode on their Website, Android, and iOS app.

    Google Drive does not need any introduction. It is a cloud storage platform with over a billion users worldwide. The platform is used widely for storing and sharing files, videos, images, and other documents. It also enables you to use Google Docs, Sheets, and Slides for free. It comes with 15 Gigabytes of default storage space that can be upgraded by subscribing to its premium services. People upload and host videos on Google drive to share them with other people.

    Does Google Drive offer a Dark Mode?

    As people are still confused about whether Google Drive offers a dark mode or not and it’s a genuine concern as still there are many apps and websites that do not offer the darker version of their product. Google Drive however offers the dark mode option on Android and iOS but does not offer it on PC or on the website. Thankfully, there are a few workarounds that can help you to turn your Google drive on the Desktop version to the dark theme.

    In this article, we will discuss how you can turn on/off Google Drive dark mode on Windows, Android, and iOS.

    Turn On Google Drive Dark Mode on the Website

    Google Drive does not offer a direct way to turn on the Dark Mode on its website even after a lot of requests from its users. Enabling Dark mode on Google Drive can help you to use it at night time without hurting your eyes. Thankfully, there are a few browser extensions that can help you to turn the Google Drive light version to a darker one on your Desktop. this extension is free to use and you can enable Google Drive as well as any other website that you wish to change to a dark mode. Moreover, this extension will enable google drive dark more on Windows as well as Mac.

    Below is a guide to installing the extension and converting the light theme to a darker one on Google Drive.

    Step 1: Go to the Chrome extension store by visiting this link and type “Turn Off the Lights” in the search box and click on the first option that appears.

    turn off the lights chrome extension

    Step 2: Click on the “Add to Chrome” button placed on the right side and select “Add extension” when prompted.

    add turn off the lights to chrome

    Step 3: Once the extension is added to your browser, you will see a small bulb-like icon next to the URL bar

    turn off the lights

    Step 4: Right-click on the icon or if you are on a laptop then double-click the icon and select the “Options” tab from the drop-down menu.

    Step 5: On the following new tab window, Click the “Night Mode” option from the vertical menu on the left side and Scroll down a little. Here you will find two options

    1) Show the night switch button below the web page to make the page dark or light

    2) Activate the ‘Night Mode’ option when you click on the gray lamp button

    The second option will be enabled only when you enable the first one. Select the appropriate option and head over to Google drive by opening it in the new tab or if it’s already opened then refresh the tab to reflect the changes.

    turn off the lights options

    Step 6: Once you refresh the Google Drive page, you will see a night switch icon on the bottom-left corner of the screen. As shown in the image below.

    enable google drive dark mode

    Step 7: Finally, Click the Night icon and the light theme of Google drive will automatically be converted to a dark one. Similarly, If you want to exit the dark mode and view the lighter version of Google Drive then just click the night icon once more and the changes will be reverted.

    google drive dark mode enabled

    How to Enable Google Drive Dark mode on Android

    Android users are lucky as Google offers a built-in Dark mode option on the app. Most Android devices come with dark mode as their default Google Drive app theme. However, if you have light theme enabled and want to change it to a dark theme then also its a simple. Follow these steps.

    Step 1: Open the Google Drive app on your android device.

    Step 2: Click the Three lines icon on the top-left corner of the app.

    google drive menu

    Step 3: From the list, Select the “Settings” options

    google drive settings

    Step 4: Scroll down to the option that says “Choose theme” and click it.

    choose theme google drive

    Step 5: Finally, select the “Dark” option and you will see the default theme changed to dark.

    google drive dark mode android

    Enable Google Drive dark mode on iPhone

    Just like android, enabling the dark mode on iPhones or iPads is also easy and you can turn the dark mode on in just a few steps.

    Step 1: Open the Google Drive app on your iPhone or iPad.

    Step 2: Click the options menu by clicking the three horizontal lines on the top-left corner of the app.

    Step 3: Select the “Settings” option from the list.

    Step 4: Finally, Click the “Choose theme” option and select “Dark”.

    Also Read:

    How To Disable Google Drive Dark mode on Android and iPhone

    If the dark mode on your android or iOS device is already active and you wish to disable it or switch to a litter version of the application then follow these steps.

    1. Open the Google Drive app on your Android or iOS device.
    2. Open the Menu by clicking the three lines on the top-left corner.
    3. Select the “Settings” option from the menu.
    4. Scroll through the options and select the “Choose theme” option.
    5. Finally choose “Light” or “System Default” option when prompted.

    That’s it, Google Drive dark mode will be deactivated and you can use the app in a lighter version.

    Conclusion:

    Although Google does not officially support Google Drive dark mode there are other workarounds to use the platform in a darker mode using third-party extension such as “Turn Off the lights”. There are other extensions too, just do your research and use a suitable option for yourself.

    Android and iOS users are lucky as the Google Drive’s default theme on both the applications is Dark and they can even swtich between dark and light mode.

  • How To Find Minecraft Server IP Address

    How To Find Minecraft Server IP Address

    Looking for a way to upgrade your Minecraft server? or trying to play the game with your friends on a custom server with extra managed options to customize your Minecraft server then this article is definitely for you. For a frequent Minecraft Gamer, it is important to know their server’s IP address so that they can invite their friends and play Multiplayer Minecraft.

    Minecraft is a fun game to play alone, with your friends online, or by connecting through LAN (Local Area Network). It is an arcade game with millions of active users. The game takes you to a totally different level where you can build your own World by mining and minting different resources and building other stuff with these resources. The game might be fun to play alone, but when you connect with your friends and start playing together, the games take you on a completely new ride with lots of cool options and you can easily finish mining more resources and building more structures with your friends.

    However, many people find it difficult to locate and copy the IP address of their server. This article will help you to easily find your Minecraft Server’s IP address on Windows, Xbox, PS4, and Android.

    There are many different ways that a gamer can use to find the Minecraft Server IP. The methods and steps will vary according to the device you are using. We have written a complete guide to including every device on which you can play Minecraft and connect with other players.

    How to Find Minecraft Server IP Address on Windows

    Let’s see how you can find your local IP address for creating a Minecraft server on Windows PC. Using this IP address anyone can easily connect with you on a local level and start playing Minecraft on your Server. Here are some simple steps to do it.

    Step 1: Hold the Windows Key and Press the “R” key at the same time to open the Windows RUN box. Besides the Open text Type “cmd” in the search box and press Enter.

    windows_cmd

    Step 2: On the Windows CMD window, Click on the black area and type in “ipconfig/all” and Hit Enter. By Hitting the Enter Option, a new line with your Wireless Network Adapter information will appear. If you are using a WIFI router then this IPv4 address will be your Minecraft server’s IP otherwise if you are using an Ethernet cable then you have to look for the Ethernet address.

    Step 4:  If you want to connect other people and friends to your local server, you have to forward the TCP Port to 25565. You can do this by logging in to your Router’s settings. For more information, You can refer to the Router’s User Manual.

    How to Find Minecraft’s Server Address on Xbox

    The IP address of your Xbox is similar to that of your Windows PC and finding it on your Xbox device is really easy. Follow these steps to get your Minecraft Server address –

    Step 1: Switch on your Console and Head over to the Home Page by pressing the big “X” button on your Xbox Controller.

    find minecraft server ip on xbox

    Step 2: Head over to the “Settings” option from the Right-side dropdown menu.

    Step 3: Select Network >> Network Settings and click the “Advanced Network Settings” option

    Step 4: Finally, Using the Right-side menu, Click the IP Address option and You can see the IP address for your Minecraft server on Xbox. Copy the address or write it down and send it to your friends to connect.

    That’s it. Using this method, You can easily find and use the IP address to join the Minecraft Servers and connect with your friends. Similarly, If you or your Friend plays Minecraft on PS4 then follow the below-given steps.

    What is My Minecraft Server IP on PS4

    Just like the Xbox, Finding your Minecraft Server address on PS4 is quite easy and one can easily obtain it by following these easy and simple steps.

    • Navigate to the PS4’s home screen by clicking the PS Logo button on your PS4 controller.
    • Using the Arrow keys on your controller, Navigate to the “Settings” option.
    • Inside the Settings menu, Use the UP-Down arrow keys to scroll between the options and select the “Network” option.
    • Under Networks Tab, Select the View Connections Status option and Look for the IP address option from the given list.
    • Finally, Copy the Address and share it with your other gaming buddies.

    find Minecraft server IP address

    Find Minecraft Server’s IP address on Mobile

    Minecraft is also widely loved and played on the Mobile Devices and a lot of Android or Apple users can also obtain and share their Minecraft’s address to play with other people.

    Here is a guide to getting a Minecraft IP address on Android:

    • Click the “Settings” icon or scroll down and click on the “Settings gear icon”.
    • From the options, Click the “WIFI” tab.
    • Under the WIFI tab click on the “Currently Connected network” option.
    • Under the Network Details look for the IP address and copy it.

    Get the Minecraft IP address on iPhone

    • Head over to the Settings app.
    • Click the WIFI option.
    • Click on the “i” icon next to your currently connected network.
    • Scroll down until you find the IP address and copy it or write it down.

    How to Join Minecraft Server

    by following the steps given above, You might have already obtained the IP address to create your own Minecraft server and share the Address with your Friends for them to join. However, If you want to join some other 3rd party Minecraft server or want your friends to join your server then this guide is for you.

    Step 1:

    Launch the Minecraft Application on your Computer, Xbox, PS4, or mobile.

    Step 2:

    Under the main menu, click the “Direct Connect” option.

    Step 3:

    Enter The Server IP address in the input box and hit enter.

    Step 4:

    Similarly, If you are creating your own Minecraft server and want your friends to join it then share the first 3 steps with your friends and give them your Minecraft Server IP address that you obtains from the previous methods.

    join minecraft server using ip address

    Conclusion:

    Playing Minecraft alone is fun but playing it with other people is great and can help you to engage more with the game. After reading this article, You must have learned to get your Minecraft Server’s IP address to create your own Minecraft server and to help other people to join your Minecraft Server.

  • How to Insert Audio and Video into Google Slides

    How to Insert Audio and Video into Google Slides

    If you are looking for a way to make your Google slides presentation more engaging and interactive by adding background music to it then this article is perfect for you. In this article, we will teach you to easily add audio and videos as well as embed Youtube videos directly into Google slides.

    Those days are gone when presentations were boring and had simple text written on them. Nowadays, presentations are becoming more engaging and graphic-rich. Presentations are used in so many different sectors, like presenting research on the topic in school or presenting market research in the office. Giving a presentation is a perfect way to deliver your message to the audience in a graphical manner. What makes these presentations unique is the ability to add graphic-rich, audio, and video-embedded content. In this tutorial, we will help you to insert audio and video directly into Google Slides.

    Google Slides is a free-to-use cloud platform. it enables you to create engaging and interactive presentations quickly from anywhere in the world. Its cross-platform compatibility also makes it unique to create and edit your slides on different devices. Google Slides also comes with a lot of features such as animation, Text decoration, collaboration with other users, etc. However, many users find it difficult to use some of its features and today we are going to teach you about one such problem which is how to insert audio and video into Google Slides.

    Adding Audio/Music to your Google Slides

    Let’s first see how you can add audio or basic music to your Google Slides. Please make sure that the audio file you have is in the MP3 or WAV format. If your file is in a different format then also don’t worry just use any online format converter to convert it to the MP3 or WAV format.

    The very first step is not to open Google slides but to open Google drive as there is no direct way to upload the audio/video files to google slides. After uploading, we can import the audio/video file to Google slides.

    Step 1: First, upload your desired music, audio, or video file to drive.google.com, and then continue following the second step.

    Step 2: Now head over to the existing presentation in which you want to add the audio or create a new presentation by visiting slides.google.com.

    blank google slides

    Step 3: Now head over to the slide where you want to add the audio to start playing and click on the “Insert” tab from the menu.

    add audio to google slides

    Step 4: In the “Insert” dropdown menu, Scroll down to the “Audio” option and click it.

    audio option google presentation

    Step 5: On the newly opened pop-up window, You will see many options like Insert audio using “My Drive” where you can add the audio/music file that you have uploaded on Google Drive. Similarly, You can also add an audio file shared with you by clicking “Shared with me” and selecting that file. In the Recent tab, you will see all the recently browsed audio files.

    Step 6: Select your desired audio file from the list of options and click the “Select” button. Now you can see a speaker icon will appear on the slide you have selected. Drag the icon anywhere you want on the screen. Similarly, By clicking the icon you can play the audio as well as a new customization panel will appear where you can set audio volume, auto or manual audio play, audio loop, and a few icon-related settings.

    If you want the music to automatically start playing when the slide appears, just click the speaker icon and head over to the right-side panel that says “Format options” and under “Audio Playback” select Start playing >> Automatically.

    automatically play music in google slides

    Inserting/Embedding Youtube videos into Google Slides

    Similar to inserting an audio file, adding a video or Embedding a Youtube video is also easy in Google Slides. You can embed any Youtube video into google slides using these 4 simple steps.

    Step 1: Open the existing Google slides document or create a new one.

    Step 2: Head over to the menu and click the Insert >> Video option.

    google slides insert video option

    Step 3: On the Newly opened popup window, under the search tab, search for any Youtube video that you want to embed. Finally, click on the desired video and click the “Select” button given at the bottom.

    embed youtube video google slides

    Step 4: As you can see, the video is added to our slide in google slides. Here you can also customize and edit the video by using the “Format options” given on the right-side panel

    embedded youtube video into google slides

    How to insert Video from Computer to Google slides

    If you have a video saved locally on your computer and want to insert it into any of the Slides then you can not do that directly. rather, you have to upload the video to Google Drive first, and then you can access the video in the video section of Google Slides.

    Once you have the video uploaded on Google Drive, Follow these steps to add it to any Google Slide.

    Step 1: Head over to your already created or new Google slide.

    Step 2: Click the “Insert” button from the top menu and select “Video” from the dropdown.

    google slides insert video option

    Step 3: On the new Pop-up Window, Click the “Google Drive” option from the tab menu. Under the “My Drive” tab, you will see all the videos that are uploaded on your Google Drive. Select your desired video and click the “Select” button given at the bottom.

    insert video from google drive into google slides

    Step 4: Once the video is added to your selected slide, Click on the video to Resize it as well as to view format options. Under the Format options tab, you can edit the start and end point of the video, how the video will play (On-click, Automatically, Manual), Size and rotation, and aspect ratio.

    format google presentation video

    That’s it. You have successfully added a video file to your Google Slide.

    Conclusion:

    The above-given ways or methods can help you to add audio or video file to your Google slides. Unlike Microsoft, you can not add any file directly to the Google slides, rather you have to upload it on Google Drive first and then use the Insert option to add the desired file. Hopefully, Google will look into this matter and improve the Google slides features and usability.

  • How to Allocate More RAM to Minecraft Server – 4 Easy Methods

    How to Allocate More RAM to Minecraft Server – 4 Easy Methods

    Allocating more RAM to your Minecraft server enables you to expand your Minecraft world and run it smoothly. As your Minecraft world grows in size the default allocated RAM might not be enough and sometimes it can cause your game to crash. Increasing the RAM of your server also helps you to apply additional plugins and mods to your Minecraft Server. However, It might be tricky to understand the process of adding extra RAM. Thankfully, We have found some workarounds to solve this problem.

    Minecraft is a popular arcade game with over 100 Million copies sold worldwide. The game is very popular among teenagers and youngsters. It allows you to mine various metals, and build new things using them. The game is really fun to play especially when you add mods and other external features to it. However, Due to these additions, the game might get heavy and take longer time to launch. This might irritate a lot of players and can affect your gaming experience.

    There are multiple ways to increase the RAM of your Minecraft server and this additional RAM will enable you to add extra features such as Mods, and various plugins to enhance your gaming experience. Some players find it difficult to find methods to allocate more RAM thus we have written this guide which will guide you step-by-step on how to allocate more ram to your Minecraft server.

    The default allocated RAM to a Minecraft Server is 2 GB which is enough to run the basic module of the game. However, as your Minecraft world grows and you add extra plugins, Mods, or textures, the allocated RAM won’t be able to handle this load and your game might crash. Below we have mentioned four easy methods that will help you to increase the RAM size of your Minecraft Server.

    Allocate More RAM to a Minecraft Server using Default Launcher

    Before proceeding please make sure that you have the correct version of JAVA installed on your computer otherwise you will not be able to increase the RAM size on your Minecraft Server. download Java 8 64-bit version by clicking this link.

    To Allocate more RAM to your Minecraft server, Launch the default Minecraft launcher and click the “Installation” option. Click on the three dots icon on the right side of the “Latest Release” and select edit. Click on the more options button and under JVM arguments text “-Xmx2G” change the number to your desired one. here 2G represents the 2 Gigabytes memory.

    For a more detailed and step-by-step guide follow the below-given steps.

    Step 1: Open the default Minecraft launcher and head over to the “Installation” tab.

    minecraft default java launcher

    Step 2: Under the Installation tab, click the three dots icon which is placed on the right side of the “Latest Release” and click “Edit” from the dropdown menu.

    how to allocate more ram to minecraft server

    Step 3: Under the “Edit Installation” tab, Scroll down to the “More options” button and click it. from the list of new options, select “JVM arguments” under JVM arguments as you can see -Xmx2G where 2G represents the number of Gigabytes of memory allocated to the Minecraft server. Edit this number to whatever number of Gigabyte memory you want to allocate.

    jvm arguments minecraft

    Step 5: Finally, Click the play tab and start playing Minecraft on your server without any interruption.

    Increase Minecraft Server RAM easy Method

    Another method of increasing Minecraft server RAM is by creating a text file with configuration details in the Minecraft folder. This method can be tricky for some people but if you follow the steps given below then you can easily increase the RAM of your server.

    Step 1: Open the Minecraft server directory from the C:// directory of your computer or by simply searching for “Minecraft_Server” in the windows search bar.

    Step 2: Now open the Notepad app by clicking the windows icon >> All Apps >> notepad or by searching for the notepad app using the search bar.

    Step 3: Paste the given text in the notepad file that you have just created

    ava -Xmx****M -Xms****M -exe Minecraft_Server.exe -o true
    PAUSE

    Step 4: Replace **** with the value in Megabytes that you want to allocate (1GB = 1024MB) for example, if you want to allocate 4 GB of RAM to your Minecraft server then it will be 4096 MB.

    Step 5: Finally Save the Notepad file by clicking “CTRL + S” on your keyword or head over to files >> Save As option. change the default “.txt” extension to the “.bat” extension and save the file in the Minecraft server folder we just found.

    Step 6: The newly created file will be your new launcher with the RAM you have allocated. double-click on the file icon to launch it and enjoy Minecraft with additional RAM.

    Increase Minecraft Server RAM using CurseForge Launcher

    There are many third-party launchers available for Minecraft. They help you with additional options and features and provide you with many tools to customize your game. One such popular launcher is CurseForge Launcher. It offers easy options to change the memory allocated to your Minecraft server. Below are the steps to change the default memory using CurseForge Launcher.

    Step 1: Open the CurseForge Launcher by double-clicking the icon. On the Launch Window, click the “Settings” gear icon located at the bottom left corner.

    Add more RAM to CurseForge Minecraft

    Step 2: From the right-side menu, Under the “Game Specifics” tab, select Minecraft

    minecraft settings curseforge

    Step 3: On the Minecraft settings page, scroll down to the option that says “Java Settings”. Under the Allocated memory option, use the scroll bar to adjust the RAM allocation to your Minecraft server.

    increase Minecraft server ram curseforge

    Step 4: Finally click the “X” icon at the top right corner or relaunch the curseforge launcher and enjoy Minecraft with additional allocated RAM.

    ATLauncher:

    ATlaucher is another widely used third-party launcher for Minecraft. Atlauncher also has the option to change the default memory allocation settings for Minecraft. Follow these steps to change memory of your Minecraft server using ATlauncher.

    Step 1: Open the ATLauncher app on your computer.

    Step 2: Select the “Settings” option from the menu given on the right side.

    Step 3: From the top menu, click on Java/Minecraft to launch the Minecraft-related settings.

    Step 4: Look for the Maximum memory/ RAM option and change number according to your requirement.

    Step 5: Finally Hit the save button and start playing Minecraft without crashes or lags.

    Conclusion:

    These are the top four methods to easily allocate more RAM to your Minecraft server. There are other third-party launchers such as ATLauncher, Voidswrath, and Technic launcher and the method of changing the memory settings might be different as per the launcher but in most of these launchers, you will find the memory allocation option in the settings tab.