Author: Mark Russell

  • How to Download Twitch VOD Videos

    How to Download Twitch VOD Videos

    Every Streamed video on twitch can be downloaded by both streamers as well as by viewers. These videos are generally termed Video on Demand (VOD). You can download and save these VOD videos from twitch to your local storage and can be used on different platforms such as Youtube, Facebook, or Dailymotion. You can also share these videos with your friends once you download the twitch stream. In this article, We will discuss all the possible ways and methods you can utilize to download or save VOD videos on Twitch.

    Twitch is a popular streaming platform ideally used by gamers to stream different games. Gamers stream games such as Fortnite, GTA V, Watch Dog, or some other games available on platforms like Roblox. The platform is quite popular and has already crossed the 100 million users mark. Apart from the general games, the platform is also used by other streamers to stream their live content or just to interact with their audience.

    If you recently viewed any stream on Twitch or if you have streamed your own video on twitch and now wondering how you can download it on your computer or smartphone then continue reading this article till the end to know the methods.

    How To Download Twitch VOD Videos

    As a Twitch streamer, you can download your own Streams instantly or even download the previous streams from your Twitch account. This is a great solution from Twitch as these streams can then be used on other social networking websites to grow your audience or to cater to your existing audience on different platforms.

    You can enable the VOD storage feature on Twitch, It will enable you to save your previous streams for multiple days depending upon your account types, such as a regular streamer, Twitch affiliate, or Twitch partner, these streams can be saved on your account between 14 to 60 days. Once the period is over, the broadcasted videos will be deleted from your Twitch account.

    Let’s see how to enable the automatic download feature for broadcasts on Twitch.

    Enable the Automatic Twitch Store option

    Before you can download your streams, you need to enable the feature that will automatically save your streams on Twitch. Here are the steps to enable it.

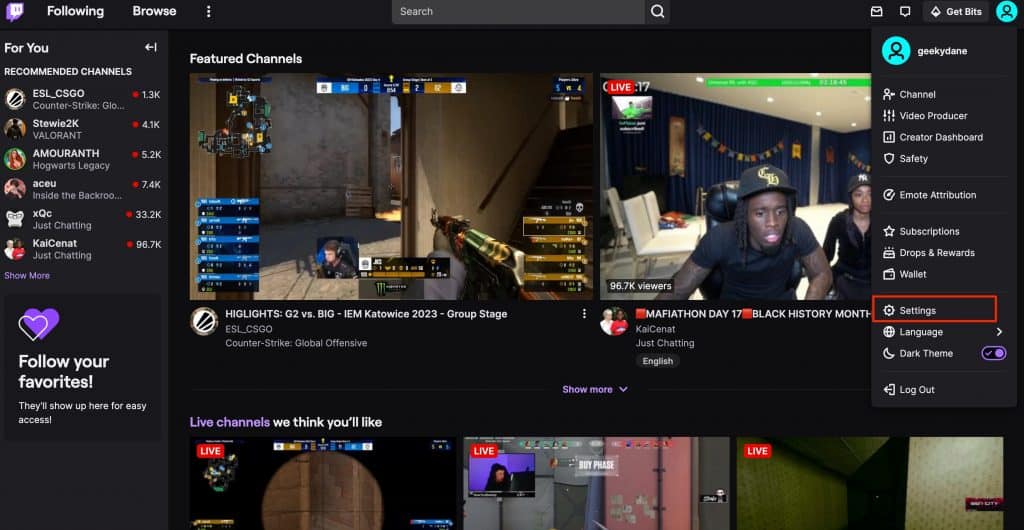
    Step 1: Visit the Twitch website and log in with your credentials (ID and Password). On the Twitch home screen, click the profile icon on the top-right corner of your screen, and from the context menu, select Settings.

    twitch home screen

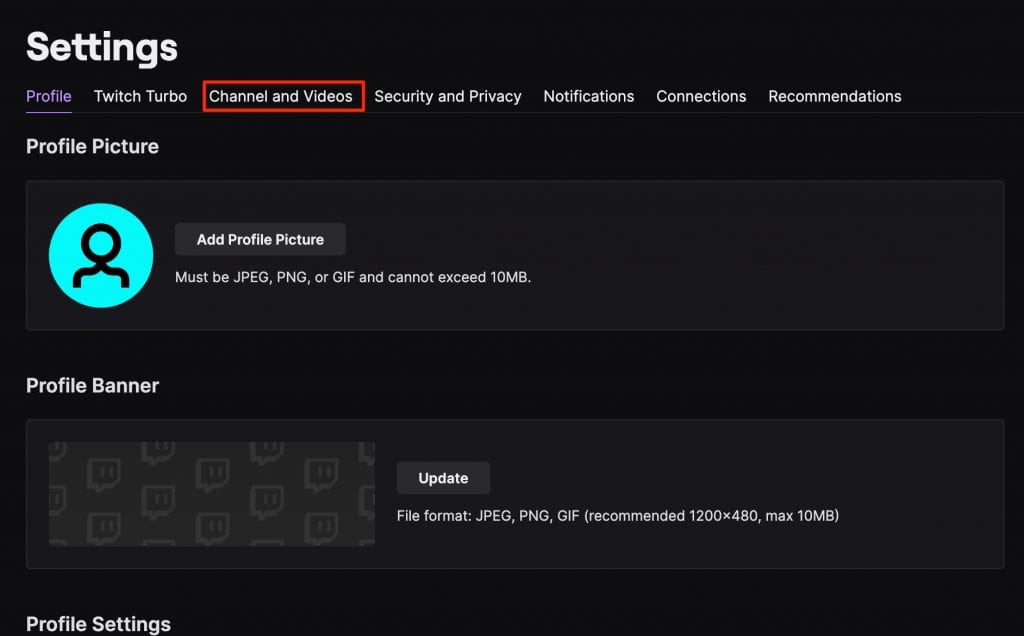
    Step 2: On your settings page, go to the “Channels and videos” tab from the horizontal menu.

    channels and videos setting

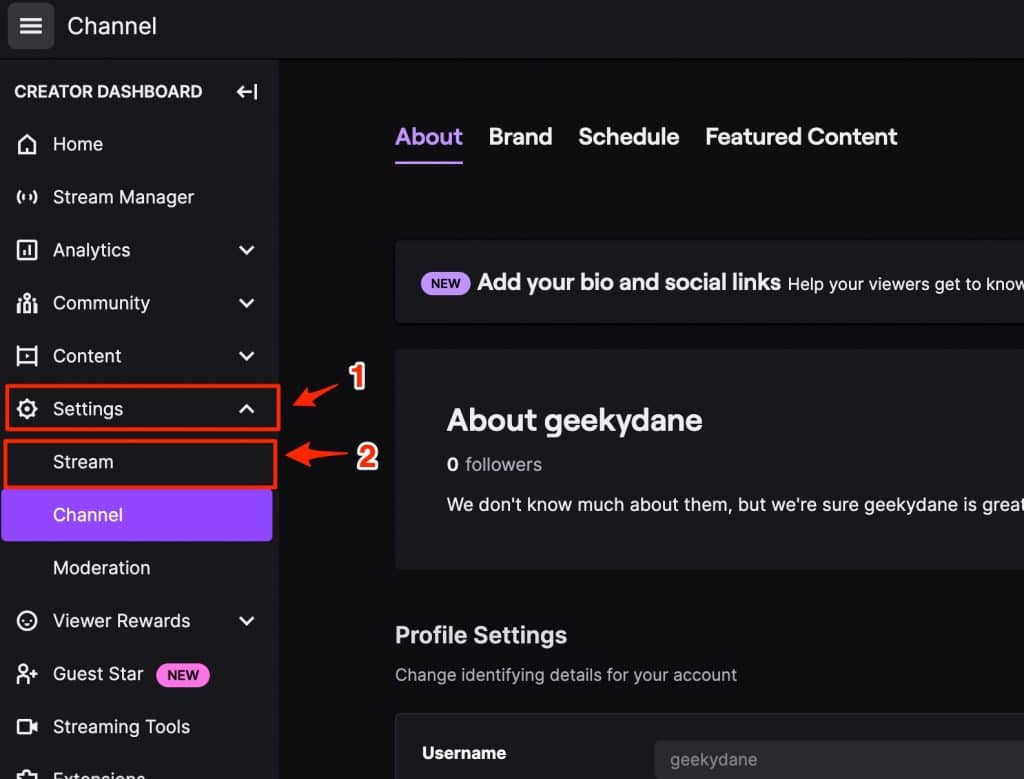
    Step 3: Now use the left-pane menu to select Settings >> Strems.

    stream settings twitch

    Step 4: Now scroll down to the VOD Settings and enable the option that says “Store past broadcasts”.

    save twitch streams automatically

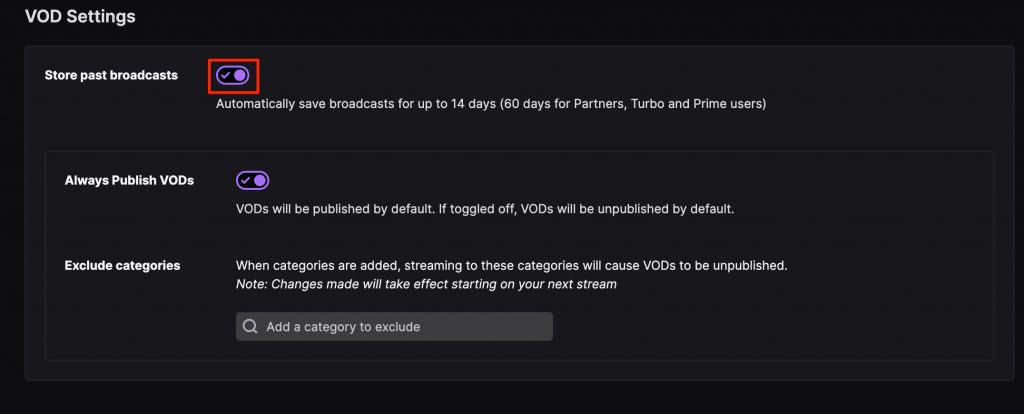
    That’s it! Now you have enabled the option to save your Twitch broadcasts automatically on Twitch. As you can see, the broadcasts will be saved for up to 14 days for normal users and for up to 60 days for Partners, Turbo, and Prime users.

    Now that we have saved our Streams on Twitch, Let’s see how you can download them on your device.

    How to Download Twitch Streams on Computer

    Now that we have saved the streams, let’s move forward and learn the steps required to download the stream on your local device.

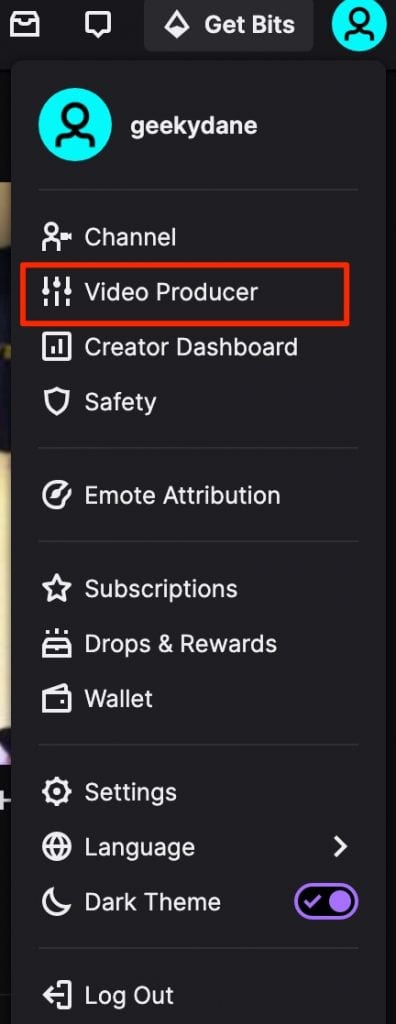
    Step #1: Go to the Homepage of your Twitch Account and click the Profile icon on the top-right corner to explore the menu and select the “Video Producer” option.

    video producer twitch

    Step #2: Now from the list of videos that are already saved, click the three dots icon placed to the right of the video you want to download.

    Step #3: From the list of options, click the “Download” button and wait for the download to start.

    Download Twitch Streams on Mobile

    Now that you know the method to download Twitch streams on PC, let’s discuss the method to download Twitch streams on Android and iOS.

    Please note that this method can be used to download your own streams as well as download streams of other people on Twitch. Let’s see the step by step explanation.

    Download Twitch Streams on Android

    For all the Android users, downloading Twitch streams from your own account or someone else’s twitch stream is quite easy and all you need is the link to the stream and an android app specifically designed to download twitch videos.

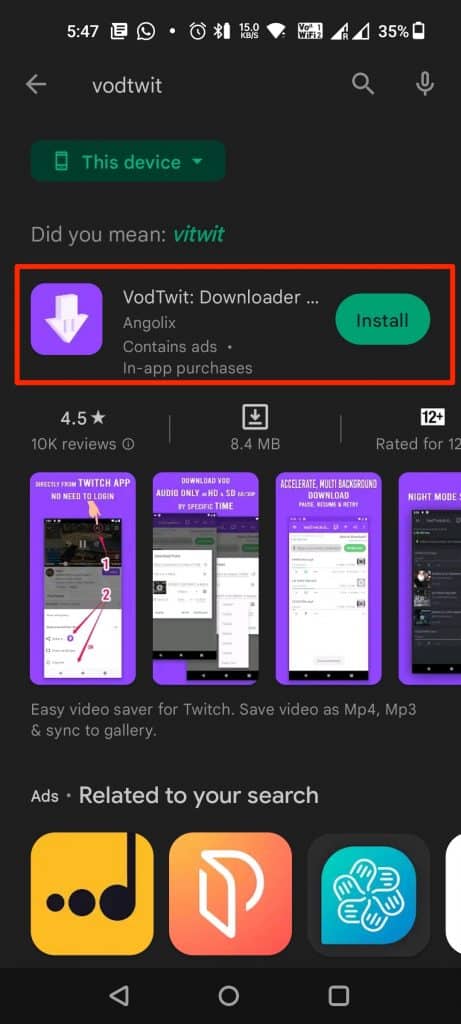
    #1: Open your android device and go to Play store. Type in VodTwit: Downloader for Twitch in the search box and download the first app that appears.

    vodtwit twitch vod downloader

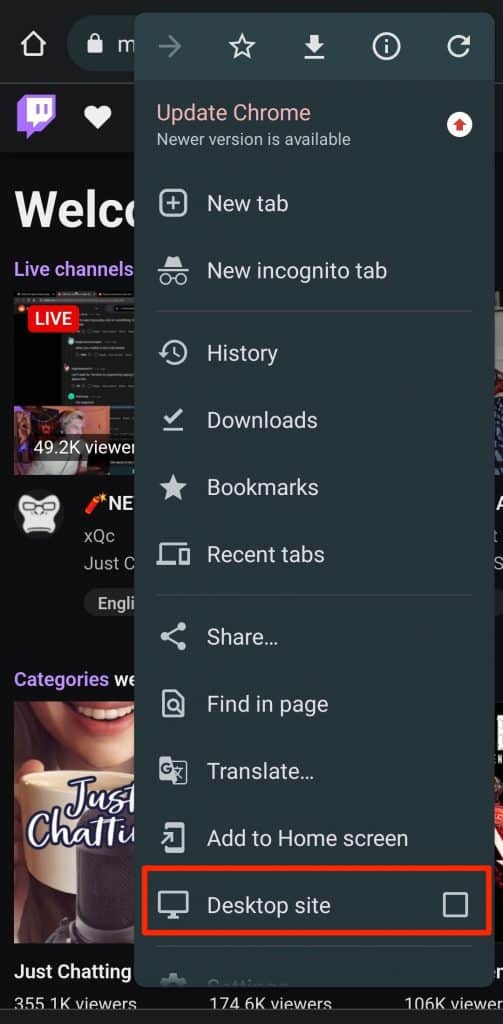
    #2: Now open Twitch.tv on your mobile using the web browser. Click the three dots icon in the top-right corner to open more options and select “Desktop site“.

    twitch desktop site

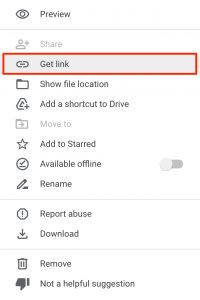
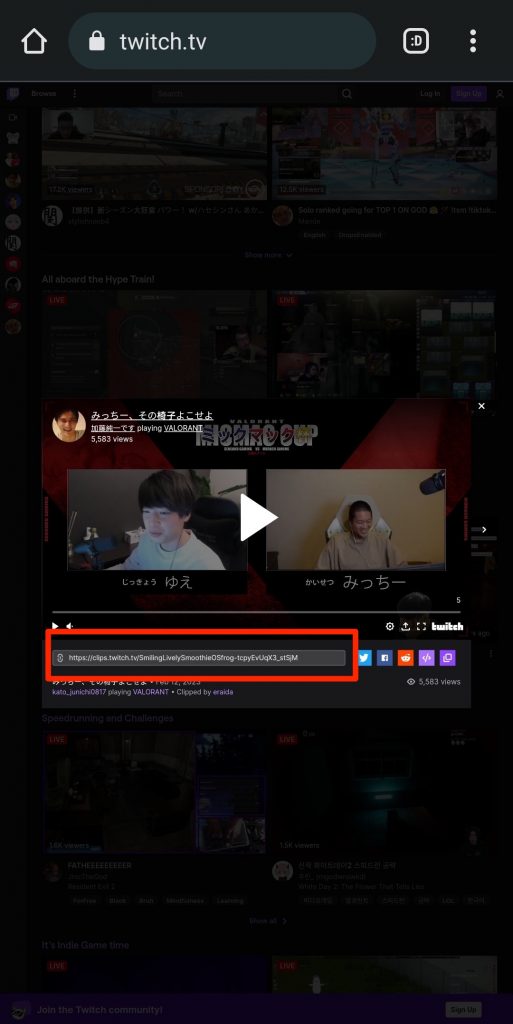
    #3: Now go to the video that you want to download. If you wish to download your own stream then go to the “Video Producer” tab and click the three dots icon and select Copy Link option. Similarly, Go to any other stream of any user and just copy the link of the stream.

    Download Twitch streams on mobile

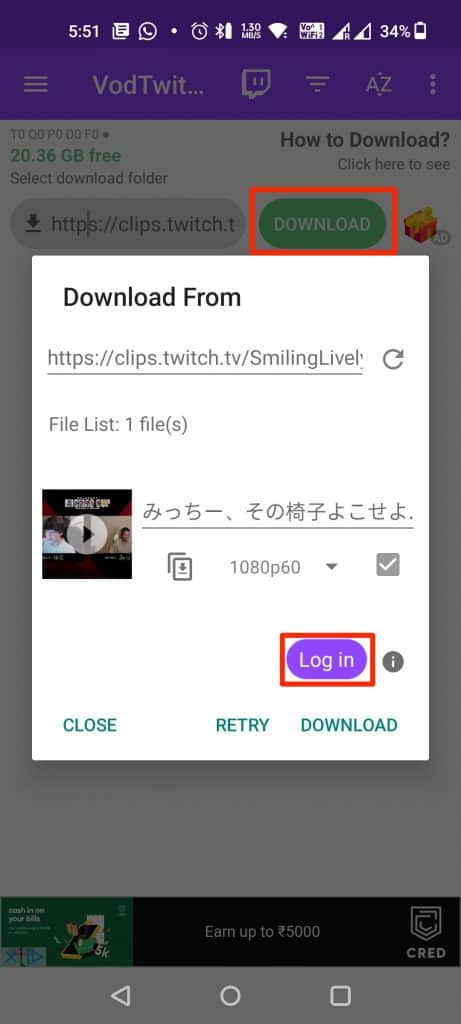
    #4: With the copied link, Open the VodTwit app on your device and paste the user in the box. The app will automatically detect the URL and give you an option to start downloading. Select the quality of the video and click the Download button to start the downloading of the Twitch broadcast.

    download twitch VOD videos on mobile

    Download Twitch Broadcast on iOS

    For iPhone users, the trick is simple and very similar to that of an Android user. Please make sure that you have VLC media player installed on your iPhone that will act as a video downloader. Here are the steps to download Twitch streams on iPhone.

    • Go to the Twitch official website on your iPhone.
    • Select the Stream that you want to download. You can either copy the link of the third-party broadcast or if you want to download your own stream then simply go to the Chrome menu and select “Desktop Site“. On desktop mode, go to the profile icon and click “Video Producer“, here you will get a complete list of your previous streams. Just click the more icon next to the stream and copy the URL.
    • Now open the VLC media player on your iPhone and go to the Network Tab.
    • Under the Network tab, click downloads.
    • Now paste the link of the Twitch stream in the input box and click the Download button.
    • Wait for the Downloading to finish and play the Stream to enjoy it.

    How to Download Twitch VOD Videos of other Streamers

    Now that we know the method used to download your own Twitch VOD Videos and videos of other streamers on Android and iOS, Let’s see the method used to download Twitch streams of other Streamers.

    To download the broadcasted videos of other people, we are going to use a program called Twitch Leecher. It is a free and open-source program available to download on Windows. It is a perfect app if you want to download any third-party stream from Twitch. The program is up-to-date and the contributors keep it fresh and updated so that you won’t face any issues even if Twitch updates any of its codes or makes changes to the server.

    Let’s see the steps needed to download VOD videos of any Twitch streamer for free using the Twitch Leechers program.

    • Download the Twitch leechers program from its official GitHub repository.
    • Now double-click the downloaded program file and select “Run” when prompted.
    • Once the installation is completed, launch the Twitch leecher program on your PC.
    • Now go to Twitch.tv and search for the video that you want to download.
    • Right-click the video and click the “copy link address” option.
    • Go back to the Twitch leecher program, click the search option >> URLs, and paste the copied link in the input box.
    • Finally, click the search option and click the download button when the video appears.

    Conclusion:

    You can always download your own Twitch VOD videos or VODs of other streamers using the methods we mentioned in this article. It’s easy to download and use the Twitch videos on other platforms to grow your engagement and audience base. Though, there are many other methods available to download Twitch videos, these are some of the easiest and working methods that we found useful for our audience.

  • How to Recover a Snapchat Account – Guide

    How to Recover a Snapchat Account – Guide

    Did you forget your Snapchat username? or finding it difficult to log in to your Snapchat account? well, it can be painful and frustrating to keep troubleshooting multiple methods and still not being able to access your account on Snapchat, We have all experienced such issues on one or multiple social media platforms. Whether your Snapchat account was hacked, or you lost your email address or password and now you are locked out of your own account. This article will help you to recover your Snapchat account that has been lost due to multiple reasons.

    Snapchat is a popular image-sharing and messaging application that is used by over a billion users worldwide. The application is popular for introducing the stories feature and has been widely recognized for its privacy features such as disappearing messages. Snapchat is a favorite social media app of millennials and teenagers It is available on Android and iOS platforms and can be downloaded for free.

    There is nothing more frustrating than losing your Snapchat account that has your photos, chats, and other memories with your friends. Even creating a new account is a hassle and getting back all your contacts and previous data is almost next to impossible. Many people stop trying after a certain point as they get stuck in different methods and tricks posted online on various forums. Thankfully, we have come up with a few working solutions that can help you to solve this problem and recover your Snapchat account or recover your Snapchat password very easily.

    How to recover your Snapchat Account

    Before we move forward with the working methods, it’s important for you to determine why you lost your account in the first place. Now, there can be the different reason(s) such as forgetting your Snapchat email address or losing your Snapchat password and now you don’t remember one of these or both of the things. Even it is difficult to log in to a Snapchat account that has been hacked and the hacker might have changed your account email address or password.

    Below we are listing different methods and please follow one or more methods from the below list that suits your needs.

    Recover your Snapchat account if you have lost your Password

    The most common reason for people to lose their Snapchat accounts is that they have forgotten their passwords. It’s easy to forget a password because we have multiple accounts to manage and we try to keep different passwords for different social media accounts or any other account on the internet to ensure the safety of those accounts.

    If you have forgotten your Snapchat password then you won’t be able to log in to your account. However, you can simply reset the password of your account to regain access. Follow these steps to successfully reset your Snapchat account.

    Step 1: First, Launch the Snapchat application on your Android or iOS device and click the “Forgot your Password” link under the input password field.

    recover snapchat password

    Step 2: Once you click the forgot password link, a new popup will appear asking you to recover your account via “Phone” or “Email“. Please select the appropriate option you used when signing up. After that, you will be asked to enter your phone number or Email address. Do the needful and hit the submit button.

    reset your snapchat password

    Step 3: Now, If you entered the email address to recover your password then login to your Email app and click the password reset link that you received from Snapchat. Similarly, If you have entered your phone number then you will get either a message or call option, Select the option you like to receive the password reset code or the OTP.

    Step 4: Finally, enter the OTP and the new password that you want to set. lastly, confirm the password and hit the submit button. After resetting the password, Go back to the login page and enter your email id/username and password to log in to your Snapchat account successfully.

    Recover your Snapchat account if you forget your Email or Username

    Well, it is quite hard if you can’t remember your Snapchat account’s username such as a text username or your mobile number. If you know the email address associated with your Snapchat account then you can also use that to recover your account.

    Method 1:

    If you forgot your username completely then ask any of your Snapchat friends to open their app and look for your account or the username and you can use it to recover your Snapchat account.

    Method 2:

    If you are not able to recover your account with the first method then you can try remembering all the email addresses that you might own. For this, you can use the Gmail app on your phone to locate the email addresses or use other email applications that you might have used to create your email address.

    Once you have the list, just go to the forgot password option and start entering your email addresses. Once, Snapchat detects the email address with an account attached to it, it will send you a password reset link to reset your account.

    How to Recover Hacked Snapchat account

    If your Snapchat account is recently hacked and the hacker has not changed the Email address and phone number of your account then it’s easy to get your access back by simply recovering your account by following the first method given in this article. However, if the hacker has managed to successfully change the account email id or phone number then it might be hard as you won’t have direct access to the reset password link.

    In such cases, you can still recover your Snapchat account by visiting Snaptchat’s official website and contacting their support team by submitting an account compromised request. You can report that your account is compromised or select any other appropriate reason as shown on their website and fill out the form. Once you have submitted your request, wait for some time and you will receive a response asking for additional details from the Snapchat support team. Just provide them with the necessary information and then there is a high chance that you might get your Snapchat account back.

    Conclusion

    These are some of the working ways to recover your Snapchat account if you have forgotten your password, Email address, or phone number associated with it. Similarly, if your account is compromised then you can use the support link on Snapchat’s website to contact their support team for additional assistance.

  • How to Give/Donate Robux to Friends on Roblox

    How to Give/Donate Robux to Friends on Roblox

    People often want to support their favorite creators on online platforms to show their respect and gratitude. This support might be in different forms like giving them a shoutout or donating actual money to support their favorite creator. If you are also looking for a way to send Robux to your friends and other people on Roblox then this article will help you to understand the process of sending Robux from your account to other creators and people whom you want to support.

    Roblox is a popular gaming as well as game-building platform where you can build your own game or play games developed by other users. Roblox is a perfect example of a web 3.0 platform where you do not need any coding knowledge to build your own game. The platform has seen massive growth in recent years and has already reached 100 Million registered users with millions of monthly active users.

    Robux is a virtual currency used on Roblox to buy Avatars, T-shirts, and other in-game purchases. The virtual currency can be purchased for real money that can further be sent to other people on Roblox. In this article, we will cover all the ways to Donate Robux to people as well as how you can send Robux to your friends.

    How to give Robux to Friends

    Giving Robux to friends or people is not an easy task and unlike Twitch donate button option, Roblox does not offer any donation option, thus you have to find alternate ways to donate or give Robux to friends.

    Thankfully, we have found a few workarounds such as creating a t-shirt and selling it for Robux or gifting a Roblox gift card purchased from third-party websites. Read the below methods that will help you to send Robux to friends or people on Roblox.

    Method 1: By Use Donation items

    Roblox has a dedicated store named “Avatar Shop” where you can purchase different items such as Characters, T-shirts, Accessories, Caps, jackets, and many more. This shop is used to buy and sell items on Roblox by using the virtual currency Robux. For this method to work, you have to ask your friend to create an item on the shop or if he already has an item then you can directly go and purchase it in exchange for Robux. Once your friend has an item live on the Roblox store then follow these steps to purchase it.

    Step 1: Go to roblox.com and log in with your credentials.

    Step 2: Once you are on the homepage, click on the “Avatar Shop” button given on the top menu bar.

    give robux to friends

    Step 3: Now Enter the exact clothing item name in the search box or ask your friend to share the Roblox ID of the item and paste it after this URL “https://www.roblox.com/catalog/Roblox_id” (replace Roblox_id) with the actual ID of that item.

    buy roblox items using robux

    Step 4: Once you find the clothing item created by your friend or by someone to whom you want to donate the Robux, click on it, and on its product page, click the “Buy” button. (Make sure you have enough Robux in your account before clicking the Buy button).

    roblox buy button

    Step 5: Once you purchase the item, the Robux you paid will be transferred to your friend or to the person you desire to give the Robux.

    That’s it, it’s the simple way to give Robux to anyone you wish on Roblox. If you don’t want to follow this method then continue reading this article to learn more ways.

    Method 2: By using a Game Pass

    This is another method to donate or give Robux to a person or your friend who does not have a builder’s club membership. In this method, your friend basically creates a game pass and you can purchase the pass in exchange for Robux which will be transferred to his account.

    Here are the steps to create a game pass on Roblox. Make sure to ask your friend to follow these steps in order to create a game pass

    Step 1: Go to roblox.com and sign in with your login id and password. On the home screen, click the “Create” button given on the top menu bar.

    create game pass roblox

    Step 2: Once you are on the Create page, click the “Manage my experience” text just below the “Start Creating” button.

    manage my experience roblox

    Step 3: On the experience page, you will see a default experience created by Roblox itself. Click the Gear icon next to it and select the “Create Pass” option from the dropdown menu.

    experience settings roblox

    Step 4: Now you can create your game pass. In the image section, upload an image of your choice. In the pass name input box, enter the name of your pass and enter the description under the description section. Finally, hit the Preview button to continue. Finally, hit the Verify upload button to create your pass.

    create pass roblox

    Step 5: Now you can view your newly created pass under the Passes section. Click the gear icon next to the pass name and select the “Configure” option. On the following page, click the “Sales” option from the left-side vertical menu and use the toggle button beside the “Item for Sale” text to enable it. Enter the desired price as per your choice. (Remember that Roblox will charge a 30% commission for every sale). Finally, hit the save button and your pass will be created.

    send robux to friends using roblox game pass

    Now you can share the link of this pass with all the people who want to donate the Robux. It takes around 3 days for the Robux to get credited into your Roblox account.

    Method 3: Using Third-party Roblox Gift cards

    If you want a more direct way of donating Robux to your friend or favorite Roblox player then this method can help you. It’s a pretty straightforward method and saves you from following the steps in the previously given methods. You can directly purchase a gift card from online as well as offline stores. These are Roblox gift cards that contain the Robux and anyone adding it to their account can get the equivalent amount of Robux transferred to their Roblox account.

    Below is a list of a few online and offline stores where you can buy this Roblox gift card.

    Purchase your gift card from any of these stores and send the gift card directly to your Friend or person to whom you want to give Robux. However, remember to opt for a digital card as you can send it virtually unlike a physical card which you might have to deliver to the person.

    Conclusion:

    These are the working and proven ways to send Robux to friends or anyone on Roblox. There are also some other methods that can help you to do this but they are complicated or might require you to do some additional steps. You can use the methods given in this article to easily send Robux to anyone on Roblox.

    Frequently Asked Questions

    Q. How to give Robux to Friends?

    Ans: You can either purchase an item such as a t-shirt from your friend in exchange for Robux or you can directly send them Roblox gift cards that can either be physical or digital and send them to your friends who can then redeem it in their Roblox account.

    Q. Can I exchange Robux for real money?

    Ans: Unfortunately, there is no direct way of exchanging the Robux for real bucks, and any donation received on the Roblox in the form of Robux can only be used on the platform to buy different items from the inventory or to buy a game passe and other stuff.

    Q. How to give Robux to Someone without a Group?

    Ans: You can use either the gift card method or purchase an item created by your friend to give Robux to them without creating or joining any group on Roblox.

  • Google Drive Still Processing the Video [Fixed]

    Google Drive Still Processing the Video [Fixed]

    If you use Google Drive to store photos, Videos, or other important files on the cloud then you must’ve come across the text that says “We’re processing this video. Please check back later.” or something like “Video is still processing and can be downloaded later” This is a common problem with many Google drive users and because of this, they are unable to download or view the video file as it is still in process. In this article, we will discuss the reasons for this text to appear and how you can bypass this and video or download the video without any interruption.

    Google Drive is a widely used cloud application to store and share files. It is also one of the important products of Google as it enables google to offer multiple services such as Google Docs, sheets, and Google Slides under the same platform. Google Drive also helps you to save space on your mobile or PC by transferring files to the cloud. Google Drive offers up to 15 GB of storage for free which is enough for many people.

    A lot of the drive users use it for sharing files and other documents, Videos with their friends and family. However, when you or someone tries to download the video they say a text saying the following lines.

    • We’re processing this video, Check back later or download the video now. 
    • We’re processing this video. Please check back later.
    • The video is still processing and can be downloaded later.

    These are some of the common errors that a user sees when playing a video online on google drive. read this article to understand what google means by processing the video, how long it takes, and how you can easily view the video on Google Drive without any interruption.

    What does Google Drive Processing Video mean?

    When you upload a video on Google Drive, It goes into the upload phase until the uploading is done. after that, the video is processed to support different resolutions, Formats, devices, and codecs. During this process you see the “Google Drive Processing video” message appearing on your device.

    How Long does Video Processing take on Google Drive?

    There is no solid statement about how much time Google Drive or Photos takes to Process a video as it needs to be uploaded first and then the video will be processed. Obviously, the major factor while uploading a video would be the size of that video which will influence the time taken to upload that video. However, uploading a video from PC and mobile works differently. Your internet connectivity such as LAN, Wifi, 3G, 4G, and 5G upload speed also influences the uploading time.

    How long does it take to process the video on Google Drive? well, it can take anywhere between 10-30 minutes depending on the video to process the video. Once the Processing of the video is completed, you can video or download the video without any problem.

    Also Read : 

    How To Fix “Google Drive Video Still Processing”

    If you have successfully uploaded a video file on Google Drive and still whenever you click on it then it prompts “Video Still Processing” then you should wait for some more time for the video to complete its processing in the background. However, if the issue does not get resolved on its own then you can follow a few methods mentioned in this article that will help you to get rid of the Video File still processing issue on Google Drive.

    Reupload the video

    If the video is short and even though after uploading the video a long back if you are still seeing the “We’re processing this video, Check back later or download the video now” message appear on the screen when you click it, there are chances that the file is not properly uploaded or processed by the Google Drive.

    If the video length is not that big and your upload speed is good then you can try to upload it again and see if the processing gets completed for you to play the video directly on Google Drive.

    Clear Browsing Data and Cached files

    if the video is uploaded and the processing of the video also gets completed. However, if you still get to see the “Processing video” message then there might be some problem with your browser. The most common problem in such cases is bad browsing data and cached files. These files are temporarily stored on your browser for faster access but sometimes these files can create problems that can lead to errors and bugs appearing while using the internet.

    Follow the below-given steps to clear your browser cache and data.

    Step 1: Open your browser and click the menu icon given at the top right corner of your screen and select the settings option.

    chrome settings option

    Step 2: Now on the settings menu, Select the “Privacy and Security” option from the left side menu and click on “Clear Browsing Data” under privacy and security.

    clear chrome browsing data and cache

    Step 3: Finally, Restart your browser and open google drive to play the video without the “Video Still Processing” issue.

    Upgrade Your Browser

    If for any reason, both the already mentioned methods fail to solve the “Video is Processing” error on your Google Drive then update your browser to the latest available version. Follow these steps to update/upgrade your browser.

    Step 1: If you have already launched the browser on your computer then simply click the menu icon on your browser and select the last option “Help >> About Chrome”

    upgrade google chrome

    Step 2: Now under about chrome, The browser will automatically check for updates and if there is an update available then it will automatically download it.

    chrome checking for updates

    Step 3: Once you see the “Chrome is up to date” message rather than checking for updates, that means the upgradation process is completed. Just relaunch your browser and go to Google Drive to see if the issue is resolved.

    chrome is up to date

    Download the video and play it offline

    If the problem is still not solved then you can try downloading the video by using the shareable link on Google Drive. This way you can not watch the video directly on Google Drive and it will consume some of your data and space on your device.

    Here are the steps to download the video using a link.

    #1 Open the Google Drive App or Website on your browser.

    #2 Head over to the video file that you want to download.

    #3 Now Right-click on the file and select the “Get Link” option.

    get shareable link google drive

    #4 On the following window, Select “anyone with the link” under the General Access option and click the “Copy link” button.

    #5 Open the link in the new tab and click the download icon to start downloading the video file.

    #6 Finally Open it on any local video player such as VLC Media Player or MX Player and enjoy your video.

    Conclusion :

    Google Drive is an important part of our lives and it makes sharing large files, sheets, docs, pdfs, and videos so much easy. However, Due to the nature of videos, some users might experience issues like the video keeps loading and never actually plays. If you face any such issue then make sure to try the methods given in the article.

  • How to Enable Google Drive Dark Mode on PC, Mobile and iPhone

    How to Enable Google Drive Dark Mode on PC, Mobile and iPhone

    It’s not a long time ago when many websites and apps started rolling out the dark mode version of their products. Surprisingly, almost everyone accepted the switch and people started liking the new dark version of these apps. Nowadays, a lot of websites and apps launch their product with a dark theme by default without wasting time on developing a lighter version. However, many applications and sites still prefer the light mode over the dark mode and one such platform is Google Drive. In this tutorial, we will explain how you can enable Google Drive dark mode on their Website, Android, and iOS app.

    Google Drive does not need any introduction. It is a cloud storage platform with over a billion users worldwide. The platform is used widely for storing and sharing files, videos, images, and other documents. It also enables you to use Google Docs, Sheets, and Slides for free. It comes with 15 Gigabytes of default storage space that can be upgraded by subscribing to its premium services. People upload and host videos on Google drive to share them with other people.

    Does Google Drive offer a Dark Mode?

    As people are still confused about whether Google Drive offers a dark mode or not and it’s a genuine concern as still there are many apps and websites that do not offer the darker version of their product. Google Drive however offers the dark mode option on Android and iOS but does not offer it on PC or on the website. Thankfully, there are a few workarounds that can help you to turn your Google drive on the Desktop version to the dark theme.

    In this article, we will discuss how you can turn on/off Google Drive dark mode on Windows, Android, and iOS.

    Turn On Google Drive Dark Mode on the Website

    Google Drive does not offer a direct way to turn on the Dark Mode on its website even after a lot of requests from its users. Enabling Dark mode on Google Drive can help you to use it at night time without hurting your eyes. Thankfully, there are a few browser extensions that can help you to turn the Google Drive light version to a darker one on your Desktop. this extension is free to use and you can enable Google Drive as well as any other website that you wish to change to a dark mode. Moreover, this extension will enable google drive dark more on Windows as well as Mac.

    Below is a guide to installing the extension and converting the light theme to a darker one on Google Drive.

    Step 1: Go to the Chrome extension store by visiting this link and type “Turn Off the Lights” in the search box and click on the first option that appears.

    turn off the lights chrome extension

    Step 2: Click on the “Add to Chrome” button placed on the right side and select “Add extension” when prompted.

    add turn off the lights to chrome

    Step 3: Once the extension is added to your browser, you will see a small bulb-like icon next to the URL bar

    turn off the lights

    Step 4: Right-click on the icon or if you are on a laptop then double-click the icon and select the “Options” tab from the drop-down menu.

    Step 5: On the following new tab window, Click the “Night Mode” option from the vertical menu on the left side and Scroll down a little. Here you will find two options

    1) Show the night switch button below the web page to make the page dark or light

    2) Activate the ‘Night Mode’ option when you click on the gray lamp button

    The second option will be enabled only when you enable the first one. Select the appropriate option and head over to Google drive by opening it in the new tab or if it’s already opened then refresh the tab to reflect the changes.

    turn off the lights options

    Step 6: Once you refresh the Google Drive page, you will see a night switch icon on the bottom-left corner of the screen. As shown in the image below.

    enable google drive dark mode

    Step 7: Finally, Click the Night icon and the light theme of Google drive will automatically be converted to a dark one. Similarly, If you want to exit the dark mode and view the lighter version of Google Drive then just click the night icon once more and the changes will be reverted.

    google drive dark mode enabled

    How to Enable Google Drive Dark mode on Android

    Android users are lucky as Google offers a built-in Dark mode option on the app. Most Android devices come with dark mode as their default Google Drive app theme. However, if you have light theme enabled and want to change it to a dark theme then also its a simple. Follow these steps.

    Step 1: Open the Google Drive app on your android device.

    Step 2: Click the Three lines icon on the top-left corner of the app.

    google drive menu

    Step 3: From the list, Select the “Settings” options

    google drive settings

    Step 4: Scroll down to the option that says “Choose theme” and click it.

    choose theme google drive

    Step 5: Finally, select the “Dark” option and you will see the default theme changed to dark.

    google drive dark mode android

    Enable Google Drive dark mode on iPhone

    Just like android, enabling the dark mode on iPhones or iPads is also easy and you can turn the dark mode on in just a few steps.

    Step 1: Open the Google Drive app on your iPhone or iPad.

    Step 2: Click the options menu by clicking the three horizontal lines on the top-left corner of the app.

    Step 3: Select the “Settings” option from the list.

    Step 4: Finally, Click the “Choose theme” option and select “Dark”.

    Also Read:

    How To Disable Google Drive Dark mode on Android and iPhone

    If the dark mode on your android or iOS device is already active and you wish to disable it or switch to a litter version of the application then follow these steps.

    1. Open the Google Drive app on your Android or iOS device.
    2. Open the Menu by clicking the three lines on the top-left corner.
    3. Select the “Settings” option from the menu.
    4. Scroll through the options and select the “Choose theme” option.
    5. Finally choose “Light” or “System Default” option when prompted.

    That’s it, Google Drive dark mode will be deactivated and you can use the app in a lighter version.

    Conclusion:

    Although Google does not officially support Google Drive dark mode there are other workarounds to use the platform in a darker mode using third-party extension such as “Turn Off the lights”. There are other extensions too, just do your research and use a suitable option for yourself.

    Android and iOS users are lucky as the Google Drive’s default theme on both the applications is Dark and they can even swtich between dark and light mode.

  • How to Fix “Not Registered on Network Error”

    How to Fix “Not Registered on Network Error”

    As over a billion people using the android operating system daily, people also encounter multiple errors and issues that need to be solved. One such issue that prevents Samsung Galaxy users from calling or texting someone is the “Phone not registered on Network” or “Samsung Galaxy Not Registered on Network

    Android is a widely used operating system in the world for smartphones. The operating system is already powering over a billion smartphones. Multiple manufacturers such as Samsung, Xiaomi, Huawei, Oppo, Vivo, and Oneplus, are using android as their primary operating system for their mobiles.

    Not Registered on a network is a common error for Samsung users and other android smartphone users. The error generally occurs when you are trying to call someone or text someone. There are multiple reasons for this error to occur. There might be a network issue or your cellphone is unable to establish a connection with your carrier provider, or any app is preventing you from calling or texting. Thankfully, there are many solutions to this issue and we are going to help you to fix the “Not Registered on network” error on your Samsung or any other android device.

    Why Does My Phone Say – Not Registered on Network

    The error “Not Registered on Network” generally indicates that your device is unable to connect to your carrier’s network. the error might also occur due to hardware failure or if you have not inserted your sim card properly. When such an error occurs, you will not be able to make any calls, and your incoming and outgoing services will not work, You will not be able to send or receive any text messages or use the internet. In such situations, you can generally try restarting your Samsung device and see if the issue is fixed otherwise read this article till the end to find the solution.

    What causes Not Registered on Network Error

    There is not fixed reason for this problem to occur and thus not a fixed solution too. However, we have tried to include all the possible issues and their fixes in this article and we hope that at the end of this article you will have a solution to your not registered on network issue.

    Below we are listing some of the common reasons for this error.

    • Your Phone is in airplane/aeroplane Mode.
    • You have inserted your Sim card incorrectly.
    • Your Operating system is outdated.
    • Your Carrier is having issues on their end.
    • You have rooted your device.
    • Your phone is not able to detect the correct carrier automatically.

    These are the common reasons for the not registered-on network error to occur. However, there can be other reasons and thus we are listing a few workarounds to solve this issue.

    How to Fix Not Registered on Network Error on Samsung/Android

    Now that we know some of the common reasons for this error to occur, Let’s see what are the ways to solve this problem and start receiving calls and messages on your Samsung or Android device.

    To quickly fix the Not registered on network error, Try shutting down your mobile phone and wait 30 sec – 1 minute before starting it again. This will reset any recent errors and glitches caused by system or third-party apps.

    Below are the ways to fix not registered on network error.

    #1 Put Your Phone on Airplane mode

    The very first step is to reset the network and make your smartphone establish a connection again with your carrier provider. to do that, You have to put your smartphone on airplane/aeroplane mode for 20-30 sec and then remove it from the mode.

    If you are not familiar with how to do it, Follow these steps

    Step 1: Scroll down your notification bar and look for the airplane-like icon.

    put phone on aeroplane mode

    Step 2: click the icon to turn it on.

    Step 3: Wait for 30 sec and again turn it off and see if the problem is solved.

    #2 Restart your Android Phone

    Another simple method to get your network connection back is to restart your smartphone. Press and hold your lock button for few seconds and you will see a menu asking you to “Restart” or “Power Off” your mobile. We recommend that you power off your phone and keep it like that for at least 30 sec to 1 minute before powering it on.

    #3 Check your Sim Card

    If you are experiencing this error just after you have inserted a sim card then you have to see if the sim card is inserted properly or not. Similarly, also check if the sim card is working fine and not damaged by inserting it into another device. Use the sim card ejector pin and pull your sim card tray and set the sim properly in the tray before putting it back in.

    #4 Update your Samsung/Android Device to the latest version

    It is always a good idea to keep your mobile phone updated to the latest available version. This ensures that all the bugs and glitches are fixed and also offers more device security. If there is a system update available then we recommend you to update your device. If you don’t know how to check for system updates then follow these steps.

    Step 1: Open the settings app on your mobile and scroll down to the “About Device” or “System Settings” option and click it.

    about device android

    Step 2: On the following screen either scroll down to the “System updates” option or look for the updates option based on your device.

    fix not registered on network issue

    Step 3: Finally, Click the Install now button and wait until the update is downloaded and installed on your device. This might take a few minutes to a couple of hours based on the size of the update. It is always a good idea to keep your device fully charged before proceeding with any update.

    install android updates

    Once your device is updated try inserting your sim card or try calling or texting someone to see if the “Device Not registered on network” issue is solved.

    #5 Manually Choose your Network

    If the given basic troubleshooting methods are not working for you then you can try choosing the network carrier manually using the settings app. By default, android chooses the network operator automatically but if it fails to do so then it’s worth trying it manually. Follow these steps to manually set the preferred network.

    1. Open the Settings app on your device and scroll down to the “Wifi & Network” or “Mobile network” option.

    2. Click the Sim and network option from the list or if you are able to see the sim card info directly then just click on it.

    3. Scroll down to the option that says “Network operator” or “Operator” and select it.

    4. On the following screen Disable the “Choose Automatically” toggle bar and Press “Yes” if any pop-up prompts.

    5. Wait till the phone searches for all the available network providers.

    6. Select your desired network provider and see if the issue is resolved.

    #6 Change your Network Type

    If you are traveling or visiting an area where network signals are weak or network types such as 5G and 4G doesn’t work then also you will receive the “Not registered on network” error. In such cases, you should be changing the preferred network type on your phone to something like 3G or 2G.

    Here are the steps to follow.

    1. Open the settings app on your device.

    2. Click on the “Wifi & Network” or “Mobile Network” option.

    mobile network android

    3. If you are using dual sim cards then select the sim for which you are facing the problem and scroll down to the “Preferred Network type” option.

    preferred network type android

    4. Here you can either select 3G/2G (auto) or 2G only. Try selecting any of the given options and restart your mobile.

    samsung device not registered on network error solved

    #7 Reset Network Settings

    You can also try resetting your network settings to default. This will undo any network changes done by you or any other third-party application. The Reset network settings option will not only reset your network settings but will also reset the Wifi and Bluetooth settings to their default settings.

    Step 1: Open the Settings app and scroll down to system settings.

    Step 2: Click on Backup and reset and then the Reset phone option.

    Step 3: Under the “Reset phone” option, select “Reset Network Settings” and wait until the process is done.

    #7 Contact your Carrier Provider

    If all of the above-provided methods fail and you are still experiencing the “not registered on network” error then try visiting the nearest network provider’s store and explain to them the issue you are facing. You can also call them from another number and ask for help.

    Conclusion:

    On day to day basis, most android users face errors and issues with their devices. These issues could be software or hardware related. One such issue is the “Not Registered on Network” error which is faced by Samsung Galaxy and other android phone users. The issue is not new and it can easily be solved by following one or few methods that are mentioned in the article.

  • How To Find Minecraft Server IP Address

    How To Find Minecraft Server IP Address

    Looking for a way to upgrade your Minecraft server? or trying to play the game with your friends on a custom server with extra managed options to customize your Minecraft server then this article is definitely for you. For a frequent Minecraft Gamer, it is important to know their server’s IP address so that they can invite their friends and play Multiplayer Minecraft.

    Minecraft is a fun game to play alone, with your friends online, or by connecting through LAN (Local Area Network). It is an arcade game with millions of active users. The game takes you to a totally different level where you can build your own World by mining and minting different resources and building other stuff with these resources. The game might be fun to play alone, but when you connect with your friends and start playing together, the games take you on a completely new ride with lots of cool options and you can easily finish mining more resources and building more structures with your friends.

    However, many people find it difficult to locate and copy the IP address of their server. This article will help you to easily find your Minecraft Server’s IP address on Windows, Xbox, PS4, and Android.

    There are many different ways that a gamer can use to find the Minecraft Server IP. The methods and steps will vary according to the device you are using. We have written a complete guide to including every device on which you can play Minecraft and connect with other players.

    How to Find Minecraft Server IP Address on Windows

    Let’s see how you can find your local IP address for creating a Minecraft server on Windows PC. Using this IP address anyone can easily connect with you on a local level and start playing Minecraft on your Server. Here are some simple steps to do it.

    Step 1: Hold the Windows Key and Press the “R” key at the same time to open the Windows RUN box. Besides the Open text Type “cmd” in the search box and press Enter.

    windows_cmd

    Step 2: On the Windows CMD window, Click on the black area and type in “ipconfig/all” and Hit Enter. By Hitting the Enter Option, a new line with your Wireless Network Adapter information will appear. If you are using a WIFI router then this IPv4 address will be your Minecraft server’s IP otherwise if you are using an Ethernet cable then you have to look for the Ethernet address.

    Step 4:  If you want to connect other people and friends to your local server, you have to forward the TCP Port to 25565. You can do this by logging in to your Router’s settings. For more information, You can refer to the Router’s User Manual.

    How to Find Minecraft’s Server Address on Xbox

    The IP address of your Xbox is similar to that of your Windows PC and finding it on your Xbox device is really easy. Follow these steps to get your Minecraft Server address –

    Step 1: Switch on your Console and Head over to the Home Page by pressing the big “X” button on your Xbox Controller.

    find minecraft server ip on xbox

    Step 2: Head over to the “Settings” option from the Right-side dropdown menu.

    Step 3: Select Network >> Network Settings and click the “Advanced Network Settings” option

    Step 4: Finally, Using the Right-side menu, Click the IP Address option and You can see the IP address for your Minecraft server on Xbox. Copy the address or write it down and send it to your friends to connect.

    That’s it. Using this method, You can easily find and use the IP address to join the Minecraft Servers and connect with your friends. Similarly, If you or your Friend plays Minecraft on PS4 then follow the below-given steps.

    What is My Minecraft Server IP on PS4

    Just like the Xbox, Finding your Minecraft Server address on PS4 is quite easy and one can easily obtain it by following these easy and simple steps.

    • Navigate to the PS4’s home screen by clicking the PS Logo button on your PS4 controller.
    • Using the Arrow keys on your controller, Navigate to the “Settings” option.
    • Inside the Settings menu, Use the UP-Down arrow keys to scroll between the options and select the “Network” option.
    • Under Networks Tab, Select the View Connections Status option and Look for the IP address option from the given list.
    • Finally, Copy the Address and share it with your other gaming buddies.

    find Minecraft server IP address

    Find Minecraft Server’s IP address on Mobile

    Minecraft is also widely loved and played on the Mobile Devices and a lot of Android or Apple users can also obtain and share their Minecraft’s address to play with other people.

    Here is a guide to getting a Minecraft IP address on Android:

    • Click the “Settings” icon or scroll down and click on the “Settings gear icon”.
    • From the options, Click the “WIFI” tab.
    • Under the WIFI tab click on the “Currently Connected network” option.
    • Under the Network Details look for the IP address and copy it.

    Get the Minecraft IP address on iPhone

    • Head over to the Settings app.
    • Click the WIFI option.
    • Click on the “i” icon next to your currently connected network.
    • Scroll down until you find the IP address and copy it or write it down.

    How to Join Minecraft Server

    by following the steps given above, You might have already obtained the IP address to create your own Minecraft server and share the Address with your Friends for them to join. However, If you want to join some other 3rd party Minecraft server or want your friends to join your server then this guide is for you.

    Step 1:

    Launch the Minecraft Application on your Computer, Xbox, PS4, or mobile.

    Step 2:

    Under the main menu, click the “Direct Connect” option.

    Step 3:

    Enter The Server IP address in the input box and hit enter.

    Step 4:

    Similarly, If you are creating your own Minecraft server and want your friends to join it then share the first 3 steps with your friends and give them your Minecraft Server IP address that you obtains from the previous methods.

    join minecraft server using ip address

    Conclusion:

    Playing Minecraft alone is fun but playing it with other people is great and can help you to engage more with the game. After reading this article, You must have learned to get your Minecraft Server’s IP address to create your own Minecraft server and to help other people to join your Minecraft Server.

  • How to Insert Audio and Video into Google Slides

    How to Insert Audio and Video into Google Slides

    If you are looking for a way to make your Google slides presentation more engaging and interactive by adding background music to it then this article is perfect for you. In this article, we will teach you to easily add audio and videos as well as embed Youtube videos directly into Google slides.

    Those days are gone when presentations were boring and had simple text written on them. Nowadays, presentations are becoming more engaging and graphic-rich. Presentations are used in so many different sectors, like presenting research on the topic in school or presenting market research in the office. Giving a presentation is a perfect way to deliver your message to the audience in a graphical manner. What makes these presentations unique is the ability to add graphic-rich, audio, and video-embedded content. In this tutorial, we will help you to insert audio and video directly into Google Slides.

    Google Slides is a free-to-use cloud platform. it enables you to create engaging and interactive presentations quickly from anywhere in the world. Its cross-platform compatibility also makes it unique to create and edit your slides on different devices. Google Slides also comes with a lot of features such as animation, Text decoration, collaboration with other users, etc. However, many users find it difficult to use some of its features and today we are going to teach you about one such problem which is how to insert audio and video into Google Slides.

    Adding Audio/Music to your Google Slides

    Let’s first see how you can add audio or basic music to your Google Slides. Please make sure that the audio file you have is in the MP3 or WAV format. If your file is in a different format then also don’t worry just use any online format converter to convert it to the MP3 or WAV format.

    The very first step is not to open Google slides but to open Google drive as there is no direct way to upload the audio/video files to google slides. After uploading, we can import the audio/video file to Google slides.

    Step 1: First, upload your desired music, audio, or video file to drive.google.com, and then continue following the second step.

    Step 2: Now head over to the existing presentation in which you want to add the audio or create a new presentation by visiting slides.google.com.

    blank google slides

    Step 3: Now head over to the slide where you want to add the audio to start playing and click on the “Insert” tab from the menu.

    add audio to google slides

    Step 4: In the “Insert” dropdown menu, Scroll down to the “Audio” option and click it.

    audio option google presentation

    Step 5: On the newly opened pop-up window, You will see many options like Insert audio using “My Drive” where you can add the audio/music file that you have uploaded on Google Drive. Similarly, You can also add an audio file shared with you by clicking “Shared with me” and selecting that file. In the Recent tab, you will see all the recently browsed audio files.

    Step 6: Select your desired audio file from the list of options and click the “Select” button. Now you can see a speaker icon will appear on the slide you have selected. Drag the icon anywhere you want on the screen. Similarly, By clicking the icon you can play the audio as well as a new customization panel will appear where you can set audio volume, auto or manual audio play, audio loop, and a few icon-related settings.

    If you want the music to automatically start playing when the slide appears, just click the speaker icon and head over to the right-side panel that says “Format options” and under “Audio Playback” select Start playing >> Automatically.

    automatically play music in google slides

    Inserting/Embedding Youtube videos into Google Slides

    Similar to inserting an audio file, adding a video or Embedding a Youtube video is also easy in Google Slides. You can embed any Youtube video into google slides using these 4 simple steps.

    Step 1: Open the existing Google slides document or create a new one.

    Step 2: Head over to the menu and click the Insert >> Video option.

    google slides insert video option

    Step 3: On the Newly opened popup window, under the search tab, search for any Youtube video that you want to embed. Finally, click on the desired video and click the “Select” button given at the bottom.

    embed youtube video google slides

    Step 4: As you can see, the video is added to our slide in google slides. Here you can also customize and edit the video by using the “Format options” given on the right-side panel

    embedded youtube video into google slides

    How to insert Video from Computer to Google slides

    If you have a video saved locally on your computer and want to insert it into any of the Slides then you can not do that directly. rather, you have to upload the video to Google Drive first, and then you can access the video in the video section of Google Slides.

    Once you have the video uploaded on Google Drive, Follow these steps to add it to any Google Slide.

    Step 1: Head over to your already created or new Google slide.

    Step 2: Click the “Insert” button from the top menu and select “Video” from the dropdown.

    google slides insert video option

    Step 3: On the new Pop-up Window, Click the “Google Drive” option from the tab menu. Under the “My Drive” tab, you will see all the videos that are uploaded on your Google Drive. Select your desired video and click the “Select” button given at the bottom.

    insert video from google drive into google slides

    Step 4: Once the video is added to your selected slide, Click on the video to Resize it as well as to view format options. Under the Format options tab, you can edit the start and end point of the video, how the video will play (On-click, Automatically, Manual), Size and rotation, and aspect ratio.

    format google presentation video

    That’s it. You have successfully added a video file to your Google Slide.

    Conclusion:

    The above-given ways or methods can help you to add audio or video file to your Google slides. Unlike Microsoft, you can not add any file directly to the Google slides, rather you have to upload it on Google Drive first and then use the Insert option to add the desired file. Hopefully, Google will look into this matter and improve the Google slides features and usability.

  • How to Allocate More RAM to Minecraft Server – 4 Easy Methods

    How to Allocate More RAM to Minecraft Server – 4 Easy Methods

    Allocating more RAM to your Minecraft server enables you to expand your Minecraft world and run it smoothly. As your Minecraft world grows in size the default allocated RAM might not be enough and sometimes it can cause your game to crash. Increasing the RAM of your server also helps you to apply additional plugins and mods to your Minecraft Server. However, It might be tricky to understand the process of adding extra RAM. Thankfully, We have found some workarounds to solve this problem.

    Minecraft is a popular arcade game with over 100 Million copies sold worldwide. The game is very popular among teenagers and youngsters. It allows you to mine various metals, and build new things using them. The game is really fun to play especially when you add mods and other external features to it. However, Due to these additions, the game might get heavy and take longer time to launch. This might irritate a lot of players and can affect your gaming experience.

    There are multiple ways to increase the RAM of your Minecraft server and this additional RAM will enable you to add extra features such as Mods, and various plugins to enhance your gaming experience. Some players find it difficult to find methods to allocate more RAM thus we have written this guide which will guide you step-by-step on how to allocate more ram to your Minecraft server.

    The default allocated RAM to a Minecraft Server is 2 GB which is enough to run the basic module of the game. However, as your Minecraft world grows and you add extra plugins, Mods, or textures, the allocated RAM won’t be able to handle this load and your game might crash. Below we have mentioned four easy methods that will help you to increase the RAM size of your Minecraft Server.

    Allocate More RAM to a Minecraft Server using Default Launcher

    Before proceeding please make sure that you have the correct version of JAVA installed on your computer otherwise you will not be able to increase the RAM size on your Minecraft Server. download Java 8 64-bit version by clicking this link.

    To Allocate more RAM to your Minecraft server, Launch the default Minecraft launcher and click the “Installation” option. Click on the three dots icon on the right side of the “Latest Release” and select edit. Click on the more options button and under JVM arguments text “-Xmx2G” change the number to your desired one. here 2G represents the 2 Gigabytes memory.

    For a more detailed and step-by-step guide follow the below-given steps.

    Step 1: Open the default Minecraft launcher and head over to the “Installation” tab.

    minecraft default java launcher

    Step 2: Under the Installation tab, click the three dots icon which is placed on the right side of the “Latest Release” and click “Edit” from the dropdown menu.

    how to allocate more ram to minecraft server

    Step 3: Under the “Edit Installation” tab, Scroll down to the “More options” button and click it. from the list of new options, select “JVM arguments” under JVM arguments as you can see -Xmx2G where 2G represents the number of Gigabytes of memory allocated to the Minecraft server. Edit this number to whatever number of Gigabyte memory you want to allocate.

    jvm arguments minecraft

    Step 5: Finally, Click the play tab and start playing Minecraft on your server without any interruption.

    Increase Minecraft Server RAM easy Method

    Another method of increasing Minecraft server RAM is by creating a text file with configuration details in the Minecraft folder. This method can be tricky for some people but if you follow the steps given below then you can easily increase the RAM of your server.

    Step 1: Open the Minecraft server directory from the C:// directory of your computer or by simply searching for “Minecraft_Server” in the windows search bar.

    Step 2: Now open the Notepad app by clicking the windows icon >> All Apps >> notepad or by searching for the notepad app using the search bar.

    Step 3: Paste the given text in the notepad file that you have just created

    ava -Xmx****M -Xms****M -exe Minecraft_Server.exe -o true
    PAUSE

    Step 4: Replace **** with the value in Megabytes that you want to allocate (1GB = 1024MB) for example, if you want to allocate 4 GB of RAM to your Minecraft server then it will be 4096 MB.

    Step 5: Finally Save the Notepad file by clicking “CTRL + S” on your keyword or head over to files >> Save As option. change the default “.txt” extension to the “.bat” extension and save the file in the Minecraft server folder we just found.

    Step 6: The newly created file will be your new launcher with the RAM you have allocated. double-click on the file icon to launch it and enjoy Minecraft with additional RAM.

    Increase Minecraft Server RAM using CurseForge Launcher

    There are many third-party launchers available for Minecraft. They help you with additional options and features and provide you with many tools to customize your game. One such popular launcher is CurseForge Launcher. It offers easy options to change the memory allocated to your Minecraft server. Below are the steps to change the default memory using CurseForge Launcher.

    Step 1: Open the CurseForge Launcher by double-clicking the icon. On the Launch Window, click the “Settings” gear icon located at the bottom left corner.

    Add more RAM to CurseForge Minecraft

    Step 2: From the right-side menu, Under the “Game Specifics” tab, select Minecraft

    minecraft settings curseforge

    Step 3: On the Minecraft settings page, scroll down to the option that says “Java Settings”. Under the Allocated memory option, use the scroll bar to adjust the RAM allocation to your Minecraft server.

    increase Minecraft server ram curseforge

    Step 4: Finally click the “X” icon at the top right corner or relaunch the curseforge launcher and enjoy Minecraft with additional allocated RAM.

    ATLauncher:

    ATlaucher is another widely used third-party launcher for Minecraft. Atlauncher also has the option to change the default memory allocation settings for Minecraft. Follow these steps to change memory of your Minecraft server using ATlauncher.

    Step 1: Open the ATLauncher app on your computer.

    Step 2: Select the “Settings” option from the menu given on the right side.

    Step 3: From the top menu, click on Java/Minecraft to launch the Minecraft-related settings.

    Step 4: Look for the Maximum memory/ RAM option and change number according to your requirement.

    Step 5: Finally Hit the save button and start playing Minecraft without crashes or lags.

    Conclusion:

    These are the top four methods to easily allocate more RAM to your Minecraft server. There are other third-party launchers such as ATLauncher, Voidswrath, and Technic launcher and the method of changing the memory settings might be different as per the launcher but in most of these launchers, you will find the memory allocation option in the settings tab.