Category: Hardware

  • How to Stay Safe in a World Full of Listening Devices

    It starts innocently enough. You ask Alexa to play your favourite playlist while you cook. Your smartwatch tracks your morning run. Your smart TV recommends a show you just mentioned in conversation. But as our homes, cars, and offices fill up with voice-activated technology, a chilling question lingers: who else might be listening?

    In the age of smart assistants and connected devices, privacy has quietly become a luxury. While we’ve embraced the convenience of saying “Hey Siri” or “OK Google,” we’ve also opened the door to a level of passive surveillance few people fully understand. These devices don’t just listen when we speak directly to them – they’re often always listening, always ready, always collecting.

    And they’re not the only culprits. From hidden microphones in meeting rooms to spy cams in rental properties, today’s world is full of discreet, sometimes malicious, listening devices. So, how do you protect your privacy in a space where eavesdropping can happen without your knowledge – or your consent?

    This guide explores the risks, the reasons, and the simple steps you can take to regain control of your environment. Whether you’re a busy professional, a public figure, or just a tech-savvy homeowner, it’s time to think seriously about what your devices are really doing – and who they’re doing it for.

    The Rise of Everyday Eavesdropping

    The average UK household now contains nine or more connected devices, many of which have microphones built in. Smartphones, tablets, smartwatches, TVs, laptops, doorbells, baby monitors – even kitchen appliances – can record audio or be remotely activated.

    We’ve normalised having always-on devices within earshot, often without questioning what data they’re collecting or where it’s going. Voice assistants are triggered by “wake words,” but recordings sometimes begin before those commands are fully spoken. In some cases, snippets of private conversations are stored on cloud servers and reviewed by third-party contractors. Amazon, Google, and Apple have all admitted to such practices in recent years.

    Then there’s the more insidious side: devices that don’t advertise their presence. A hidden voice recorder in a boardroom. A disguised camera in a hotel clock. A Bluetooth mic under a car seat. These aren’t science fiction gadgets – they’re available online for less than the price of a nice dinner. And they’re being used more frequently, not just by criminals or spies, but in domestic abuse cases, legal disputes, and corporate sabotage.

    Why People Are Being Secretly Listened To

    Most people aren’t targets of espionage – but that doesn’t mean they’re safe from being recorded. Companies track voice data to improve ad targeting and AI training. Hackers might hijack a smart device to listen in on conversations, looking for sensitive info. Employers might use surveillance to monitor staff, often without explicit consent.

    In more sinister cases, ex-partners or stalkers use covert recording devices to exert control or gather information. The rapid spread of affordable spy tech has made these tactics more common than ever. That’s why bug sweeping services – once reserved for high-level security ops – are increasingly being used by everyday people to protect their privacy at home or work.

    The Passive Surveillance Trap

    What makes these devices particularly dangerous is how seamlessly they integrate into our lives. Most smart gadgets operate in the background – quiet, helpful, and largely invisible. But that’s also what makes them so effective at collecting data without drawing attention.

    Voice assistants, for example, are always “listening” for their wake word. But what if they mishear it? What if the line between helpful and intrusive isn’t as clear as we’d like? It’s one thing to let a smart speaker play your favourite podcast – it’s another to have your private conversations end up on a server, where they might be accessed, analysed, or even leaked.

    In 2019, it emerged that Apple contractors were regularly hearing intimate audio recordings from users interacting with Siri. These included everything from medical discussions to private arguments. Similar stories have come out about Amazon Alexa and Google Assistant. While most companies now offer opt-out features or data deletion options, very few people know how to access them – let alone use them effectively.

    How to Take Back Control

    While we can’t escape technology entirely, there are practical steps you can take to reduce your risk of being unknowingly recorded:

    1. Audit Your Devices

    Make a list of all the gadgets in your home or workspace that contain microphones. Smart speakers, TVs, thermostats, laptops, baby monitors – if it has a mic, it has the potential to listen.

    2. Review Privacy Settings

    Go into the settings of your voice assistants and turn off any unnecessary data collection or cloud storage. Delete past recordings if the option is available. Some devices now let you auto-delete voice logs every few months – enable this if possible.

    3. Mute When Not in Use

    Most smart speakers have a physical mute button. Use it. If you’re not actively using the device, there’s no reason it needs to be listening.

    4. Keep Devices Out of Sensitive Spaces

    Don’t place voice assistants in bedrooms, bathrooms, or private meeting rooms. These are spaces where conversations should remain truly confidential.

    5. Secure Your Network

    An insecure Wi-Fi connection is an open invitation for hackers. Use a strong password, enable encryption, and consider segmenting your network to keep smart devices separate from more sensitive data.

    When to Call in the Experts

    Sometimes, peace of mind requires more than a settings tweak. If you suspect you’re being recorded or surveilled – whether it’s in a business, rental property, car, or even your own home – it may be time to consider professional help.

    Bug sweeping services offer a thorough inspection of your environment using specialised equipment to detect hidden microphones, GPS trackers, wireless transmitters, and covert cameras. These sweeps are discreet, often conducted by former security professionals, and can provide clear evidence of unwanted surveillance – or the reassurance that you’re in the clear.

    Bug sweeps are no longer just for celebrities or government officials. They’re increasingly being used by:

    • Executives concerned about corporate leaks
    • Victims of harassment or stalking
    • Individuals involved in legal disputes or high-value divorces
    • Travellers staying in unfamiliar accommodations

    If you feel uneasy, trust your instincts. A professional sweep could uncover something your eyes – and ears – missed.

    Awareness Is Your Best Defence

    We live in a world where listening devices are everywhere – from your living room to your pocket. While many are designed to serve and simplify our lives, they also pose serious risks to our personal privacy.

    You don’t need to throw away your gadgets or live off-grid to stay safe. But you do need to be aware. Adjust your settings. Question your convenience. And when in doubt, call in the experts.

    Because in a world that’s always listening, knowing who’s hearing what makes all the difference.

  • Hotspot.webui Login Manager – WiFi Network

    Hotspot.webui Login Manager – WiFi Network

    Hotspot.webui is a control portal for AT&T Turbo Hotspot 2. This portal will help you to access all the basic and advanced settings on your AT&T WiFi router. In this article, We will be showing how you can access the Hotspot.webui portal from your browser and mobile and Login with the Default Username and Password.

    AT&T is a popular network provider in the USA. The company has been in the business for many years now and it offers services like Mobile networks, Wi-Fi networks, and TV Cable connections to its users. Before proceeding with the article, Let’s first understand what Hotspot.webui manager is and why you should be using it.

    What is Hotspot.webui?

    Hotspot.webui is a login portal for AT&T Turbo Hotspot 2 users to manage their WiFi network more efficiently. Using Hotspot.webui, users can access all the options offered by the Wifi Network. Users can change their WiFi router password, See the connected devices, Add/Remove devices, Restrict access to the network, and manage other security and system settings.

    Anyone who is looking to make basic or advanced changes to their AT&T Turbo Hotspot network needs the Hotspot.webui login credentials.

    Connecting to Turbo Hotspot 2 Wifi Router

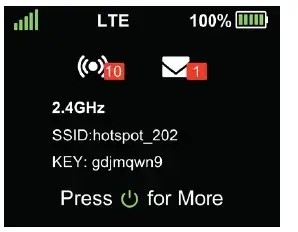
    If you have just purchased the Wifi router then you will first need to connect any of your Devices to the router. To do this, Turn on the Turbo Hotspot 2 router and you will see the Wi-Fi network name and Password on the Home screen.

    The Wifi Network name is beside SSID whereas the Password will be shown under the “Key” option.

    att Turbo Hotspot 2 wifi name and password

    How to Login into Hotspot.webui Manager?

    Now that we know what is Hotspot.webui Portal, Let’s understand how you can log into the network with the default credentials. In this tutorial, we will learn two methods to log into your WiFi network using the Portal. both these methods are easy and you can use any of the two methods based on the device you are using.

    Method 1: Login from the web browser

    Once you are connected to the Wifi network from your PC using the previously mentioned method, Launch any browser app such as Chrome, Firefox, or Microsoft Edge on your PC and follow these steps.

    Step 1: Visit http://hotspot.webui from your web browser. (Make sure you are connected to the WiFi Network.)

    Step 2: Enter the Login password for the online Webui portal. The password is generally the last 8 digits of your IMEI Number. You can find the IMEI number on your WiFi router’s Label underneath the batteries.

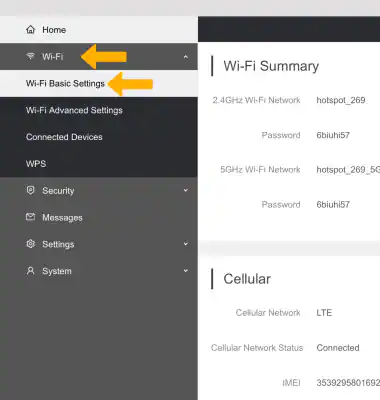
    Step 3: Once you have successfully logged into the AT&T turbo hotspot 2 router, the next step is to go to the Wi-Fi page and click on the WiFi basic settings. Here you can make your desired changes.

    hotspot webui interface

    Method 2: Login using your Mobile

    • Open any browser app on your mobile device, such as Chrome, Firefox, or Edge.
    • Make sure you are connected to the AT&T turbo hotspot 2 with the desired SSID and Password.
    • Visit hotspot.webui and enter your Login Password which are the last 8 digits of your IMEI number printed on your router’s back.
    • Finally, Visit the options from the left pane menu and make the necessary changes as required.

    How To Change Wi-Fi Password and Wi-Fi Name?

    Now that you have successfully logged into the AT&T wifi router using the hotspot.webui URL, let’s understand how you can change your SSID and Password from the control panel.

    • On the Homepage of hotspot.webui, head over to the WiFi option from the left side menu and click “Wifi Basic Settings
    • From here, scroll to the option “2.4GHz Wi-Fi Network” and change the SSID Name. Similarly, Change the password to your desired password under the password option.
    • You also get an option to change your SSID and Password for the “5 GHz Wi-Fi Network” which you can do or leave as it is.
    • Finally, Click the Save Changes option, select the new Wifi Name from the list of available networks option on your device, and enter the new password to again connect to the network.

    Att turbo 2 router wifi settings page

    Frequently Asked Questions

    Q. What is hotspot.webui?

    Ans: Hotspot.webui is a virtual dashboard for AT&T turbo 2 router that allows you to control your WiFi network and make necessary changes such as Hotspot settings, Security and Parental Control, Device restrictions, and other advanced settings.

    Q. How to Disable Wifi network using hotspot.webui?

    Ans: Log into your AT&T Wi-Fi network using the hotspot.webui URL and go to Wi-Fi Settings >> Wi-Fi Basic Settings. Use the toggle button to turn on or off your Wifi network.

    Q. What security settings can I change using WebUI Portal?

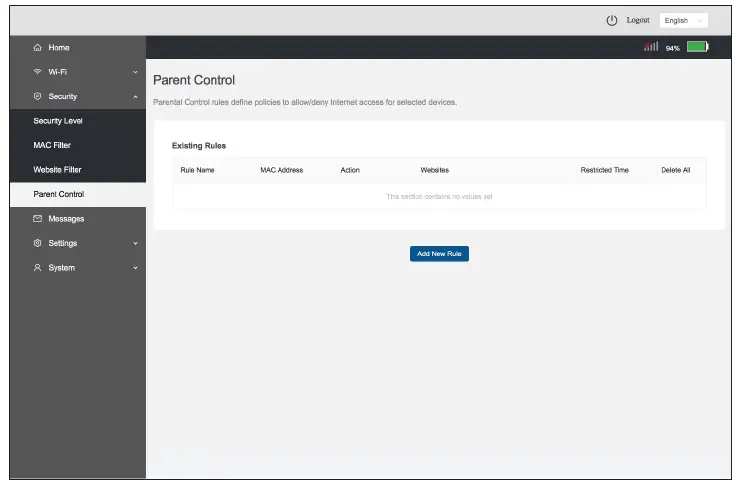
    Ans: Many security options are offered on the WebUI Portal such as Parental Control, Device Restriction, Blocking unwanted websites, Setting Wi-Fi Wake up, and sleep timing.

    Final Words:

    Hotspot.Webui is a virtual interface for controlling your AT&T Turbo Router 2 which gives you more ability on how you control your Wi-Fi Network. You can make basic settings such as changing your SSID name and Password or you can head over to the advanced settings such as Parental control and Device restrictions.

    Logging into the AT&T Wifi router is also Easy as you can directly visit the http://hotspot.webui URL and enter the Last 8 Digits of your IMEI Number as your password.

    Please let us know if you have more questions or queries regarding the hotspot.webui login manager by commenting below.

  • How Your Macbook Fan Works and What Can Go Wrong

    How Your Macbook Fan Works and What Can Go Wrong

    MacBooks are powerful machines, and nobody can say otherwise. They are sleek, high-performing, and highly reliable. For the most part, they work exceptionally well and don’t cause interruptions. However, at the end of the day, they are machines, and like any other machine, they are not invincible. They do run into their fair share of issues that sometimes disrupt the workflow.

    One such problem is heat. When you are running resource-intensive applications or running multiple programs and tabs simultaneously, your Mac is generating heat. MacBooks depend on their built-in fans to prevent overheating. Unfortunately, sometimes, the heat might be too much for the MacBook fans to handle, and this might result in problems like the fans getting too noisy.

    Since the fans play a critical role in keeping your Mac’s temperature cool and ensuring it performs optimally, this guide delves deep into the inner workings of the fans. Also, it outlines some potential problems and their solutions.

    A Sneak Peek Into Macbook’s Fan System

    The fan system of your MacBook comprises the following key elements:

    • Fans – Fans are the heart of the cooling system, and their spinning blade draws in cool air and expel hot air. The speed of the fans is automatically controlled according to the system’s temperature. So, if you are wondering why is my MacBook fan so loud, it is because your MacBook is heating up too much and the fans are working double shifts to cool it down. Normally, the fans run quietly in the background, doing their job. They only start making loud noises when the heat is too much.
    • Heat sink – Thin metal fins attached to the CPU and GPU absorb heat generated by these components.
    • Logic board – This is the brain of the Mac and receives temperature data from the sensors. It also controls the speed of the fan according to the temperature data.
    • Temperature sensors – The temperature sensors are strategically placed within the Mac. They monitor internal temperatures and offer real-time data.

    How Do the Mac Fans Work to Keep Things Cool?

    MacBook fans work together with the other elements of the cooling crew, such as the temperature sensors, heat sinks, and the logic board. For instance, when you are performing tasks on your Mac, the GPU and CPU generate heat. Then, this heat is transferred to the heat sinks while the temperature sensors constantly monitor the heat levels. These sensors send real-time data to the logic board, and based on this data, the fan speed is adjusted. The fans help to draw in cool air from the vents located on the bottom of the Mac and expel hot air through the vents located on the back or sides of the Mac.

    Potential Fan Issues and Troubleshooting Tips

    When things heat up, you need to take charge and turn things around in your favor. You cannot let your Mac get heated unchecked, or it will result in performance issues and fry the internal components. Some of the common problems and their solutions are discussed below:

    • Dust buildup results in overheating and fan issues 

    Dust can accumulate on the fan blades, vents, and heat sink fins. This may result in hindering airflow and reducing the cooling efficiency of your system.

    The solution is simple. Regularly clean your Mac using compressed air to prevent dust buildup.

    • Faulty or problematic fan

    Sometimes, the fan might be malfunctioning and this may result in the fans not spinning properly. This might significantly impact the cooling capacity of your Mac and result in an overheated system.

    The solution is to diagnose a faulty fan by seeking professional assistance. You can take your system to an authorized Apple service center for replacement or repair.

    • Degradation of thermal paste 

    Thermal paste is a substance that is applied between the GUP/CPU and heat sink. This facilitates heat transfer. But with time, this might degrade and lose its effectiveness.

    The solution is to replace thermal paste by going to an authorized Apple service center.

    • Software problems 

    Corrupted system files or outdated software may interfere with fan control. The solution is to always keep your macOS software updated. If the issue persists, you can reinstall the OS.

    Symptoms of a Potential Fan Problem

    It is important to stay vigilant and look for the red flags that might indicate there’s a fan issue. The moment you see these signs, you must take steps to solve the problem so your Mac can continue functioning normally.

    • Loud or erratic fan noise – If the fan is making loud, grinding noises or spinning at a high speed, it means your computer is experiencing a heavy load. You may need to quit some of the resource-intensive apps or programs so that some of the pressure is relieved.
    • Unexpected shutdowns – Your Mac might unexpectedly shut down if it is frequently getting overheated.
    • Performance problems – If you are frequently experiencing lagging, sluggish performance, or application crashes, it might be due to thermal throttling. You have to prevent overheating to overcome these issues.

    In summation, MacBook fans play a critical role in keeping the temperature cool and comfortable so your system can function at its optimal. You must ensure your Mac stays cool so it remains productive for a long time.

  • How to Turn On Vizio TV Without a Remote

    How to Turn On Vizio TV Without a Remote

    Many times Vizio TV remote gets damaged or does not work properly, in such situations, using a universal TV remote like the GE universal remote can be a lifesaver. However, if you want a quick solution to turn on your Vizio TV without a remote then there are a few ways that can help you to do so.

    Vizio is a popular TV manufacturer with dozens of different models under its brand name. The manufacturer offers custom OS TVs with 4k and up to 8k resolution. Vizio offers an all-in-one solution for watching Movies online, Live sports matches and series, and playing games, and it supports all major OTT platforms to play movies and other shows using your existing OTT subscription.

    Quick Summary – Turn off the Vizio TV using the power button given at the bottom center or bottom right of your TV. Similarly, if the TV is connected to the Local Wifi network then just connect your mobile to the same network and use the Vizio Smartcast App to operate your TV.

    Below we have mentioned a details guide and methods that you can use to Turn on your Vizio TV without a Remote.

    How to Turn On/ Operate Vizio TV Without a Remote

    Many methods are listed by users on multiple forums to operate your Vizio TV Without a Remote. In this article, We have summarized some of the working methods that are guaranteed to help you to fix your remote not working problem and help you to operate Vizio TV without the need for a remote control.

    #1: Use Physical Buttons on the TV (Quick Method)

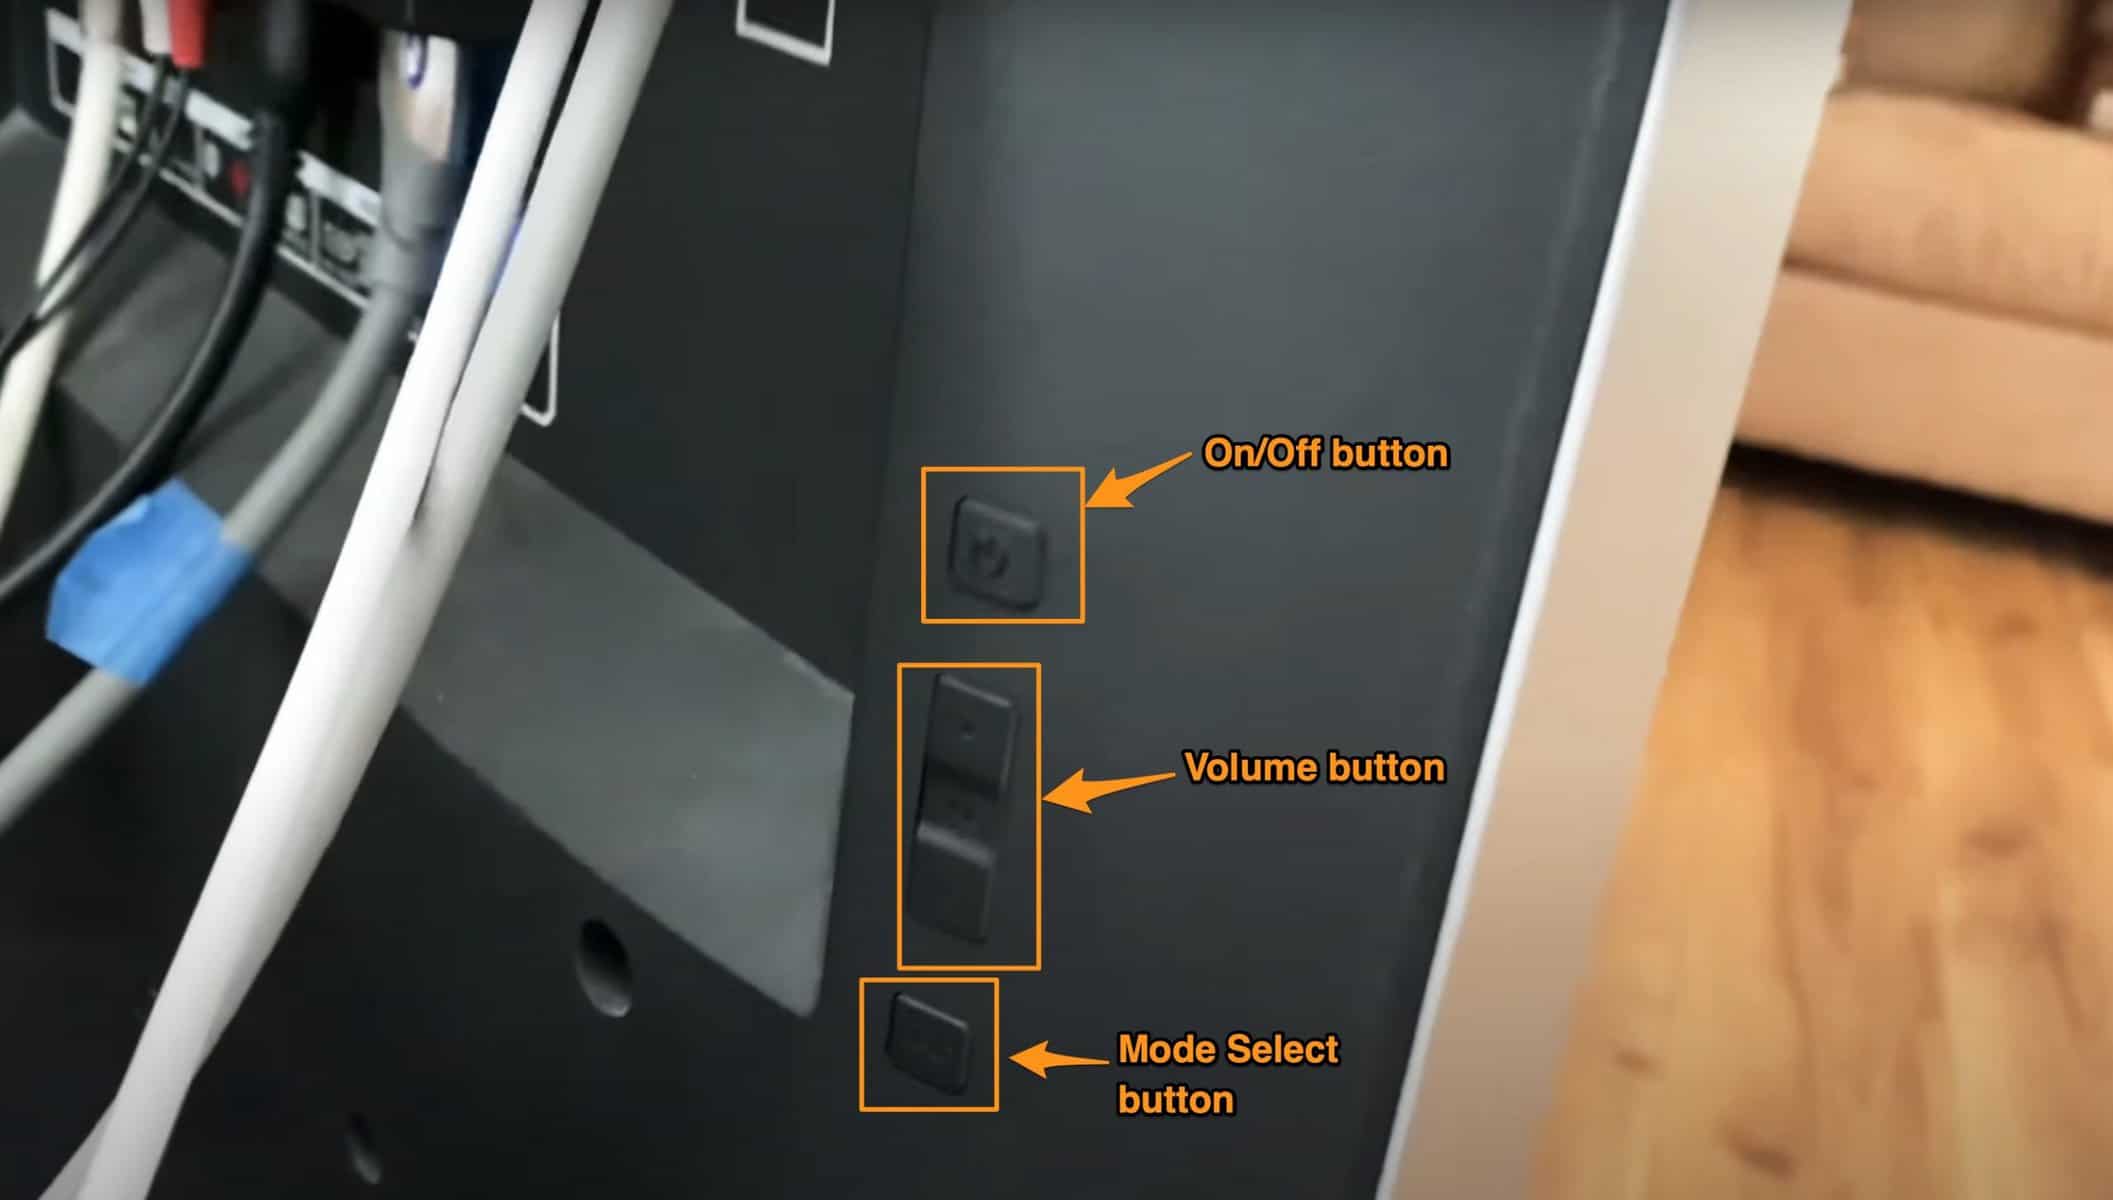
    Every Television has a physical ON/OFF button on it. This button can be multifunctional such as it can turn on/off your TV as well as doing some other tasks like Turning volume up/down or Switching between channels and modes.

    Even if we go with the basic functionality of the button then still you will be able to turn the TV ON or OFF using the physical button on the TV.

    On Vizio, The Physical button on the TV can be situated at the bottom center or bottom right corner of your TV. Just identify the physical button and use it to operate the TV until your problem is solved.

    Vizio TV On/Off physical buttons

    #2: Turn on Vizio TV using Vizio Smartcast App (Users Recommended)

    This method is by far the most popular method among Vizio users. Connecting and operating their TV using the Vizio Smartcast app not only gives them full access to all the physical remote functionalities but it also enhances user experience by offering On-Screen Keyboard and trackpad-like functionality for easy scrolling through options.

    Step 1: For using the Vizio TV Smartcast app to control your TV, Follow these steps.

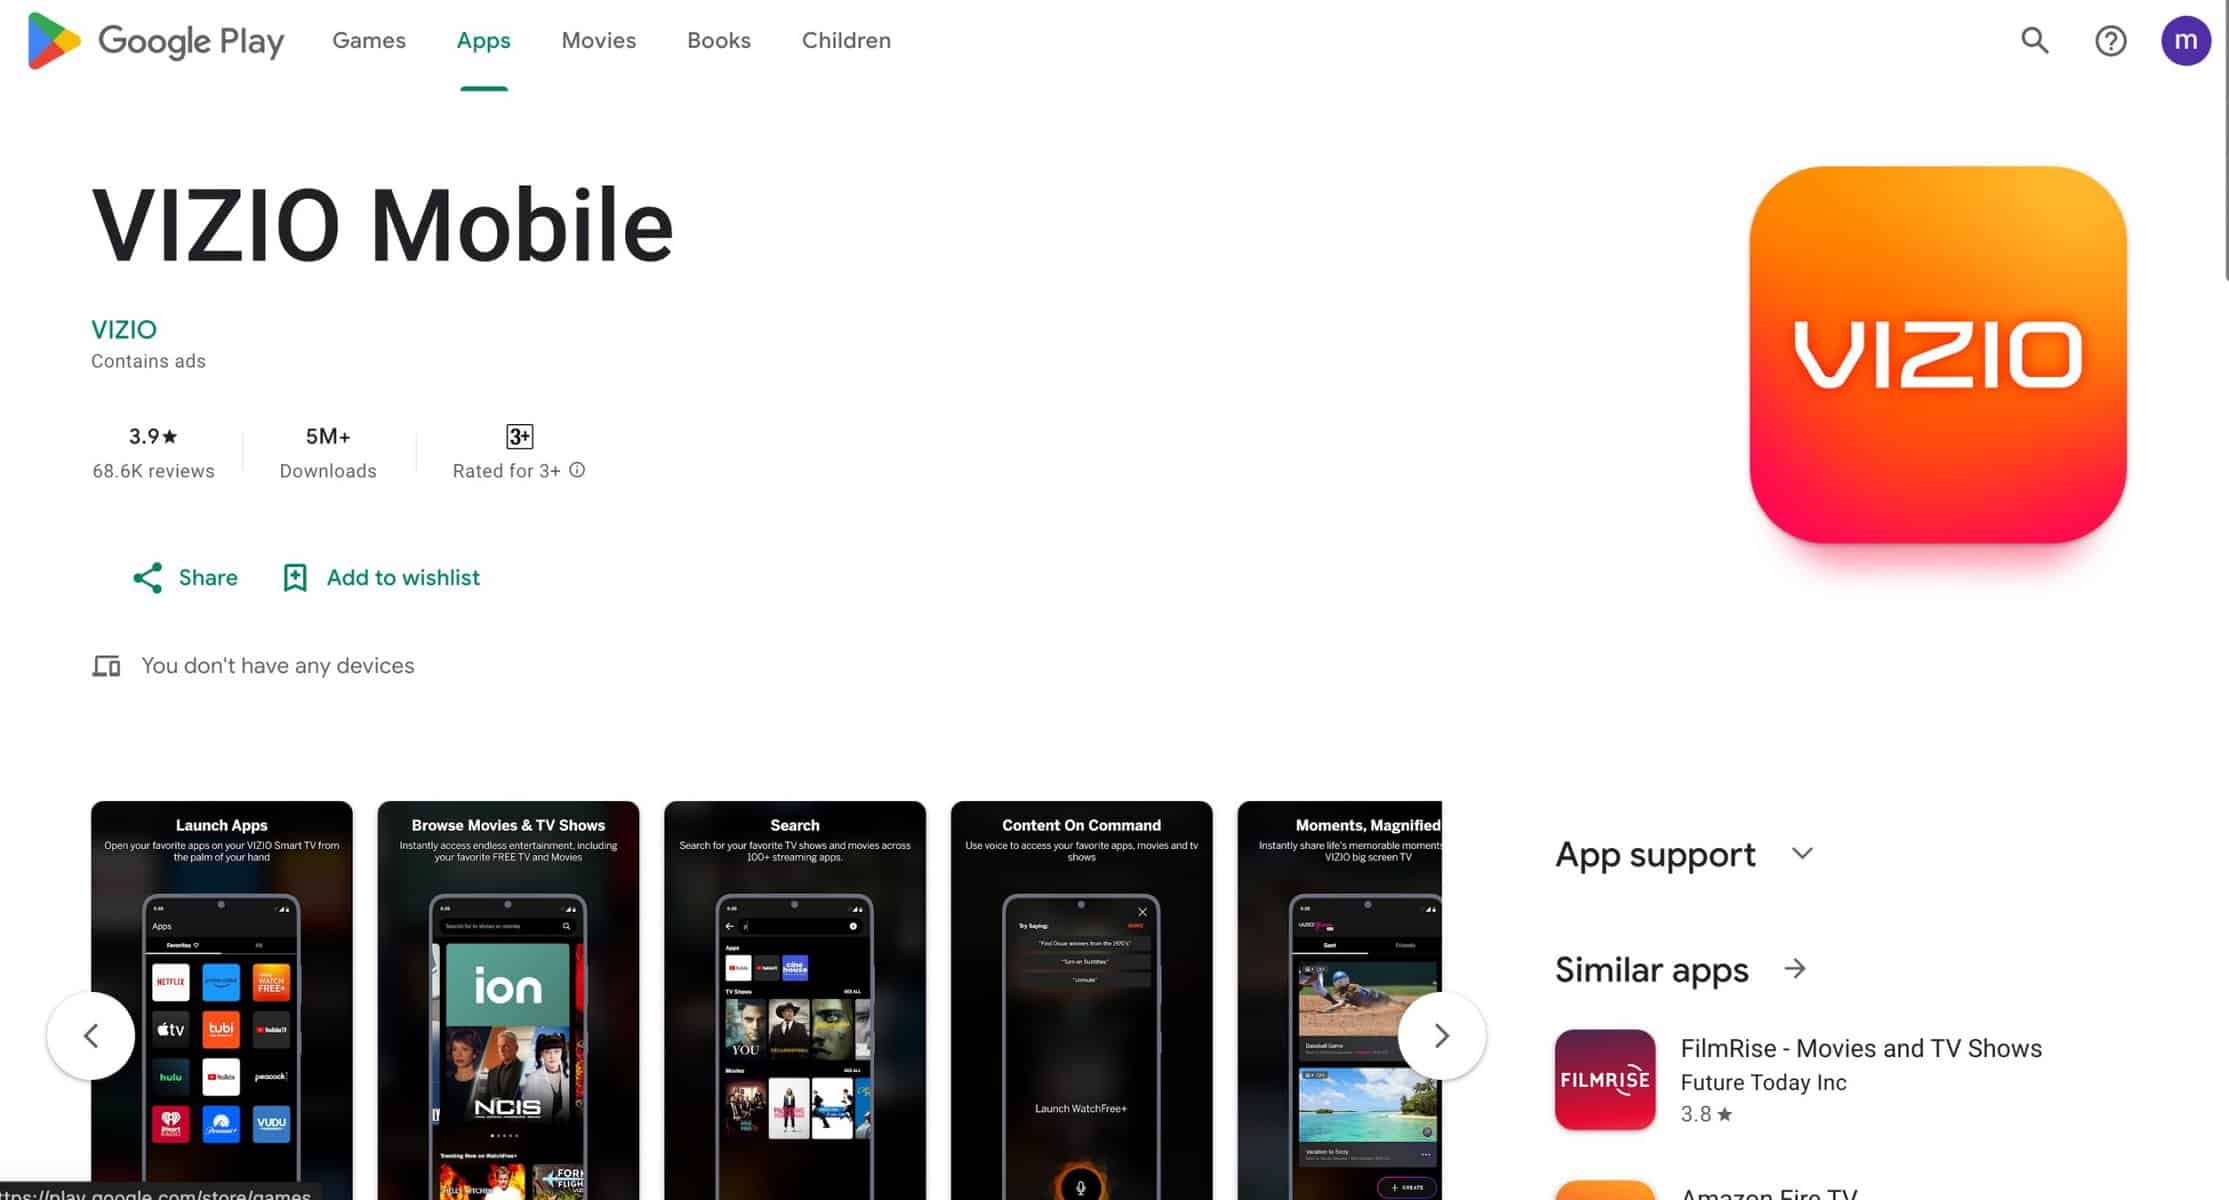
    Step 2: Go to the Play Store on Android or App Store on iPhone/iPad.

    Step 3: In the search bar, Type “Vizio Smartcast” and download the official Vizio Smartcast app on Play Store similarly you can download the Vizio Smartcast app for iPhone too.

    Vizio TV remote app

    Step 4: Once you have the app downloaded and installed on your phone, launch the app on your device.

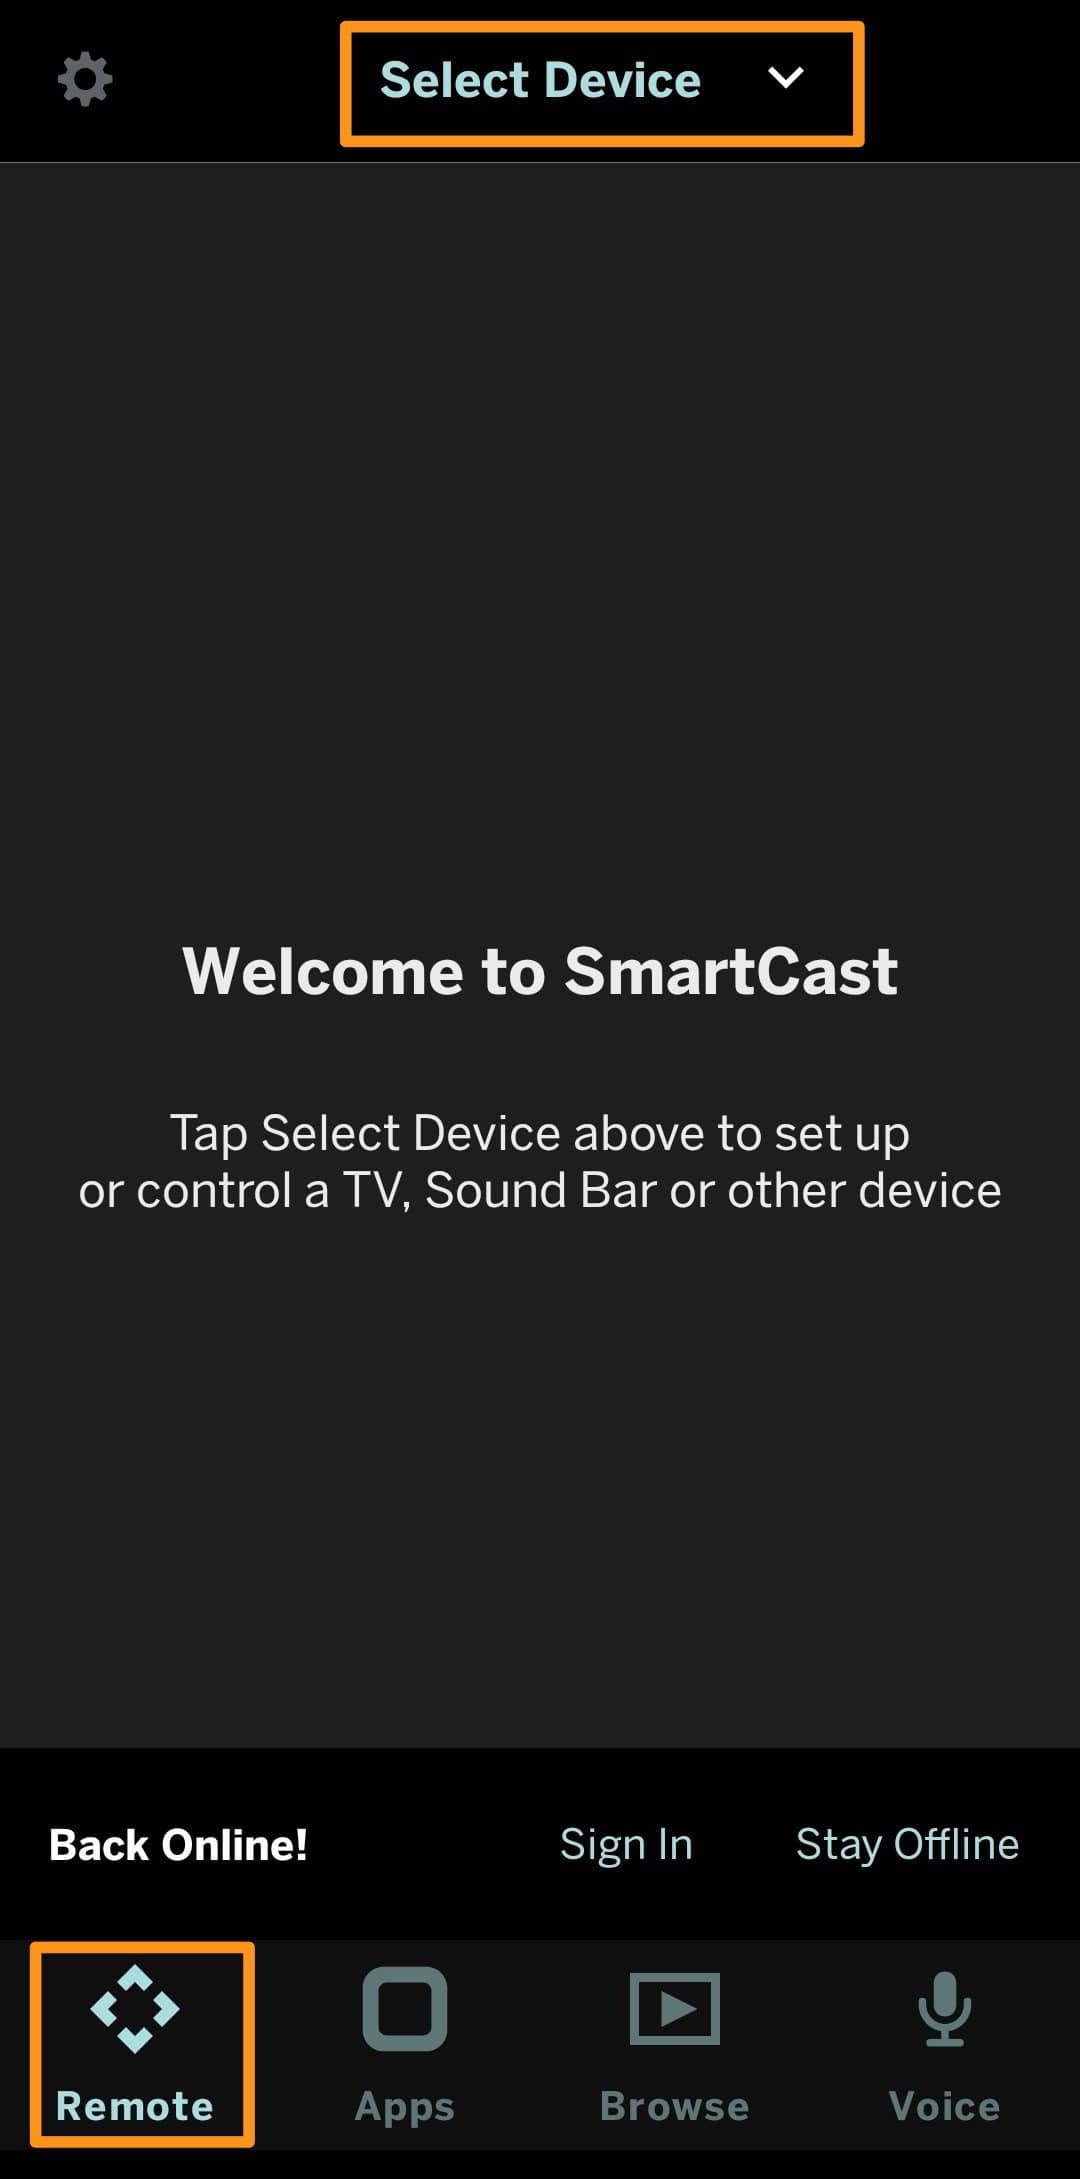
    Step 5: Go to the Remote tab and click “Select Device” at the top.

    Turn On vizio TV using Vizio App

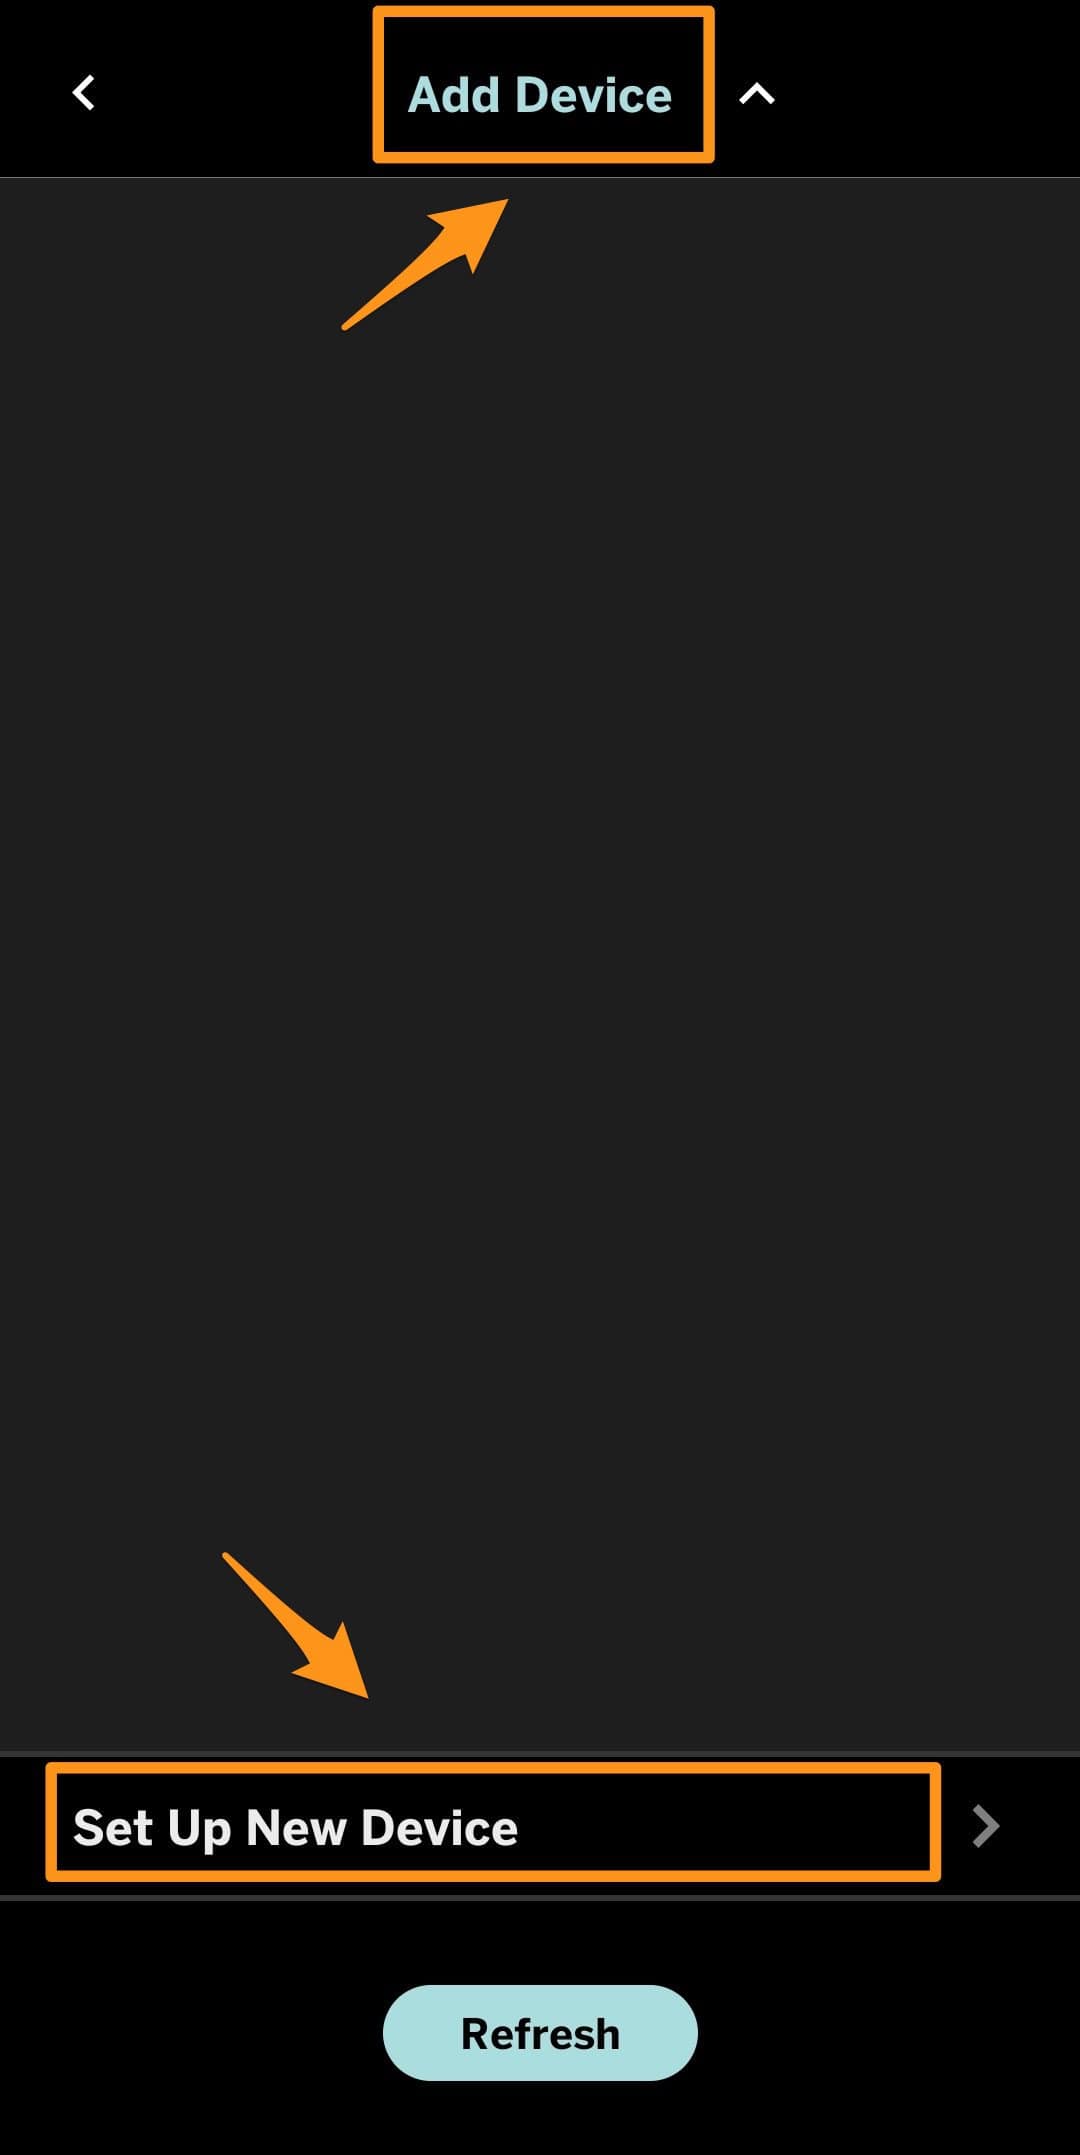
    Step 6: Click the “Get Started” button to automatically detect the device and add it to the list. Else, Click the “Setup New Device” button to add the Vizio TV to the Smartcast app Manually.

    add device vizio smartcast app

    Step 7: Once you have added the device successfully, Click the device icon and you’ll get a virtual Vizio TV remote on your mobile. You can use this remote to turn ON the TV as well as Turn OFF it, The remote will also help you to Turn the Volume UP/DOWN, Change between channels and input methods, and do other TV-related settings.

    Also Read the DirecTV Channel Guide to find your favorite channel’s number on the DirecTV network.

    #3: Turn On Vizio TV Using PS4 and Nintendo Switch (Alternate Method)

    Many people don’t know this but you can also Turn ON your Vizio TV Using gaming consoles like Play Station 4 and Nintendo Switch

    Here is the Step-by-Step guide on connecting and using PS4 and Nintendo Switch to turn on the Vizio TV.

    PlayStation 4

    1. Connect your PS4 to Vizio TV using the HDMI Cable. You can the HDMI input socket on both devices on the back side.
    2. Once connected, Turn on Your Play Station 4 select “Settings” and click “System” from the menu.
    3. Tick the Checkbox that says Enable HDMI Device Link.
    4. Now when you turn on the Play Station 4, The Vizio TV will also turn on automatically with it. This way you can easily Turn it ON without any remote.

    Nintendo Switch

    1. Connect your Nintendo Switch to Vizio TV using the connector you have.
    2. Turn on the Switch and select Settings >> System
    3. From the left-side menu, Select the TV Settings option scroll down to the text that says “Match TV Power State” and turn it ON.
    4. Now, Turn OFF your Nintendo Switch and Turn it ON again and the Vizio TV will automatically Turn ON with it.

    #4. Replace your Remote

    If the remote is not working correctly or it is broken then it is recommended to replace it with a different remote. You can purchase a Vizio TV remote or any Universal TV Remote from your local vendor or online from the official Vizio website.

    For some reason, if you are not able to find the perfect match for your previous Vizio Remote then you can opt for GE Universal TV Remote and set it up using Remote codes to Turn on your TV and also perform basic TV functions.

    Xbox One and other users can also connect their gaming console to the TV and turn it ON using the same methods.

    Final Words:

    If your Vizio Remote is not working then try replacing the batteries or use the physical buttons on your TV to quickly turn it ON/OFF. For the long term, you might have to buy a new Vizio remote or any other universal Remote such as a GE universal Remote.

    However, the best way according to us is that you use physical TV buttons to Turn your TV ON and then the Vizio Mobile app to Operate other functions.


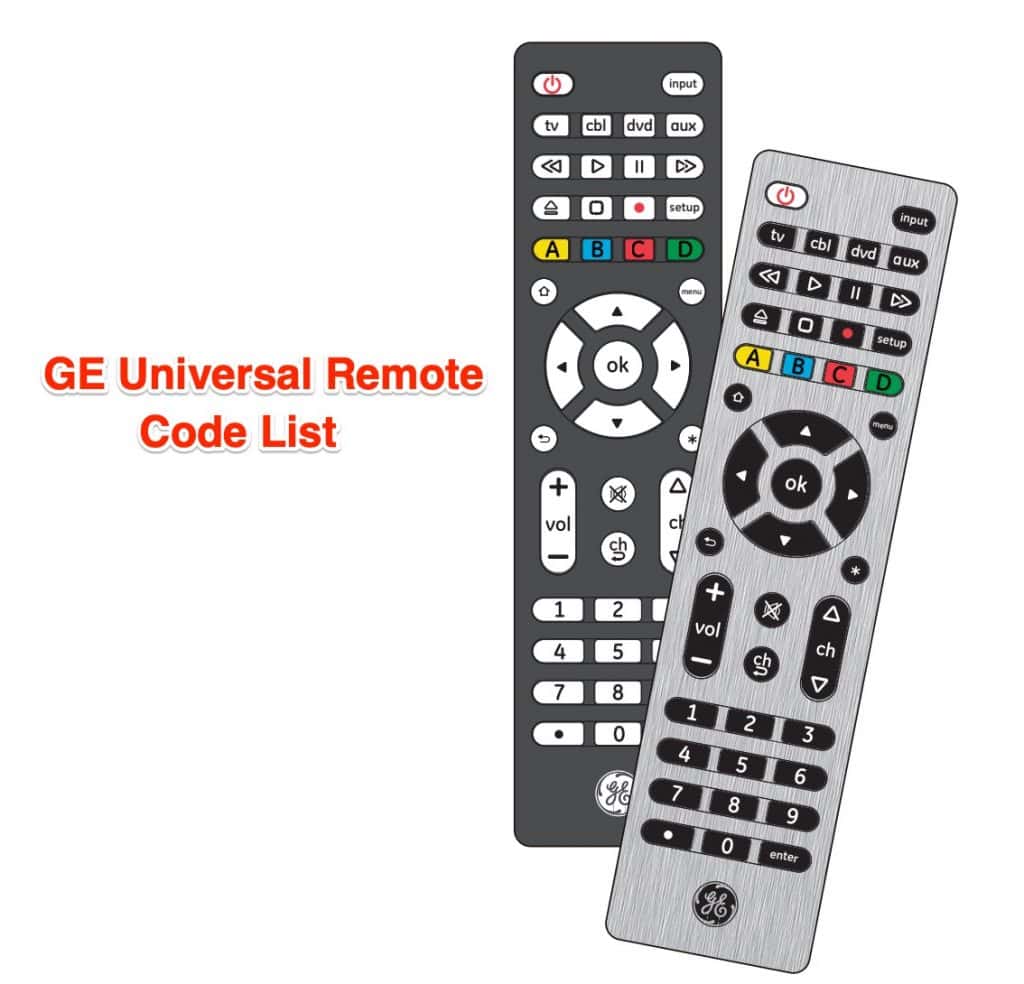
  • GE Universal Remote Codes List & Program Guide [Latest]

    GE Universal Remote Codes List & Program Guide [Latest]

    GE Universal remote is a one-stop destination for all your Remote controlling needs. The main USP of this remote is that you can control multiple devices such as a TV, Speaker, Home theatre, Amazon Fire TV stick, DVD Player, VCR, Cable set-top Box, and other devices using a single remote. It is really easy to program the GE universal remote and using the codes you can pair it with multiple devices in your house.

    Universal remote controls are known to ease our life by reducing the need of having and maintaining multiple remote controls. It also allows you to pair your Remote to any device if you have lost the remote or the remote is not working. This makes it easy to use GE universal remote by just pairing it with any device using the GE universal remote codes. You can watch videos on your TV or even download videos from the internet that too directly on your TV using the GE remote.

    This article will help you to understand how you can program your GE Remote control and use it with any device using the remote code list.

    What is GE Universal Remote?

    GE or General Electric Universal Remote is a multi-purpose remote Control that helps you to control and manage multiple devices using a single remote control. The Remote control can be paired with one or multiple devices using the Remote codes. These codes are specific to each individual device and you have to use the specific code to pair it with that specific device.

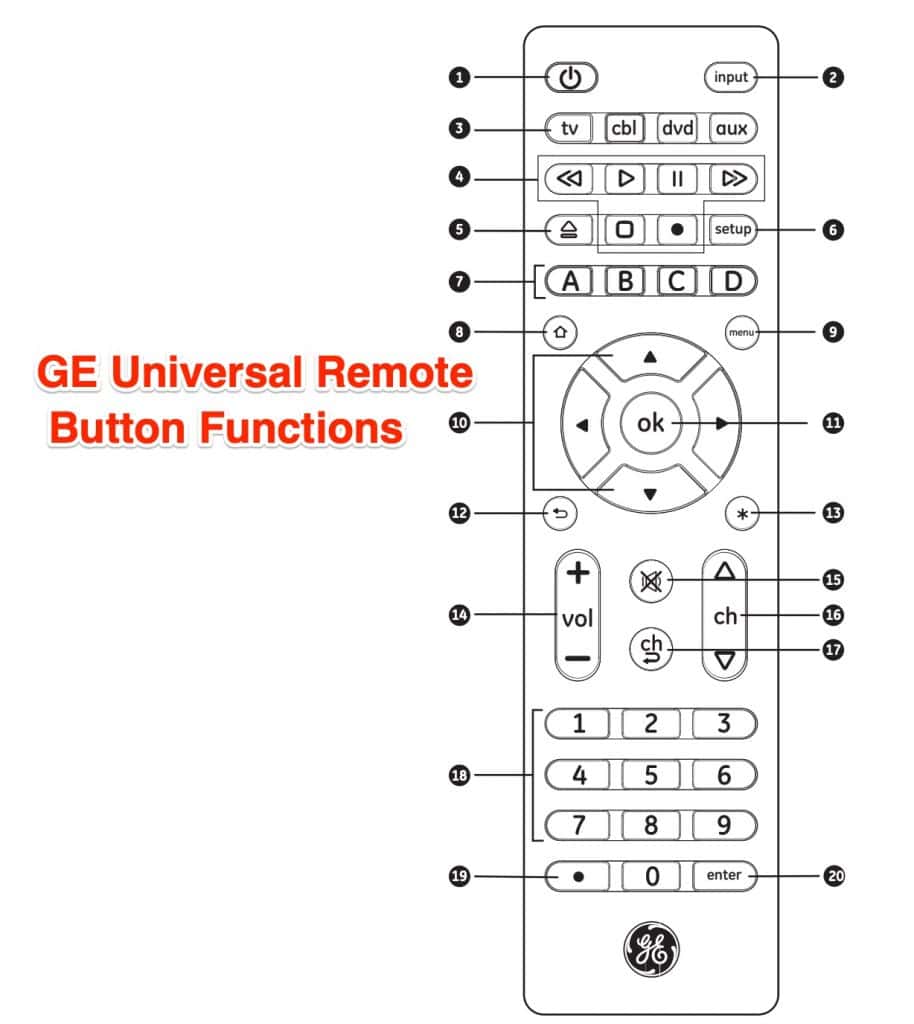
    The GE universal remote has many functions and features that make it a popular choice among consumers. The remote control can be used to operate any old device such as a DVD or VCR player to some newly launched devices such as Roku & Apple TV media players, TV, Blu-ray, Home theatre, Projectors, Cable TV, etc.

    Below are some of the features of the General Electric Universal Remote.

    • Control Multiple Multimedia devices like Apple TV, Roku, Blu-ray, Home theatres, DVD, and VCR Player.
    • Can be used as a replacement for a lost remote.
    • Pre-programmed remote codes for compatibility with over 100+ devices and brands.
    • Easy to use and intuitive.
    • Fast connection.
    • GE universal Remote is easy to program with any hardware device.

    Program GE Universal Remote

    As from the above paragraph, you have already understood what GE universal remote is and its features. Let’s now discuss the methods used to program the GE remote with any device. This process is simple but some people might find it difficult to setup the remote due to the long setup process. Please read the article carefully and follow the step-by-step guide to successfully pair your GE universal remote with other devices.

    There are mainly two ways to pair the GE universal Remote to your device. Whether you want to pair it with a DVD/ VCR Player or some modern Media players like Roku, Amazon Fire TV, or Apple TV, These two methods can be used. Let’s See the first and second methods to understand the pairing process.

    Method 1 – Program GE Universal Remote using Code

    The most popular and easiest method to pair your GE remote control with other multimedia devices is by programming the remote for that device using the codes. There are mainly two ways to find these remote codes. the First method is to get a list of codes from your local GE retailer or by reading the user manual and the second method is to use an online website to get a list of codes. Thankfully, we will be sharing a complete list of codes that are used to connect the GE remote to any device.

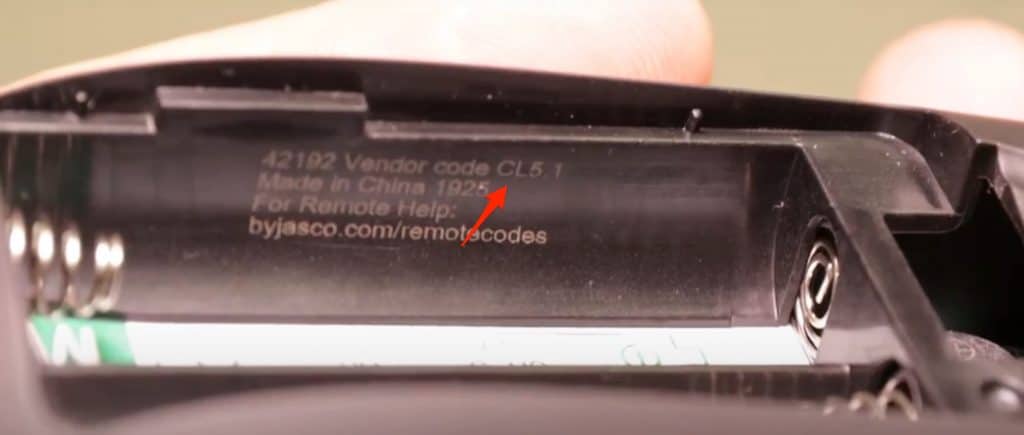
    Step 1: Find the Version code for your GE Remote

    Every GE universal remote has a version code. The version code is used to determine the version of the GE remote and the specific code list for that remote can be used after you find out the correct code. To view the Version code for your GE universal remote, remove the batteries from the remote and look for the text that says “Version Code CL4” or “Version Code CL5” There are a total of 4 version codes and they are as follows – CL3, CL4, CL5, CL6.

    GE remote types

    Step 2: Add the Remote code to your GE remote.

    Once you know the remote code for your device, Go to the Codes list section of this article (Scroll down below to find all the codes) or use the manual provided with the remote to find the Remote code. Once, you have the code for the specific device that you want to connect, Follow these steps.

    • Connect your TV to the Power port but do not turn it on.
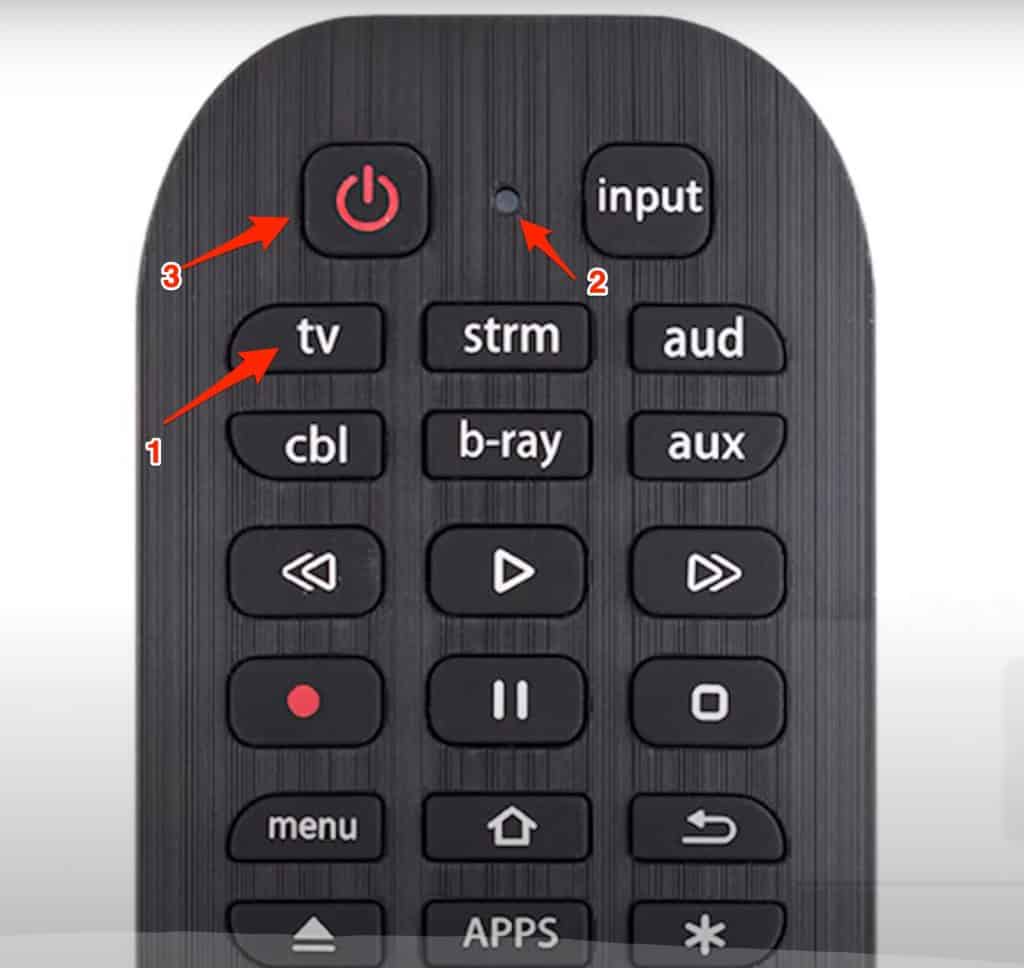
    • Press and hold the setup button for a few seconds until the light on the remote turns RED.
    • Press the TV button situated just under the Power off button.
    • Enter the Exact 4-digit code for that specific device that you found in this article or in the user manual. (Upon entering the 4-digit code, the red light will turn OFF)
    • Finally, Turn on the TV using the GE universal remote. If the TV turns on without any issue then the remote is paired successfully or else repeat steps 2 to 4 again.
    • Try the volume and other keys when the TV is turned on to check if all the buttons are working properly or not. If you face any issues or glitches while using the remote then check out the GE troubleshooting methods given in this article.
    setup ge universal remote with code

    Step 3: Check the pairing

    Once you have paired it with the desired device and the device is operating properly then we suggest you check all the keys on the remote and see if the keys are doing the work as expected. You can use the same method and steps given above to pair other devices with your GE universal remote using codes.

    Method 2 – Use GE Universal Remote without the codes

    This is the second method to pair your GE universal remote without using any codes. This is an easy method and requires only a few steps to complete the pairing process. If the previous method does not work for you then you can try using this method and get your TV or any other device working with GE universal remote. Follow the below-mentioned steps carefully to pair your device to GE remote.

    • Switch on your TV or any other device that you want to pair.
    • Press and hold the setup button on your GE remote until the red light blinks on the remote.
    • Now press and hold the TV button for a few seconds.
    • Press the power button for a few seconds and release it for 5 seconds and again repeat the same process a few times.
    • In this process of switching off and on the power button, your TV will get paired automatically and only the TV switches off due to the button method you are just performing, it is an indication that the pairing is successful.
    • Now turn on the TV using the Power button on your remote.
    • Finally, try using other keys on your remote to see if they are functioning properly and giving the expected output.

    GE Universal Remote Codes for TV

    GE remote code list
    BrandCode list
    Pioneer0401, 1221, 1981, 0001, 1371, 1511, 1841, 4021, 4662
    Sony1071, 5811, 5321, 4981, 1901, 2741
    Toshiba1311, 5531, 1121, 2691, 0211, 0341, 0821, 151, 1801, 1841, 1911, 4891, 4941, 5081
    Samsung5791, 5801, 3301
    LG6021, 0001, 5511, 3001, 1911, 1181, 1221
    Panasonic5821, 1573, 6231, 5201, 5551, 5561
    Sharp6011, 5341, 6251, 6001, 3191, 6171, 5941
    Philips0181, 6241, 6221, 5741, 6261, 6051, 0201, 0911, 3981, 4261
    JVC5071, 6271, 1481, 5781, 5281, 0901, 0771, 0481
    Hitachi6301, 1041, 6171, 4331, 0925
    RCA0131, 1001, 2851, 2361, 1731, 4921, 3431, 2481, 2121, 2131, 0691, 3572, 2381
    Vizio0081
    Insignia2891, 0371, 6381, 6171, 2271, 0141, 6481, 0581, 0871, 0921, 2241, 6181, 2921, 3761, 4371, 4721, 4761, 5051, 5061, 5181
    Sanyo1161, 5261, 2891, 5251
    Dynex3141, 5311, 3161, 6521, 0371, 2891
    Element5421, 1091, 1651, 5361, 5341, 2401, 5471, 5831, 5841, 6021
    Westing House5971, 5981, 5781, 3241, 1891, 2141, 0111, 2281
    Hisense6161, 1651, 6251, 6171, 20181, 5331, 2211, 2141, 5341, 0001, 0671, 4391
    TCL6171, 5961, 6031, 5771, 6201
    Magnavision5741, 4191, 4761, 0975, 4641, 4261, 0141
    Akai0191, 5891, 5901, 5911, 5921, 6041, 3215, 0331, 4151, 4461, 5141, 5171
    AOC4261, 961
    Coby3351, 2521, 2511, 2531, 5091, 5191, 2541, 2551
    Apex2521, 6081, 6101, 0045, 4841, 0191, 1891, 0425, 0431, 0671, 1025, 1105, 5111, 0245
    Curtis2121, 2141, 2361, 2371, 5411, 1881, 1891
    Polaroid2401, 5541, 6491, 4631, 091, 5411, 1961, 0581, 6101, 2271, 2311, 2451, 5132
    Sylvania1381, 2761, 0371, 4761, 3701, 0141, 0201, 0231, 0941, 0951, 0001, 0321, 0931, 0961, 1021, 1221, 1801, 1821, 4731
    RCA2131, 5881, 6391, 5421, 5781, 1651, 2361, 4771, 2761, 4191, 0221, 1731
    Proscan2131, 5881, 6391, 5421, 5781, 1651, 2361, 4771, 2761, 4191, 0221, 1731
    Magnavox2131, 5881, 6391, 5421, 5781, 1651, 2361, 4771, 2761, 4191, 0221, 1731
    Proton0001, 0391, 0641, 1221, 1911, 2231, 4211, 4221, 4271
    Viore5431, 1421, 1881, 2141, 2831, 2841, 3681
    Curtis Mathes0351, 1552, 5351, 5371, 0001, 0261, 1221, 1661, 4011, 4941
    Emerson2761, 5761, 5231, 5221, 5831, 5561, 5421, 0141, 0201, 2891, 4731, 1651
    Dynex3141, 5311, 3161, 6521, 0371, 2891
    JVC5071, 6271, 1481, 5781, 5281, 0901, 0771, 0481
    Pioneer0401, 1221, 1981, 0001, 1371, 1511, 1841, 4021, 4662
    Panasonic5821, 1573, 6231, 5201, 5551, 5561
    Magnavox2131, 5881, 6391, 5421, 5781, 1651, 2361, 4771, 2761, 4191, 0221, 1731
    Toshiba1311, 5531, 1121, 2691, 0211, 0341, 0821, 151, 1801, 1841, 1911, 4891, 4941, 5081
    Sony1071, 5811, 5321, 4981, 1901, 2741
    Samsung5791, 5801, 3301
    Philips0181, 6241, 6221, 5741, 6261, 6051, 0201, 0911, 3981, 4261
    LG6021, 0001, 5511, 3001, 1911, 1181, 1221
    Sharp6011, 5341, 6251, 6001, 3191, 6171, 5941
    Toshiba1311, 5531, 1121, 2691, 0211, 0341, 0821, 151, 1801, 1841, 1911, 4891, 4941, 5081
    Sanyo1161, 5261, 2891, 5251
    JVC5071, 6271, 1481, 5781, 5281, 0901, 0771, 0481
    Samsung5791, 5801, 3301
    Panasonic5821, 1573, 6231, 5201, 5551, 5561
    Toshiba1311, 5531, 1121, 2691, 0211, 0341, 0821, 151, 1801, 1841, 1911, 4891, 4941, 5081
    Sony1071, 5811, 5321, 4981, 1901, 2741
    Pioneer0401, 1221, 1981, 0001, 1371, 1511, 1841, 4021, 4662
    Magnavox2131, 5881, 6391, 5421, 5781, 1651, 2361, 4771, 2761, 4191, 0221, 1731
    Sharp6011, 5341, 6251, 6001, 3191, 6171, 5941
    LG6021, 0001, 5511, 3001, 1911, 1181, 1221
    Philips0181, 6241, 6221, 5741, 6261, 6051, 0201, 0911, 3981, 4261
    Proscan2131, 5881, 6391, 5421, 5781, 1651, 2361, 4771, 2761, 4191, 0221, 1731
    Hitachi6301, 1041, 6171, 4331, 0925
    Toshiba1311, 5531, 1121, 2691, 0211, 0341, 0821, 151, 1801, 1841, 1911, 4891, 4941, 5081
    Samsung5791, 5801, 3301
    Sony1071, 5811, 5321, 4981, 1901, 2741
    Pioneer0401, 1221, 1981, 0001, 1371, 1511, 1841, 4021, 4662
    Philips0181, 6241, 6221, 5741, 6261, 6051, 0201, 0911, 3981, 4261
    LG6021, 0001, 5511, 3001, 1911, 1181, 1221
    Magnavision5741, 4191, 4761, 0975, 4641, 4261, 0141
    Toshiba1311, 5531, 1121, 2691, 0211, 0341, 0821, 151, 1801, 1841, 1911, 4891, 4941, 5081
    Sony1071, 5811, 5321, 4981, 1901, 2741
    Samsung5791, 5801, 3301
    Panasonic5821, 1573, 6231, 5201, 5551, 5561
    Pioneer0401, 1221, 1981, 0001, 1371, 1511, 1841, 4021, 4662
    Sharp6011, 5341, 6251, 6001, 3191, 6171, 5941
    Toshiba1311, 5531, 1121, 2691, 0211, 0341, 0821, 151, 1801, 1841, 1911, 4891, 4941, 5081
    Samsung5791, 5801, 3301
    LG6021, 0001, 5511, 3001, 1911, 1181, 1221
    Philips0181, 6241, 6221, 5741, 6261, 6051, 0201, 0911, 3981, 4261
    JVC5071, 6271, 1481, 5781, 5281, 0901, 0771, 0481
    RCA0131, 1001, 2851, 2361, 1731, 4921, 3431, 2481, 2121, 2131, 0691, 3572, 2381
    Toshiba1311, 5531, 1121, 2691, 0211, 0341, 0821, 151, 1801, 1841, 1911, 4891, 4941, 5081
    Toshiba1311, 5531, 1121, 2691, 0211, 0341, 0821, 151, 1801, 1841, 1911, 4891, 4941, 5081
    RCA0131, 1001, 2851, 2361, 1731, 4921, 3431, 2481, 2121, 2131, 0691, 3572, 2381
    Panasonic5821, 1573, 6231, 5201, 5551, 5561
    Toshiba1311, 5531, 1121, 2691, 0211, 0341, 0821, 151, 1801, 1841, 1911, 4891, 4941, 5081
    Samsung5791, 5801, 3301
    LG6021, 0001, 5511, 3001, 1911, 1181, 1221
    Philips0181, 6241, 6221, 5741, 6261, 6051, 0201, 0911, 3981, 4261
    Sony1071, 5811, 5321, 4981, 1901, 2741
    Pioneer0401, 1221, 1981, 0001, 1371, 1511, 1841, 4021, 4662
    Magnavox2131, 5881, 6391, 5421, 5781, 1651, 2361, 4771, 2761, 4191, 0221, 1731
    Toshiba1311, 5531, 1121, 2691, 0211, 0341, 0821, 151, 1801, 1841, 1911, 4891, 4941, 5081
    Sanyo1161, 5261, 2891, 5251
    JVC5071, 6271, 1481, 5781, 5281, 0901, 0771, 0481
    Samsung5791, 5801, 3301
    Proscan2131, 5881, 6391, 5421, 5781, 1651, 2361, 4771, 2761, 4191, 0221, 1731
    Dynex3141, 5311, 3161, 6521, 0371, 2891
    Hisense6161, 1651, 6251, 6171, 20181, 5331, 2211, 2141, 5341, 0001, 0671, 4391
    Magnavision5741, 4191, 4761, 0975, 4641, 4261, 0141
    Viore5431, 1421, 1881, 2141, 2831, 2841, 3681
    Polaroid2401, 5541, 6491, 4631, 091, 5411, 1961, 0581, 6101, 2271, 2311, 2451, 5132
    Magnavox2131, 5881, 6391, 5421, 5781, 1651, 2361, 4771, 2761, 4191, 0221, 1731
    Dynex3141, 5311, 3161, 6521, 0371, 2891
    TCL6171, 5961, 6031, 5771, 6201
    Coby3351, 2521, 2511, 2531, 5091, 5191, 2541, 2551
    Insignia2891, 0371, 6381, 6171, 2271, 0141, 6481, 0581, 0871, 0921, 2241, 6181, 2921, 3761, 4371, 4721, 4761, 5051, 5061, 5181
    AOC4261, 961
    Apex2521, 6081, 6101, 0045, 4841, 0191, 1891, 0425, 0431, 0671, 1025, 1105, 5111, 0245
    Sylvania1381, 2761, 0371, 4761, 3701, 0141, 0201, 0231, 0941, 0951, 0001, 0321, 0931, 0961, 1021, 1221, 1801, 1821, 4731
    Curtis2121, 2141, 2361, 2371, 5411, 1881, 1891
    Element5421, 1091, 1651, 5361, 5341, 2401, 5471, 5831, 5841, 6021
    Westing House5971, 5981, 5781, 3241, 1891, 2141, 0111, 2281
    Hitachi6301, 1041, 6171, 4331, 0925
    Viore5431, 1421, 1881, 2141, 2831, 2841, 3681
    AOC4261, 961
    Viore5431, 1421, 1881, 2141, 2831, 2841, 3681
    Toshiba1311, 5531, 1121, 2691, 0211, 0341, 0821, 151, 1801, 1841, 1911, 4891, 4941, 5081
    Philips0181, 6241, 6221, 5741, 6261, 6051, 0201, 0911, 3981, 4261
    Coby3351, 2521, 2511, 2531, 5091, 5191, 2541, 2551
    Curtis2121, 2141, 2361, 2371, 5411, 1881, 1891
    Sony1071, 5811, 5321, 4981, 1901, 2741
    Panasonic5821, 1573, 6231, 5201, 5551, 5561
    Apex2521, 6081, 6101, 0045, 4841, 0191, 1891, 0425, 0431, 0671, 1025, 1105, 5111, 0245
    TCL6171, 5961, 6031, 5771, 6201
    Hitachi6301, 1041, 6171, 4331, 0925
    Pioneer0401, 1221, 1981, 0001, 1371, 1511, 1841, 4021, 4662
    Insignia2891, 0371, 6381, 6171, 2271, 0141, 6481, 0581, 0871, 0921, 2241, 6181, 2921, 3761, 4371, 4721, 4761, 5051, 5061, 5181
    Sylvania1381, 2761, 0371, 4761, 3701, 0141, 0201, 0231, 0941, 0951, 0001, 0321, 0931, 0961, 1021, 1221, 1801, 1821, 4731
    Westing House5971, 5981, 5781, 3241, 1891, 2141, 0111, 2281
    RCA0131, 1001, 2851, 2361, 1731, 4921, 3431, 2481, 2121, 2131, 0691, 3572, 2381
    Hitachi6301, 1041, 6171, 4331, 0925
    Proscan2131, 5881, 6391, 5421, 5781, 1651, 2361, 4771, 2761, 4191, 0221, 1731
    AOC4261, 961
    Sylvania1381, 2761, 0371, 4761, 3701, 0141, 0201, 0231, 0941, 0951, 0001, 0321, 0931, 0961, 1021, 1221, 1801, 1821, 4731
    Sanyo1161, 5261, 2891, 5251
    JVC5071, 6271, 1481, 5781, 5281, 0901, 0771, 0481
    Coby3351, 2521, 2511, 2531, 5091, 5191, 2541, 2551
    Hisense6161, 1651, 6251, 6171, 20181, 5331, 2211, 2141, 5341, 0001, 0671, 4391
    Curtis2121, 2141, 2361, 2371, 5411, 1881, 1891
    JVC5071, 6271, 1481, 5781, 5281, 0901, 0771, 0481
    Polaroid2401, 5541, 6491, 4631, 091, 5411, 1961, 0581, 6101, 2271, 2311, 2451, 5132
    Apex2521, 6081, 6101, 0045, 4841, 0191, 1891, 0425, 0431, 0671, 1025, 1105, 5111, 0245
    Proton0001, 0391, 0641, 1221, 1911, 2231, 4211, 4221, 4271
    Curtis Mathes0351, 1552, 5351, 5371, 0001, 0261, 1221, 1661, 4011, 4941
    Curtis Mathes0351, 1552, 5351, 5371, 0001, 0261, 1221, 1661, 4011, 4941
    Curtis Mathes0351, 1552, 5351, 5371, 0001, 0261, 1221, 1661, 4011, 4941
    Viore5431, 1421, 1881, 2141, 2831, 2841, 3681
    Curtis Mathes0351, 1552, 5351, 5371, 0001, 0261, 1221, 1661, 4011, 4941
    Curtis Mathes0351, 1552, 5351, 5371, 0001, 0261, 1221, 1661, 4011, 4941
    Insignia2891, 0371, 6381, 6171, 2271, 0141, 6481, 0581, 0871, 0921, 2241, 6181, 2921, 3761, 4371, 4721, 4761, 5051, 5061, 5181
    Apex2521, 6081, 6101, 0045, 4841, 0191, 1891, 0425, 0431, 0671, 1025, 1105, 5111, 0245
    AOC4261, 961
    Element5421, 1091, 1651, 5361, 5341, 2401, 5471, 5831, 5841, 6021
    Apex2521, 6081, 6101, 0045, 4841, 0191, 1891, 0425, 0431, 0671, 1025, 1105, 5111, 0245
    AOC4261, 961
    Apex2521, 6081, 6101, 0045, 4841, 0191, 1891, 0425, 0431, 0671, 1025, 1105, 5111, 0245
    Proscan2131, 5881, 6391, 5421, 5781, 1651, 2361, 4771, 2761, 4191, 0221, 1731
    Curtis Mathes0351, 1552, 5351, 5371, 0001, 0261, 1221, 1661, 4011, 4941
    Proscan2131, 5881, 6391, 5421, 5781, 1651, 2361, 4771, 2761, 4191, 0221, 1731
    Proscan2131, 5881, 6391, 5421, 5781, 1651, 2361, 4771, 2761, 4191, 0221, 1731
    Curtis Mathes0351, 1552, 5351, 5371, 0001, 0261, 1221, 1661, 4011, 4941
    Curtis Mathes0351, 1552, 5351, 5371, 0001, 0261, 1221, 1661, 4011, 4941
    Curtis Mathes0351, 1552, 5351, 5371, 0001, 0261, 1221, 1661, 4011, 4941
    Magnavox2131, 5881, 6391, 5421, 5781, 1651, 2361, 4771, 2761, 4191, 0221, 1731
    Polaroid2401, 5541, 6491, 4631, 091, 5411, 1961, 0581, 6101, 2271, 2311, 2451, 5132
    Toshiba1311, 5531, 1121, 2691, 0211, 0341, 0821, 151, 1801, 1841, 1911, 4891, 4941, 5081
    Toshiba1311, 5531, 1121, 2691, 0211, 0341, 0821, 151, 1801, 1841, 1911, 4891, 4941, 5081
    Insignia2891, 0371, 6381, 6171, 2271, 0141, 6481, 0581, 0871, 0921, 2241, 6181, 2921, 3761, 4371, 4721, 4761, 5051, 5061, 5181
    JVC5071, 6271, 1481, 5781, 5281, 0901, 0771, 0481
    Magnavox2131, 5881, 6391, 5421, 5781, 1651, 2361, 4771, 2761, 4191, 0221, 1731
    Hitachi6301, 1041, 6171, 4331, 0925
    Toshiba1311, 5531, 1121, 2691, 0211, 0341, 0821, 151, 1801, 1841, 1911, 4891, 4941, 5081
    LG6021, 0001, 5511, 3001, 1911, 1181, 1221
    Curtis2121, 2141, 2361, 2371, 5411, 1881, 1891
    Insignia2891, 0371, 6381, 6171, 2271, 0141, 6481, 0581, 0871, 0921, 2241, 6181, 2921, 3761, 4371, 4721, 4761, 5051, 5061, 5181
    Panasonic5821, 1573, 6231, 5201, 5551, 5561
    Sanyo1161, 5261, 2891, 5251
    Toshiba1311, 5531, 1121, 2691, 0211, 0341, 0821, 151, 1801, 1841, 1911, 4891, 4941, 5081
    TCL6171, 5961, 6031, 5771, 6201
    Samsung5791, 5801, 3301
    Samsung5791, 5801, 3301
    Curtis2121, 2141, 2361, 2371, 5411, 1881, 1891
    Westing House5971, 5981, 5781, 3241, 1891, 2141, 0111, 2281
    Curtis2121, 2141, 2361, 2371, 5411, 1881, 1891
    JVC5071, 6271, 1481, 5781, 5281, 0901, 0771, 0481
    Coby3351, 2521, 2511, 2531, 5091, 5191, 2541, 2551
    Pioneer0401, 1221, 1981, 0001, 1371, 1511, 1841, 4021, 4662
    Magnavox2131, 5881, 6391, 5421, 5781, 1651, 2361, 4771, 2761, 4191, 0221, 1731
    Viore5431, 1421, 1881, 2141, 2831, 2841, 3681
    Viore5431, 1421, 1881, 2141, 2831, 2841, 3681
    Sylvania1381, 2761, 0371, 4761, 3701, 0141, 0201, 0231, 0941, 0951, 0001, 0321, 0931, 0961, 1021, 1221, 1801, 1821, 4731
    Viore5431, 1421, 1881, 2141, 2831, 2841, 3681
    Hitachi6301, 1041, 6171, 4331, 0925
    Panasonic5821, 1573, 6231, 5201, 5551, 5561
    LG6021, 0001, 5511, 3001, 1911, 1181, 1221
    Samsung5791, 5801, 3301
    Toshiba1311, 5531, 1121, 2691, 0211, 0341, 0821, 151, 1801, 1841, 1911, 4891, 4941, 5081
    Toshiba1311, 5531, 1121, 2691, 0211, 0341, 0821, 151, 1801, 1841, 1911, 4891, 4941, 5081
    Curtis Mathes0351, 1552, 5351, 5371, 0001, 0261, 1221, 1661, 4011, 4941
    AOC4261, 961
    Westing House5971, 5981, 5781, 3241, 1891, 2141, 0111, 2281
    Toshiba1311, 5531, 1121, 2691, 0211, 0341, 0821, 151, 1801, 1841, 1911, 4891, 4941, 5081
    Toshiba1311, 5531, 1121, 2691, 0211, 0341, 0821, 151, 1801, 1841, 1911, 4891, 4941, 5081
    Magnavision5741, 4191, 4761, 0975, 4641, 4261, 0141
    Philips0181, 6241, 6221, 5741, 6261, 6051, 0201, 0911, 3981, 4261
    Hitachi6301, 1041, 6171, 4331, 0925
    JVC5071, 6271, 1481, 5781, 5281, 0901, 0771, 0481
    Polaroid2401, 5541, 6491, 4631, 091, 5411, 1961, 0581, 6101, 2271, 2311, 2451, 5132
    Dynex3141, 5311, 3161, 6521, 0371, 2891
    TCL6171, 5961, 6031, 5771, 6201
    Viore5431, 1421, 1881, 2141, 2831, 2841, 3681
    Magnavox2131, 5881, 6391, 5421, 5781, 1651, 2361, 4771, 2761, 4191, 0221, 1731
    Proton0001, 0391, 0641, 1221, 1911, 2231, 4211, 4221, 4271
    Proscan2131, 5881, 6391, 5421, 5781, 1651, 2361, 4771, 2761, 4191, 0221, 1731
    Insignia2891, 0371, 6381, 6171, 2271, 0141, 6481, 0581, 0871, 0921, 2241, 6181, 2921, 3761, 4371, 4721, 4761, 5051, 5061, 5181
    Curtis2121, 2141, 2361, 2371, 5411, 1881, 1891
    Curtis Mathes0351, 1552, 5351, 5371, 0001, 0261, 1221, 1661, 4011, 4941
    Polaroid2401, 5541, 6491, 4631, 091, 5411, 1961, 0581, 6101, 2271, 2311, 2451, 5132
    Viore5431, 1421, 1881, 2141, 2831, 2841, 3681
    Hitachi6301, 1041, 6171, 4331, 0925
    Curtis2121, 2141, 2361, 2371, 5411, 1881, 1891
    Dynex3141, 5311, 3161, 6521, 0371, 2891
    Dynex3141, 5311, 3161, 6521, 0371, 2891
    Polaroid2401, 5541, 6491, 4631, 091, 5411, 1961, 0581, 6101, 2271, 2311, 2451, 5132
    JVC5071, 6271, 1481, 5781, 5281, 0901, 0771, 0481
    Curtis2121, 2141, 2361, 2371, 5411, 1881, 1891
    Proscan2131, 5881, 6391, 5421, 5781, 1651, 2361, 4771, 2761, 4191, 0221, 1731
    Toshiba1311, 5531, 1121, 2691, 0211, 0341, 0821, 151, 1801, 1841, 1911, 4891, 4941, 5081
    Toshiba1311, 5531, 1121, 2691, 0211, 0341, 0821, 151, 1801, 1841, 1911, 4891, 4941, 5081
    Insignia2891, 0371, 6381, 6171, 2271, 0141, 6481, 0581, 0871, 0921, 2241, 6181, 2921, 3761, 4371, 4721, 4761, 5051, 5061, 5181
    TCL6171, 5961, 6031, 5771, 6201
    Magnavox2131, 5881, 6391, 5421, 5781, 1651, 2361, 4771, 2761, 4191, 0221, 1731
    Sony1071, 5811, 5321, 4981, 1901, 2741
    Sylvania1381, 2761, 0371, 4761, 3701, 0141, 0201, 0231, 0941, 0951, 0001, 0321, 0931, 0961, 1021, 1221, 1801, 1821, 4731
    Samsung5791, 5801, 3301
    Samsung5791, 5801, 3301
    Curtis Mathes0351, 1552, 5351, 5371, 0001, 0261, 1221, 1661, 4011, 4941
    Proscan2131, 5881, 6391, 5421, 5781, 1651, 2361, 4771, 2761, 4191, 0221, 1731
    Viore5431, 1421, 1881, 2141, 2831, 2841, 3681
    Insignia2891, 0371, 6381, 6171, 2271, 0141, 6481, 0581, 0871, 0921, 2241, 6181, 2921, 3761, 4371, 4721, 4761, 5051, 5061, 5181
    Curtis Mathes0351, 1552, 5351, 5371, 0001, 0261, 1221, 1661, 4011, 4941
    AOC4261, 961
    Dynex3141, 5311, 3161, 6521, 0371, 2891
    Viore5431, 1421, 1881, 2141, 2831, 2841, 3681
    Magnavision5741, 4191, 4761, 0975, 4641, 4261, 0141
    Toshiba1311, 5531, 1121, 2691, 0211, 0341, 0821, 151, 1801, 1841, 1911, 4891, 4941, 5081
    Dynex3141, 5311, 3161, 6521, 0371, 2891
    Proscan2131, 5881, 6391, 5421, 5781, 1651, 2361, 4771, 2761, 4191, 0221, 1731
    Coby3351, 2521, 2511, 2531, 5091, 5191, 2541, 2551
    Magnavox2131, 5881, 6391, 5421, 5781, 1651, 2361, 4771, 2761, 4191, 0221, 1731
    Toshiba1311, 5531, 1121, 2691, 0211, 0341, 0821, 151, 1801, 1841, 1911, 4891, 4941, 5081
    Curtis Mathes0351, 1552, 5351, 5371, 0001, 0261, 1221, 1661, 4011, 4941
    Toshiba1311, 5531, 1121, 2691, 0211, 0341, 0821, 151, 1801, 1841, 1911, 4891, 4941, 5081
    Viore5431, 1421, 1881, 2141, 2831, 2841, 3681
    Panasonic5821, 1573, 6231, 5201, 5551, 5561
    Samsung5791, 5801, 3301
    Curtis2121, 2141, 2361, 2371, 5411, 1881, 1891
    Curtis Mathes0351, 1552, 5351, 5371, 0001, 0261, 1221, 1661, 4011, 4941
    TCL6171, 5961, 6031, 5771, 6201
    Hitachi6301, 1041, 6171, 4331, 0925
    Pioneer0401, 1221, 1981, 0001, 1371, 1511, 1841, 4021, 4662
    Coby3351, 251

    GE Universal Remote code list for Hisense TV

    Depending on the type and model of your Hisense TV, We have devided the list in two sections, GE universal codes for old Hisense TV’s and GE universal codes for new hisense TV’s. Please choose the remote code as per your model type.

    BrandCode list
    Old Hisense TVs0182,6161,0001,6251,4391,3671,5331,6171,2081,4671,2891,2141,2211,5341,0073,1651,0671,4381
    New Hisense TVs2211, 3671, 2081, 2891, 0001, 2141, 4391, 1741, 4671, 0671, 4381, 1651

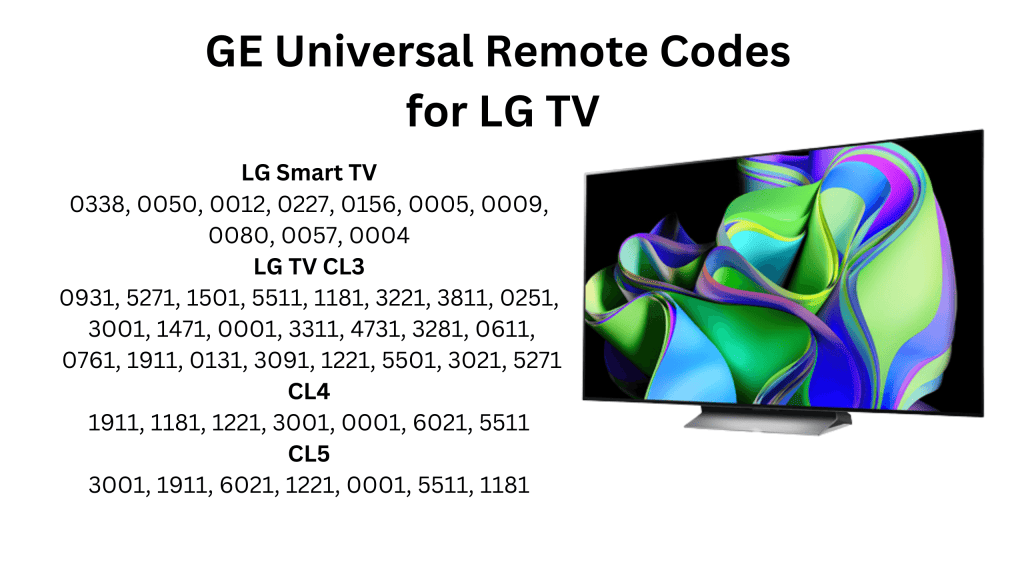
    GE Universal Remote Codes for LG TV

    GE Universal Remote Codes for LG TV
    BrandCode list
    LG Smart TV0338, 0050, 0012, 0227, 0156, 0005, 0009, 0080, 0057, 0004
    LG TV CL30931, 5271, 1501, 5511, 1181, 3221, 3811, 0251, 3001, 1471, 0001, 3311, 4731, 3281, 0611, 0761, 1911, 0131, 3091, 1221, 5501, 3021, 5271
    CL41911, 1181, 1221, 3001, 0001, 6021, 5511
    CL53001, 1911, 6021, 1221, 0001, 5511, 1181

    GE Universal Remote codes for Samsung TV

    BrandCode list
    Samsung Smart TV CL34941, 3561, 1191, 2741, 4961, 1501, 5521, 3321, 2071, 0261, 0711, 5471, 0351, 1221, 0331, 1911, 0711, 4011, 1311, 2141, 3301, 2721, 0251, 0001, 4961, 0781, 2961, 0531, 0101, 3571
    Smasung TV CL45791, 5801, 3301
    Samsung TV CL53301, 5791, 5801

    GE Universal Remote codes for Vizio TV

    BrandCode list
    Vizio Smart TV0081

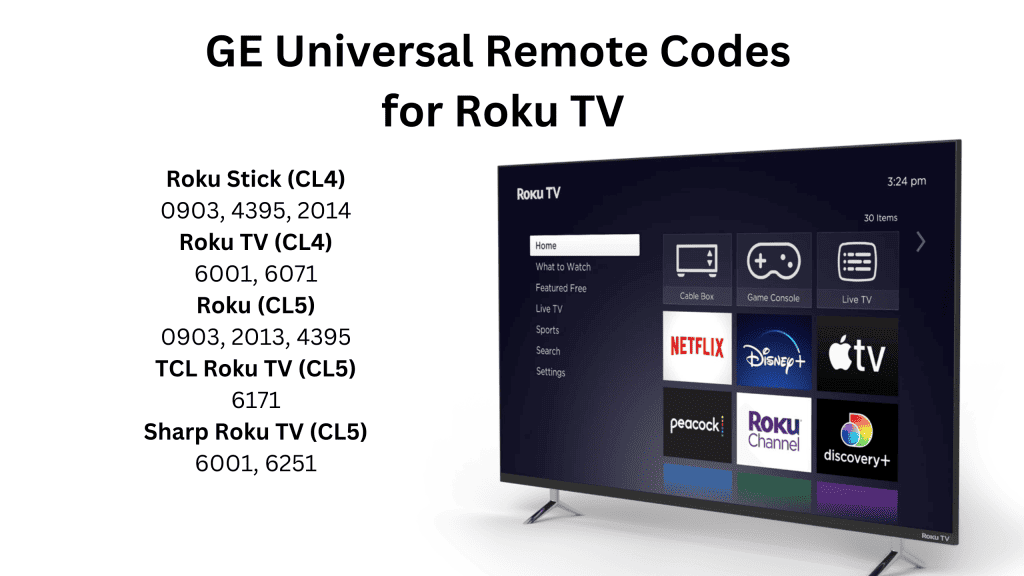
    GE Universal Remote codes for Roku TV

    GE Universal Remote Codes for roku TV
    BrandCode list
    Roku Stick (CL4)0903, 4395, 2014
    Roku TV (CL4)6001, 6071
    Roku (CL5)0903, 2013, 4395
    TCL Roku TV (CL5)6171
    Sharp Roku TV (CL5)6001, 6251

    Final Words:

    Using Universal Remote is a nice way of browsing your device without worrying about the original one. Remotes like GE Universal remote is a great way to control multiple devices from a single remote controller. It also minimizes managing multiple remote controls for different devices.

    You can pair your GE universal Remote with almost any device, especially Television sets, and control them on the go. Please let us know if you have questions regarding GE Universal remote codes and their usage.